Dead Rising 3

Dead Rising 3

95 vurderinger
Prestige Hound Achievement Guide
Af Jackington Moron
This guide will explain the simplest and fastest ways you can complete the Prestige Hound achievement in Dead Rising 3! I will try my best to go through what methods work best, this is also my first guide, so please bear with me if I have any errors in format, spelling, or methods in doing this. Also, some pictures that I was unable to retrieve from my own screenshots will be sourced.
   
Pris
Føj til foretrukne
Gjort til foretrukken
Fjern som foretrukken
What is Prestige Hound, and how do I get it?
Prestige Hound is a achievement in Dead Rising 3 that consists of completing all PP Trials in the game. These PP Trials act like mini achievements, consisting on crafting a certain amount of a combo weapon, to even killing 200,000 zombies. The PP Trials can be located under the player tab, under PP Trials. Some PP Trials are locked until you complete a smaller version of it.

Crafting Related PP Trials
These PP Trials are simple, create 50 of a specific combo weapon in the game. Despite it being easy however, it can be very time consuming, especially if done without any tricks. One trick used is replaying Chapter 4 and using all the resources in the safe house to your advantage. After crafting as much as you can make, be sure to save and then replay the chapter to have all your resources respawn.


Some are quicker than others, so I will show you the best methods to go about getting these as quick as possible. IT IS HIGHLY RECOMMENDED THAT YOU HAVE ALL THE ATTRIBUTE SKILLS NEEDED TO CREATE BLUEPRINTS FASTER! If you are following this guide, I will assume you are level 50 and have all the crafting skills unlocked.


Boom Boom Boom
This one consists of creating 50 IEDs. This will be the easiest one, seeing as there is a unlimited supply of explosives right as you start chapter 4. Once you begin the chapter, go upstairs and find the box of grenades, combine the two to create one IED. Repeat until you completed the PP Trial.


Balls of Junk
For this one, all you need to do is create 50 Junk Balls. This one should also be a simple one, all you need to do is combine any two miscellaneous items together. They are all around the safe room and even all around the entire map. So make sure you take all the cardboard boxes and tires you can carry.


Hot Headed
For this, all you need to do is create 50 Flaming Helmets. At this point these combo weapons will start to be a bit more tricky to farm. It requires you to combine any mask and any chemical item. Inside of the safe house there is a weapon cabinet, you will be using this a lot. Go inside and grab 5 masks and 3 chemicals.


Next go outside and there should be three motor oils infront of a giant spool, start combining, for the last chemical look around for a construction helmet, there should be a couple scattered around.


So Much Easier Than Throwing
This one requires you to make 50 Boom Cannons. This one is rather simple, go upstairs and locate the box of grenades, in the same room there are plenty of guns for you to start making a couple boom cannons. All you need to do is combine any gun and a explosive.


After you have created what you can, grab 8 grenades and run downstairs to the weapon cabinet and grab any 8 guns, start crafting, after all that you should have made about 12 of them total.

Toy That Creeps Me Out!
This one has you create 50 Jack in the Boxes. In order to craft them you need one miscellaneous item and one toy. The best method of doing this is going to the weapon cabinet and grabbing 8 of any toy, then run around and combine any of the misc items with them. Where you spawn there should be plenty of boxes for you to use if you so desire.


Make it Flamed Grilled
This one needs you to make 50 Flaming Swords. You can do this by combining any chemical and any blade weapon. Scattered about are a couble of knifes, use those and combine them with the previously mentioned motor oil by the giant spool. Once done, go to the weapon cabinet and make any remaining ones needed, this one might take a while, but it can be done quickly.


Jazz Hands!!!
With this one, all you need to do is make 50 Jazz Hands. All you need is a glove and a gun. Go into the weapon supply cabinet and grab 8 gloves, then go around the safe house and look for any 8 guns, I recommend going upstairs, then looking around the bottom floor for a couple pistols. Again, this one will take a while compared to the others, but it can be done quickly once you memorize the locations of the guns.


Ryu Would Be Proud
This one has you create 50 Dragon Punches, which require one mechanical item and one glove. There are a couple of mechanical items scattered about, gather what you can and bring them to the weapon cabinet, then grab the necessary gloves needed and get to work. There will always be a chainsaw in front of the cabinet and one on top of a box outside near your spawn!


Raindrops Keep Melting My Head
For this one you have to create 50 Acid Rains. All you have to do is combine one chemical item and one gun. Grab the motor oils and go upstairs, start combining the guns up there. Afterwords, go downstairs and into the weapon cabinet, start combining what you need.

Drinking to Create
All you need to do for this one is to create the Beer Hat 50 times. All you need is a miscellaneous item and a helmet. Go into the weapon cabinet and grab 8 construction hats, then run around the safe room and look for cardboard boxes and other miscellaneous items and start crafting. Remember, there are also construction hats in the safe room scattered about as well, so start looking.


Puke On You

For this, all you need is to make 50 Pukes of Hazard, which consists of any blunt weapon and any chemical weapon. First find any three blunt weapons outside and combine them with the previously mentioned motor oils near the spool, then go to the weapon cabinet and grab 8 more chemicals and look around for any more blunt weapons, they are very abundant so it should be easy. Infact there are around 5 near the cabinet itself!

Pressure Cooker
For this you have to make 50 combo food items. For this you need to make sure you unlocked the skill required for it then you can start combining any food item. You can also combine food items you made using other combos, so you can make one, then make a randomizer, and keep mixing that with other food items you find as you go, which is really simple and quick.
Combo Weapon Kills
These are rather easy, if you want to farm them easy go to Chapter 4, it will spawn you in a safe room where you can grab any combo weapon that you desire. Once you spawn grab any that you need (I recommend at least grabbing 2 of what you need) then go outside and get to work. I will not go too much in detail considering that killing zombies is really easy. I will go over what you need to craft the weapons and how many kills you need.

Kept on Swinging
For this you need to kill 200 zombies with the Defiler, which consists of crafting either a sledgehammer and a fire axe together, or crafting any blunt weapon and axe together.

Moving Over to a Dark Place
For this you need to kill 200 zombies with the Laser Sword, which consists of crafting either gems and a flashlight together, or crafting any throwing weapon and electronic item together.

Heating Up
For this you need to kill 200 zombies with the Flaming Gloves, which consists of crafting either boxing gloves and Motor Oil together, or crafting any glove and chemical together.

In the Dead-Zone
For this you need to kill 300 zombies with the Hail Mary, which consists of crafting either a football and a grenade together, or crafting any throwing weapon and explosive item together.

A Vibrating Memoriam
For this you need to kill 100 zombies with the Super Massager, which consists of crafting either massager and a leaf blower together, or crafting any toy and mechanical item together.

That a Boy, Jimmy!
For this you need to kill 200 zombies with the Roaring Thunder's Heavy Attack (Q), which consists of crafting either a Blanka Mask and a battery together, or crafting any mask and electronic item together.

Very Axe-citing
For this you need to kill 300 zombies with the Boomer Axe, which consists of crafting either a Fire Axe and a Hub Cap together, or crafting any axe and throwing weapon together.

Unleash the Chopper
For this you need to kill 200 zombies with the Chopper, which consists of crafting either a Fire Axe and a Hatchet together, or crafting any two axes together.

These Bullets are Sharp
For this you need to kill 200 zombies with the Sabre Shot, which consists of crafting either a Sawed Off Shotgun and a Machete together, or crafting a gun and a blade weapon together.

Death Metal
For this you need to kill 200 zombies with the Heavy Metal, which consists of crafting either a 2x4 and a Lead Pipe together, or crafting any two blunt weapons together.

T.L.C.
For this you need to kill 100 zombies with the Tenderizers, which consists of crafting either MMA Gloves and a Car Exhaust together, or crafting a glove and a blunt weapon together.

Enjoy That Smell in the Morning
For this you need to kill 200 zombies with the Napalm Bomb, which consists of crafting either a Propane Tank and a Motor Oil, or crafting a explosive item and a chemical together.

In Between the Numbers
For this you need to kill 100 zombies with the Metal Mary, which consists of crafting either a Football and a Bowie Knife, or crafting a throwing item and a blade weapon together.

Bomb-Bear Countdown
For this you need to kill 200 zombies with the Bomb Toy, which consists of crafting either a Robot Bear and a Gas Can, or crafting a explosive item and a toy together.

Corroding Corpses
For this you need to kill 200 zombies with the Acid Jars, which consists of crafting either a Household Cleaner and a Jar of Acid, or crafting any two chemicals together.

DIY Gun Club
For this you need to kill 500 zombies with the Split Shot, which consists of crafting either a Assault Rifle and a Lead Pipe, or crafting a gun and a blunt weapon together.

Go Rake the Guts
For this you need to kill 200 zombies with the Zombie Raker, which consists of crafting either a Katana and a Rake, or crafting a blade weapon and a spear weapon.

Well Done!
For this you need to kill 5 zombies simultaneously 50 times with the Dynameat, which consists of crafting either a Hunk of Meat and Dynamite, or crafting a explosive item and a miscellaneous item together.
Combo Vehicle Kills
Again, pretty easy to figure out how to do these, but I will list what you need to do to get each one. If you are still on Chapter 4's safe house, I highly recommend that you visit the garage that is close by, you can make any of the combo vehicles in there. Also if you wish, you can also just get the kills right as you get the blueprint. Also I will only list the initial blueprints, and not any alternatives for this section.

Big Bad Machine of Death
For this you need to kill 1000 zombies with the Turret Rig, which is made by crafting a Steamroller and a Sedan together.

Apocalypti-car
For this you need to kill 1000 zombies with the Junk Truck, which is made by crafting a SUV and a Van together.

This is How I Roll
For this you need to kill 1000 zombies with the RollerHawg, which is made by crafting a Steamroller and a Motorcycle together.

They Weren't Invited to the Party
For this you need to kill 1000 zombies with the Party Slapper, which is made by crafting a Party Van and a Street Cleaner together.

Everybody Loves Fireworks
For this you need to kill 1000 zombies with the ForkWork, which is made by crafting a Fireworks Van and a Forklift together.

Too Much Machine For Ya
For this you need to kill 1000 zombies with the Shockdozer, which is made by crafting a Bulldozer and a Ambulance together.
Skill Move Kills
With these, you must perform certain skill moves and kill a certain amount of zombies with said skill moves. It is quite tedious to farm these but you will eventually get it, the best way to do it is to do it with only your fists, seeing as any skill moves with most weapons will not count as they have their own special ones. In order to perform a skill move, press ALT (Default controls) when you have a combo 5-10 or more zombies, quickly following up with either the WASD keys depending on the move.

Drop Dead!
This is the most simple one out of the five. Simply press ALT and nothing else when you have a skill move ready to perform the body slam. You need to kill 100 zombies with this move.


My Tummy Hurts
For this you need to press ALT then S when you have a skill move ready in order to perform the disembowelment move. You need to kill 100 zombies with this.


A Head of the Job
For this you need to press ALT then A when you have a skill move ready in order to perform the Head Job move. You need to kill 100 zombies with this.


Pretty Dizzy Now... Might Puke
For this you need to press ALT then D when you have a skill move ready in order to perform the Hammer move. You need to kill 100 zombies with this. Any zombies killed with the zombie you spin around counts, so do this on large crowds!


Dead Body Mass
For this you need to press ALT then W when you have a skill move ready in order to perform the Head Job move. You need to kill 50 zombies with this.


Dash for the Dead / Sacked!
This one is a bit different actually, you do not need a combo for this attack. Simply attack while sprinting to perform the shoulder charge. Kill 100 zombies using this move, and kill 20 football zombies with this move to get the Sacked! PP Trial.


You Knee'd Me
Again, another one that doesn't require a combo to use. Simply jump, and while mid-air use your heavy attack, or press Q. You 50 zombies with this.

Farming Kills for "Damn You are One Bad-Ass"
This section will show you how to farm kills for the most time consuming PP trial of them all known as "Damn You are One Bad-Ass" which requires you to get 200,000 zombie kills. First I am going to explain how to even unlock the PP trial first before you can accomplish it. With these PP Trials, you must do each one in order, after doing one, the next one will unlock. THE KILLS DO NOT STACK, YOU MUST GET EACH NUMBER OF KILLS AFTER THE NEXT! After listing all the PP Trials that involve just getting kills I will show you a method that works really well in farming kills.

Getting Warmed Up
Kill 5,000 zombies.

Still More to Kill
Kill 10,000 zombies.

Going Pro
Kill 53,594 zombies.

Joining the Big Leagues
Kill 72,000 zombies.

Damn You are One Bad-Ass
Kill 200,000 zombies.

In total that means you must kill around 340,000 kills, which is A LOT of zombies to kill. Now, there is a easy method in doing this however, if you have the time to do it. First you must set your chapter to Chapter 7, the zombie spawns are a lot more frequent and there are a lot more, however you will not have as much time as if you were to do it during chapter 1, so you will need to restart the chapter at least twice, maybe three times. Next head over to Ingleton and go to the garage and get yourself a RollerHawg, there will be a rectangle like path you can take over and over to start farming zombies by simply running them over. If needed you can push away any cars that you feel will block your path, they will not respawn so don't worry about that. I will put down a video by a Youtuber named "Jacked Gamer" I will include the link to the video and his channel below the video.


Jack Gamer's Video

Jack Gamer's Channel
Full Service / Dine and Dash / Greased Lightning
For these three PP Trials all you need to do is enter each restaurant, gas station, and garage at least once. For each section I will show you where you can find each one.

Greased Lightning
For this one you must find each garage. Garages are the buildings that will allow you to get combo vehicles on the fly. If you take a look at my screenshot of the map, you will see a symbol of a car, be sure to visit each of those areas on the map and go inside each garage to claim this PP Trial.


Full Service
This one is REALLY easy if you are also working on Greased Lightning. When you find a garage there should be a gas station close by called "Zip Gas". Each gas station is literally next to each garage, including the very hard to find one at South Almuda, which is just the business building for Zip Gas.


Dine and Dash
This one is a bit tricky, considering that they are not marked in the map like the other two. Honestly with this, as long as you visit each building you see during the main game, which is recommended when trying to get all the collectables, then you will not have a problem at all. Just in case though, here is a map with all the restaurants and cafes I have found circled in red.

Collectables (Frank West Statues / Tragic Deaths / ZDC Speakers)
Alright so, this section of this guide will not really be explained all that well sadly, seeing as I already got all the collectables on my first play through and there is almost no way of me retrieving screenshots of each one. Instead I will show you some screenshots of the four main areas of the city of where most of the collectables are and some advice on how and when to get them. These screenshots are from Cheat Code Central's guide, which will be linked under every screenshot just in case you would like even more details.

When collecting these it is highly advise that you collect as much as possible in each area of the city you encounter, there are my times during your play through that you will not have any active side missions available with plenty of time to spare, so those are your best shots. Also these screenshots do not mention the bridges or the quarantine area, so be sure to cheek around those as well.


Cheat Code Central's Indepth Guide in this part of town. [guides.cheatcc.com]


Cheat Code Central's Indepth Guide in this part of town. [guides.cheatcc.com]


Cheat Code Central's Indepth Guide in this part of town. [guides.cheatcc.com]


Cheat Code Central's Indepth Guide in this part of town. [guides.cheatcc.com]
Misc. PP Trials
There are the more obscure ones, these are VERY easy to do and won't take long. One of these you should already have anyway but if you don't well here is how you get it.

Slippery Customer
For this one you just got to escape from a zombie's grasp 50 times. When a zombie grabs you, you must perform a quick time even to get rid of him, which is what is needed for this trial.

B.Y.O.B.Z
This one requires you to kill 666 zombies with fire. There are three PP Trials that consists of killing zombies with fire. I suggest bringing a couple flamethrowers, although if you have not unlocked that blueprint, something like the RollerHawg's fire attack works just as well if not better.

Hot Damned
For this one you need to kill 999 zombies with fire. Like I said a flamethrower is best but a RollerHawg or any other fire weapon works too.

Burn Ward
For this one you need to kill 3,600 zombies with fire. This one will take some time, the RollerHawg at this point is HIGHLY recommended, but again you can use any fire weapon.

Tastes Better Coming Up
This one requires you to vomit 21 times. All you need to do is visit any liquor store and find a box of wine/vodka/beer that has a infinite supply and start drinking. It takes around 3 drinks to make you vomit once, so have fun!


Grave Robber
For this one, just break 100 Tombstones over at the graveyard in Ingleton. A car will really help but any weapon that involves swinging will also work, maybe even a gun. There is a required story mission on getting there so I wont go over how you can get there.


Conclusion
Overall this achievement is pretty time consuming. In fact most of them are achievements in itself! I hope this guide really helped you out and I really do hope you are able to get this achievement as well! Good luck and have fun! :D

If you have any questions or concerns please leave a comment, I will try to respond when I can. Also if you see any errors or feel as though there needs to be any changes, let me know, I will take a look. Thanks.

A Special Thanks to redjack511 for pointing out a huge spelling error that was over used in this guide, thanks~!

9 kommentarer
butterysomthin 16. jan. 2023 kl. 10:20 
Another thing i forgot to put into my last comment. For the trial "Sacked" the football player zombies when you first enter the school in chapter 3 are all one shot by the shoulder charge without weakening them with other attacks first. They are non-respawnable low health versions of the enemy for some reason and seem to tackle you back more. I believe there are 7 of them in the school.

The school is one or two objectives into chapter 3 however, so it takes a long time to repeat. I used this trick because I had 14/20 shoulder charged already.
butterysomthin 16. jan. 2023 kl. 10:08 
Guide is still helpful years later. Using chapter 4 for crafting is genius.

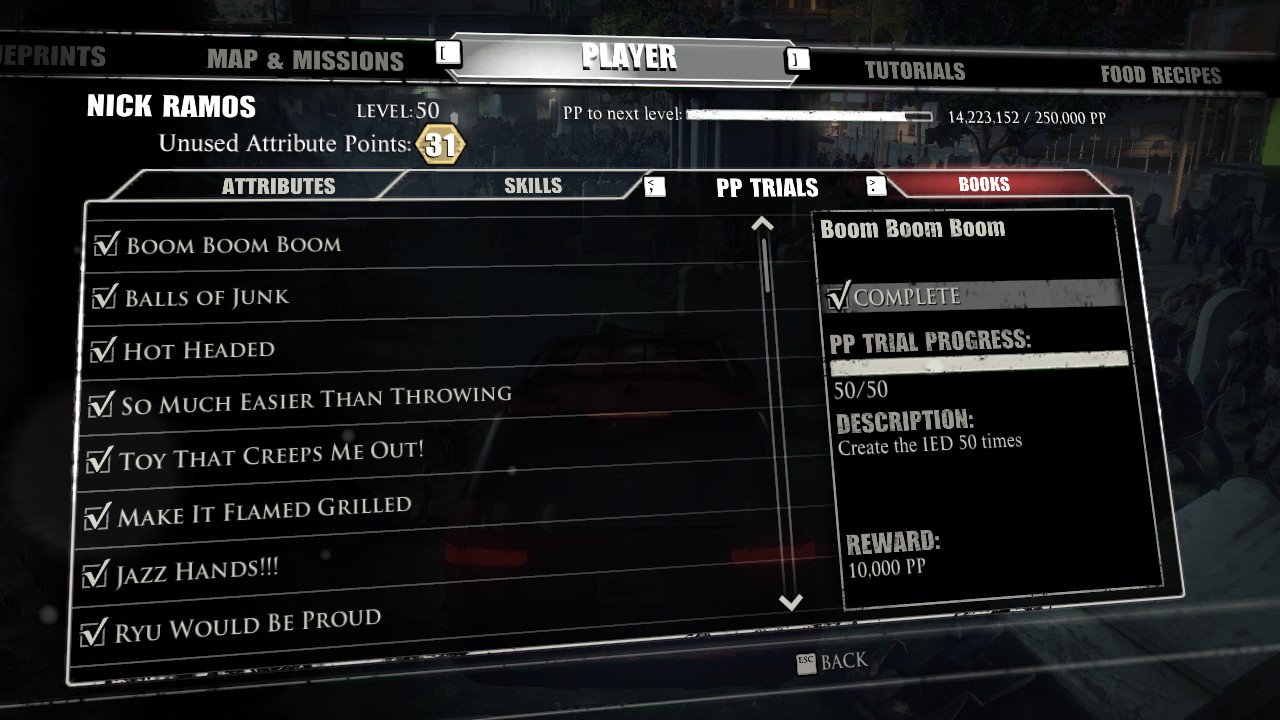
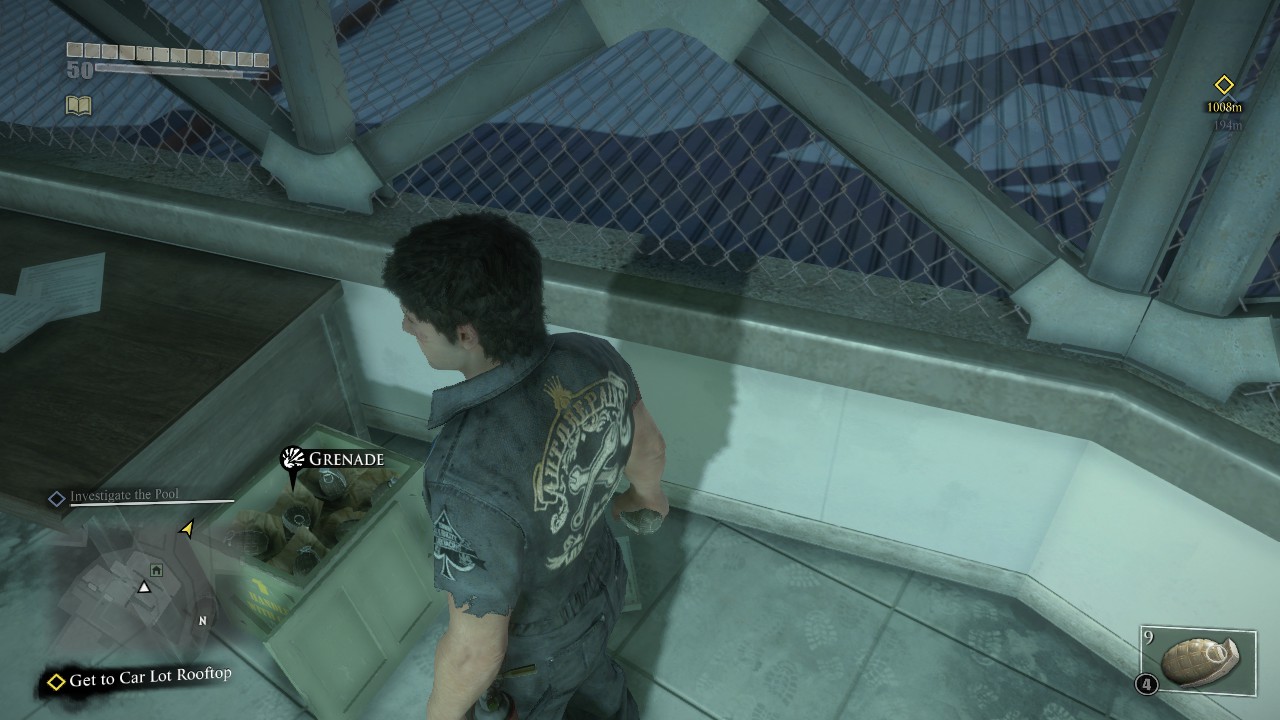
I don't know if you mentioned it but there is an assault rifle box and grenade box in the garden to help with the boom cannon and jazz hands crafting trials
Nickwilli 30. aug. 2022 kl. 20:05 
For some of the crafting trials, you can visit gunshops and the police armory as they have boxes of explosives and gun storage. Chop shops and gas stations have boxes of motor oil for chemical weapons too.
663633 3. maj 2022 kl. 4:27 
Thanks a lot for the sharing. To be honest, the Damn You are One Bad-Ass is so time consuming, I started from 18000/72000, and used about 5 hours to get to 200000/200000
Robo | TinyRick 14. jan. 2017 kl. 10:35 
Also for the shoulder charge to kill zombies it seems you need to be empty handed in order to gain enough speed to kill the zombies. If you have a weapon in hand it just pushes the zombs away.
Robo | TinyRick 5. jan. 2017 kl. 16:19 
I think the "Damn You are One Bad-♥♥♥" trial can also be done in one of the "Untold Stories" DLC missions. As far as I can tell you don't have any time limit in those.
Kona 18. dec. 2016 kl. 18:49 
Saved me allot of time on those crafting trials, thanks a bunch
Dante_Tel 21. feb. 2016 kl. 3:53 
Saved me allot of time on those crafting trials, thanks a bunch! :steamhappy:
Saint Aaron 26. juni 2015 kl. 18:48 
FYi for Ryu Would Be Proud- if you load up chapter 4. YOu will start off in the club run right outside the gym there are 2 gloves. Run into the gym and you will find 9 gloves. across the street from the gun store their are 3 gloves.underneath the safehouse by the garge it is computer store. Go in the back and you will see a box of nail guns you can easily score about 19 of thhem. After you got them go to safehouse and do the gloves. This one is faster than yours +you can do more but thats my opinion.

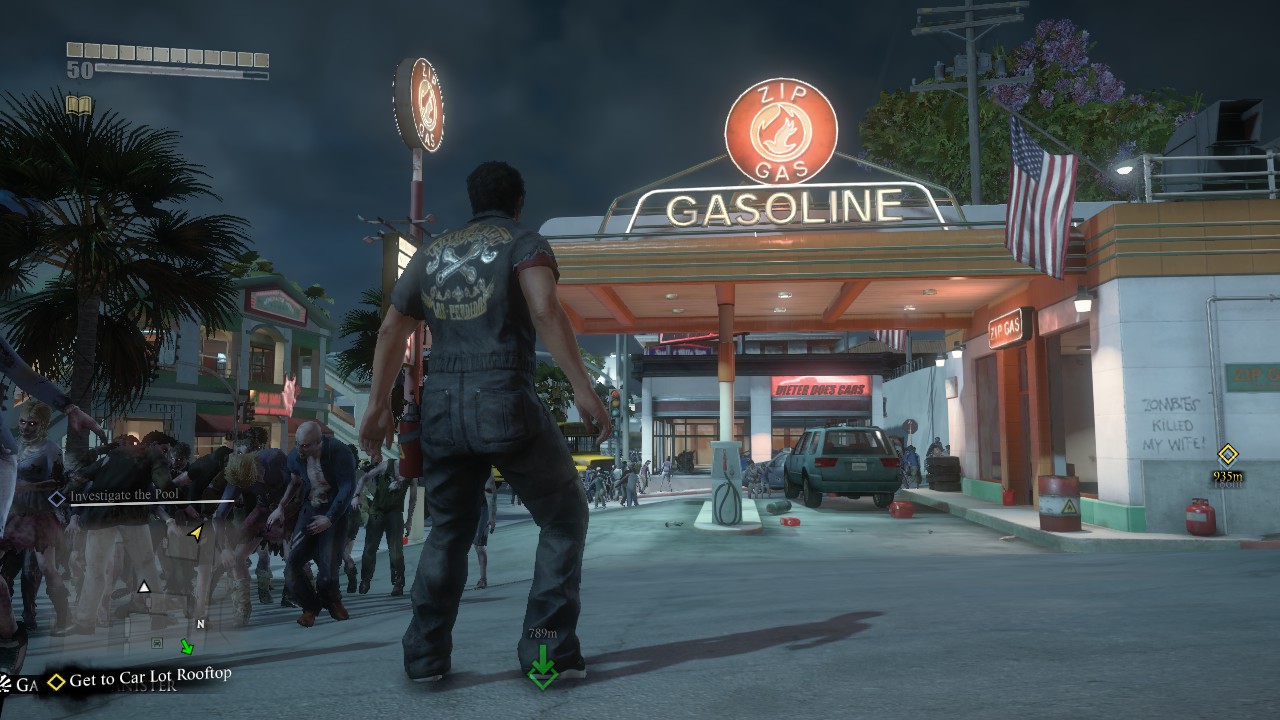
Puke On You- same as chapter 4 but you have chemical boxes in the computer store, gas station, and in the garage where nick works at. Also get the wrench in the garage and you can make it Can easily get that one done in less than 7mins in 1 run