Manor Lords

Manor Lords

36 ratings
Manor Lords Trading (0.8.029)
By Vuk Teble
Overview of the entire Manor Lords trade system, handling things from basic concepts to statistical analysis of more complex scenarios. I've included a lot in here and it is a complex system, so to be honest there could be mistakes. Feel free to find me on the Manor Lords Discord and I will correct any errors. Thank you!
2
2
2
2
   
Award
Favorite
Favorited
Unfavorite
Trade Basics
Trading in Manor Lords is executed from the Trading Post and Livestock Trading Post. Trading is conducted in Regional Wealth, and is one of the three ways in the game to gain Regional Wealth. (Trading, destroying Bandit Camps, and monthly income from Tier 2 and 3 burgages.) Regional Wealth is seen on the top bar to the left of the Livestock drop down. The primary uses of Regional wealth are:
1. The total wealth of the region can be taxed from your Manor to increase Treasury.
2. Purchasing trade routes and paying for imports from the Trading Post.

Trading Posts must be placed on a road connected to the King's Road. Your Traders will travel between their assigned Trading Post and one of the off map Trade Points(the blue icon in the image below) or a Trading Post in another of your regions.

Current information states that the Trade Point use is random, but if Trading Post usage of Trade Points is random my studies seem to show that if so it occurs at the beginning of the game. Once you start trading your traders will go to the same, closest Trade Point every time, and use the same one for all Trading Posts in that region. (Honestly I think it's not random and Traders just go to the closest Trading Point, at least until you have traded with a different Trade Point in a second region.) However, Free Merchants whose route you buy do seem to each be randomly assigned a different Trade Point.

The management of trade is handled through Trade tab of the Trading Post. From this tab you can view all the items that can be traded and the options and restrictions on trading them, separated out into categories. All settings in the Trade tab of the Trading Post apply to every trading post in the region.


From Left to Right for each item you will see:

1. A drop down that can be set to No Trade, Import, Export, and Full Trade. The default position for all of them is No Trade, to trade anything in the game this needs to be set to any of the other options. Import tells your Traders and Travelling Merchants that you'd like to buy this item. Export tells them that you want to sell this item. Full Trade tells them to buy the item if it's below the limit and sell it if it's above the limit.

2. The icon and item name of the item.

3. A check box for restricting trade to only occur between your regions. The default position is checked to allow Foreign Trade, which allows Travelling Merchants to trade the resource and your traders to trade this resource at off map Trade Points. Uncheck this box if you only want to trade the item with a different region you control. That region will need a Trading Post as well. Local trade is enabled whether the box is checked or not.

4. The first number is the current amount of this item you have in surplus. The number between the minus and plus sign is the limit you are setting, which can be adjusted by clicking the minus and plus or typing into the field of the second number.

5. A number or NA/NA followed by the Regional Wealth icon. This is the price. When set to No
Trade or Full Trade you'll see two numbers separated by a slash. The first is the RW you'll receive
for selling 1 of this item, the second is the RW you'll be charged for buying 1 of this item. Major
Trades(discussed below) will show NA/NA if you have not purchased the route. If you have the
item set to Import it will only show the cost of buying 1 item, if you have it set to Export it will only show how much you will receive for selling 1 item. The NA also shows if you have set the item to import with Foreign Trade unchecked, the tool tip will incorrectly tell you that it says NA because it is a major trade, even if it is not. If you have a minor trade that is showing the price as NA disregard the tool tip, and confirm that you intend for it to be traded locally.

6. A grey circle and an icon of a horse cart trader and a number followed by the icon for Regional Wealth. The circle will change to colored arrows if you have imported or exported too much of this item. Pressing the horse cart button deducts that amount of Regional Wealth in order to set up a trade route for it. A dedicated Free Merchant will regularly visit your region to transact this trade. This NPC will only trade this item. After purchasing the route the icon changes to a moving horse cart and an eye that you can click to view the Free Merchant if they are on the map. The cost of each route will increase with each purchased route.
Trade Workers
It's worth understanding the following things about Trade workers:


Your Workers
1. Only the Husband of each family assigned to the Trading Post will travel to execute trades. The son and mother are responsible for stocking the Trading Post with items for export. The Husband will not export items from any building other than the Trading Post, so transport times to the Trading Post should be kept low in order to make sure the Husband doesn't start his next journey with no exports or less exports than his carrying capacity. Generally, the Husband can make around one trip a month, with travel time to the Trade Point being the primary factor in fluctuations around that, along with stopping for ale and illness.

2. Your Traders on foot can only carry up to 5 of any combination of items. They use horses to pull carts, which allows them to carry up to 50.

3. Horses can be ordered directly from the Trading Post on the General tab, a Hitching Post/Stable, or from a Livestock Trader. The only use for horses is Trading Posts. Traders only start using horses once you've assigned one to a Trading Post. You can only permanently assign two horses to a Trading Post, but if you have more than two trading families at the post they will use unassigned available horses. This allows you to have four Husbands trading with four horses per Trading Post. The Horse ordering tool tip says that it significantly decreases journey time to Trade Points. I found that was not really the case. The walking speed of a horse cart seems to be close to the same as a foot merchant. From my Trading Post in Roheloch to the Trade Point was 16 days on a horse, 17 on foot. Over longer distances you may find a bigger difference, but I'd hesitate to call the speed difference significant. If you get a horse cart stuck behind a foot trader you will see the horse starting and stopping as they can't overtake them, so there is some speed difference, just not anything major. Occasionally you will see Traders riding a horse with no cart, their carrying capacity can be either 50 or 5, this behavior seems to be a bug.

NPC Traders
4. Travelling Merchants on foot will visit if you have open minor trades, they carry up to 10 of any combination of minor trade items. They will not carry major trade items. Their routes are random and will approach your village from all angles, so some of the issues with Free Merchants discussed below do not apply as much. However, their schedule is much less predictable, you can get four in the space of a week and then goes three months with none.

5. Free Merchants using horse carts will arrive if you have bought a route and can carry up to 50 of a single item. These NPC's will travel between an off map Trade Point and the first Trading Post they encounter, their Trade Point does seem to be randomized, so if you have multiple routes bought expect each Free Merchant to come from a different Trade Point. If you buy the same route in multiple regions each one will have it's own Free Merchant assigned to separate randomized trade points. They will visit between every month to every other month depending on the distance from your Trading Post to their Trade Point. If you have multiple Trading Posts in a region they will only trade at the first one they encounter on their route, so making sure that Trading Post is fully stocked is important. Place a Storehouse or Granary near it with just your traded items stored there if necessary. Be aware that if your closest Trading Post to their Trade Point is empty, unstaffed, or even paused the Free Merchants will still stop there to trade and then go home. This can result in you selling zero exports from your route that you purchased until you unpause and restaff this Trading Post. In the same way, pausing a Trading Post will not stop you importing from Free Merchants or Travelling Merchants, so if you want to stop importing you must do so using the drop down menus.

Trade Worker Specific Actions Explained
1. Trading - the Husband will show this status when they are travelling from their Trading Post to a Trade Point or another region's Trading Post. It will turn grey as they leave the map.
2. Transporting - the Husband will show this status when they are returning to their Trading Post with goods from a Trade Point or another region's Trading Post. It will be grey when they are off map.
3. Stocking Up - the Husband will show this status when returning to the Trading Post to collect more goods for export. If they are importing and exporting it will say Transporting as they'll be carrying goods back. So this only appears if they are just exporting.
4. Stocks Goods For Sale - the Wife and Son will show this status when they are transporting goods from storage in your region to the Trading Post for exports.
Route Buying and Prices
Each successive route you purchase on the Trade tab of the Trading Post gets more expensive. To figure out what your costs for future routes will be, multiply the original cost for a route by the number of routes bought. For example, the route for bread costs 40 RW as your first route, if you buy it as your 4th route it will cost 160 (40 x 4). This makes it seem attractive to buy more expensive routes early on, however, the usefulness of doing so is debatable as buying the Plate Armor route first gets you nothing as your province is likely underdeveloped for making a profit off of selling this and doesn't have a need for importing it.

There are generally three routes that should NEVER be bought, Candles, Blocks, and Plate Armor. Candles and Blocks are not in the game yet, so are a waste of RW. Plate Armor is a little more flexible here, if you are running an armor exporting region and have crashed the market price by over-exporting mail and helmets then possibly this is worth buying to have a different product to sell while the price recovers. It's not worth purchasing to equip your retinue because the price of a suit of Plate Armor is 34 RW, to then give that to a member of your retinue costs an additional 17 treasury. However, you can just buy the Plate Armor directly from the retinue management screen and pay just 34 treasury.

Here is a spreadsheet of all import/export prices and route prices up to the 8th route:

Trade Best Practices

Here are couple of more advanced things to be aware of when dealing with trade:


1. Set the limits on imports quite low. You're telling the traders that you want that amount in surplus, not that's the total amount you ever want imported. A low limit allows them to fill an order and move on to a different item. Some examples:

a. You have received your Spear/Shield shipment and want to import more spears to fill out your first militia unit, and only have one foot trading family and limited Regional Wealth(RW). If that unit has already been created then I recommend setting a limit of 1-3 on spears, because as they arrive the unit will grab them until they have 36, and you'll be left with a comfortable buffer of 1-3 in surplus to replenish losses in combat. Your Trader has a carrying capacity of 5, so when he goes to the Trade Point he can grab 2-4 of any other import item you've set. If you set it for 16 there are a couple of issues: 1. This is a major trade item, so a Free Merchant could arrive, drop off the 16 and wipe out your RW which shuts off your other imports for a while. 2. Your Trader might just bring back 5 spears over and over again while not importing other items. 3. You buy 16 Spears, the unit grabs them all, you buy 16 more Spears because you have 0 in surplus and you've told them you want 16 in surplus, so you end up buying 32 instead of 16.

b. You have bad barley fertility and want to import barley or malt to cover your 30 families' ale consumption for the year. Each family drinks an ale every three months, so you need 120 ale, which requires 60 barley or malt for the year. The issue here is that having a massive stockpile of barley or malt does you no good because it provides no benefit. If you set the limit to buy 60 malt immediately most of it is going to sit there doing nothing as the brewers slowly craft it into ale and you don't have the RW you spent on it. I'd set the limit at what the consumption should be for a month at maximum, as your Trader's will make a trip a month, and Free Merchants will come every month or two. So for 30 families, I'd set a malt import limit at 5-8. This won't break your bank, and you'll have a buffer if a Trader focuses on a different product one month.

2. Exports are mostly dependent on stocking of the good in the Trading Posts. If you have more than one Trading Post and if the distance from Trading Post 1 to the Storehouse/Granary is much more or less than the distance from Trading Post 2 to the Storehouse/Granary, then it is advisable to build one of these near the further Trading Post with filters to just allow the exported items. This will prevent your Traders at the post from making trips with less than full carrying capacity and Free Merchants stopping there not being able to trade, thus missing out on your 1-2 month 50 item trade that you've bought their route for.

3. Another factor related to stocking is the difference between your Trader's carrying capacity and your Sons+Wives carrying capacity. A Trading Post has 4 hand carts that can carry up to 10 of an item at a time, so with 2 families assigned the restocking capacity is 40, but add two more families and the restocking capacity only increases to 44 because those +4 wives+sons only will hand carry a single item. This ties in with the issue that your families don't seem to like to stock more than 60 of any item in the Trading Post for export. This isn't an issue if you have not bought any horses, because each of your Traders will only take 5 of the item, leaving ~45 in the Trading Post for anyone who comes by immediately after and your families can easily refill that with a single trip. When you add horses though, a Trader can can take 50 items, meaning every family member will need to make a trip, plus one additional trip to the storehouse to replace the sold goods before the next Trader arrives. If the goods aren't stocked, that Trader will make the trip anyway, but carrying less than his capacity which isn't an efficient use of a horse. So, when employing horses, I suggest it's probably most efficient for exports to stick with 2 horses per trade post. This will have a negative effect on imports though, because the Trade Point is always full.

4. It's possible to import or export too much of an item, the effect starts to kick in as you get closer to 600 bought or sold of a specific item. The default is a small grey circle to the left of the price, the tool tip reads "Global Marker Supply: Average". Pictured is what it looks like in the Trading Post Trade Tab when that circle changes based on the volume of trades you have completed.


The tool tip for the single light green arrow reads, "Global Market Supply: Undersupplied. Prices are higher than usual." The double green arrow reads "Global Market Supply: Critically Undersupplied. Prices are much higher than usual." This rule kicks in at the following levels: Undersupply and Oversupply seem to kick in after a certain number of large trades for an item potentially around four in the space of a month or two and Critical Over/Undersupply kicks in if that volume of trades for the item continues. The levels of supply have the following effects on base price(not including the tariff):
crit over / over / base / under / crit under
-50% / -25% / base price / +50% / +150%
These percentages break down for lower base priced items, there are some rounding variations, but for low priced items generally the price will move 1 RW per level of supply. Then the tariff is added to the changed base price. If you have sold too much of an item then first you will get a down facing yellow arrow that states: "Global Market Supply: Oversupplied. Prices are lower than usual." or a double red down arrow for Critical Oversupply.


Beyond the price increase/decrease, there was some small evidence in my tests that when you get into Critical Over or Undersupply that Traders, Travelling Merchants, and Free Merchants will avoid trading this item. This effect will drop a level after several months of lower trading volume, so prices can recover after a break in trading. I've seen people mention 600 as a cap when the Critical Over/Undersupply kicks in, but I've seen it kick in before that and go well past that without kicking in. It mostly seems to be related to doing a bunch of the same trades in a short time period.

5. It's possible to block your exports by having a Trading Post that is too full of imports. The generic storage can be overfilled by your Traders' imports, but your families won't stock goods for sale in it if it is over the limit. If your Trading Post is near it's generic storage capacity you need to set up a Storehouse nearby and set it's filters to pick up the items you're importing (or Granary if it's near it's pantry max). You're using these two storage types for imports and exports, so if there is no room in either you won't be able to stock an export.
Trade Overview Screen
The Trade Overview Screen gives you a full overview of trade activities in your region and is accessed by clicking on your town name and then the Trade Tab.

It allows you to filter by time period, exports, imports, or all. It's a really useful tool for checking the trade activities in your region and allows you to see what your specific traders are actively trading in case you're struggling to understand what exactly your traders are doing.

The label Foreign Merchant applies to all merchant NPC's, Free Merchants (travelling routes on horse carts) and Travelling Merchants (on foot).

It will show the trade logs for Livestock Trading Posts, but won't show costs from animal ordering at Hitching Posts/Stables/Pack Stations/Trading Posts.
Inter-Region or Local Trading
There are two options for moving items between your regions, Pack Stations and Trading Posts.

Pack Stations trade one good type for another good type in a barter type system. They are more efficient than Trading Posts because all three family members participate in moving the goods and all three can lead Mules. They also focus on only one good in each direction. In a Trading Post, to get a similar amount of carrying capacity you would need to assign three families. There are no limits on a Pack Station which means that due to their very efficient design an unsupervised Pack Station can completely drain a region of the item it is bartering. No Regional Wealth is exchanged through the Pack Station, so they are particularly effective at bringing supplies into a new settlement. However, later on it is preferable to use Trading Posts because they allow limits to be set and allow the exchange of RW for the items. The item drop down menus in Pack Stations are in Item ID order, which makes it confusing to search through. (This is the order that has at least some effect on the how Traders prioritize trades.) High value barter items require a Mule.

Local or inter-region trade at the Trading Post is always enabled, whether the box on the Trade tab next to the item name is checked or not. Unchecking the box means that the items will only be traded to your other regions and any foreign merchants will not deal in it, nor will your Traders take it off map. You will need to set import/export/full trade and limits in both the sending and receiving regions' Trade tabs. The restrictions on Major Trades do not apply to local trade, you do not need to buy a route to trade Ale between your regions, for example. In fact, unless you want to sell it to the foreign merchants it is a waste of money to buy that route. If you have not bought the route for a Major Trade item all you need to do is select export/import/full trade and set your limits and that item will be traded between your regions. Because you haven't bought the route you don't need to worry about selling/buying these items to/from foreign merchants. For Minor Trades (and Major Trades that you have bought the route for) that you want to trade between your regions you need to uncheck the check box.

If you are importing an item with the Foreign Trade box checked and you have another region that is exporting it to local trade your traders will prefer to purchase the good from your other region (99% of the time). If your trader arrives at the other region's trade post and there is none of that item available they will go to the closest Trade Point to them. This is the one situation I've seen where a Trader goes to a different Trade Point than there normal one.

Traders prioritize filling orders for foreign trade before local trade, if you have even a single unit of an item more than your limit your traders will take that off map before moving on to your local trades, and while they're gone selling that single unit your production probably makes another so this can be endless. There are a couple of solutions to keeping local trade flowing while still trading with off map entities.
1. The best solution I see is to choose one region as the hub for foreign trade. All the other regions set to local trade. They'll deal with all the local trade orders and keep things moving. Another advantage to this option is that if region 2, 3, 4, etc. never trade with an off map Trade Point then your region 1 traders will continue to trade with their original, closest Trade Point.
2. Or, you can micromanage your trade orders, turning all the foreign ones off to allow them to process local trades for a month and then turn them back on.

The price you pay to import locally is the sale price, so you save 10 RW per item, or if you have the Better Deals development point 5 RW per item compared to importing from a foreign Trade Point. The price for major trade items you're trading locally may display as NA if you haven't bought the route, but you can check what those prices will be on the Route Buying and Prices section of this guide. If you see the price as something like 8-18 it means you are importing the item both locally and from foreign Trade Points.
Livestock Trade
The other side of trade is handled through the Livestock Trading Post. This building allows you to import or export most animals in the game (with the exception of chickens, pigs, and goats which can only be bought from burgage extensions.) The mechanics are fundamentally the same as the Trading Post, so I won't go as in depth as I did for the Trading Post. Sheep and Lambs can only be bought from Livestock Trading Posts, while Oxen, Horses and Mules can be bought directly from other buildings. The Livestock Trader has to walk to the Trade Point and back to collect an animal, so they are about 2x as slow as ordering from the Stable, Hitching Post, etc. All three family members will trade, unlike Trading Posts.

Some things worth noting:
If you have taken the Better Deals development point you only get the discounted price from the Livestock Trading Post, not at Stables, Pack Stations, etc.

Your Livestock Traders will visit every Trade Point on the map in random order, which is different from normal Traders who will visit just one for the most part. (More on that in the Trade Basics section.)

The Livestock Trading Post has a small amount of pasture space. Your first four sheep will live there if you build the Trading Post before you build your pasture. Your sheep will fill the oldest pasture first, so I always build my pasture before building my Sheep Farm and Livestock Trading Post.

Livestock can be traded locally, the same as all other trade goods.

Trade Development Points
There are three Trade related development points.

1. Trade Logistics
This perk seems more appealing than it actually is, the table below demonstrates why. In effect you are using one entire development point to get 1/2 price on your first trade route. Your second route will cost you the same as what your first would cost without taking this development point. It definitely isn't worth it unless you're desperate for the Better Deals development point that's locked behind it. This development point has no effect on Livestock Trading. Firewood is highlighted because it's the only route you don't get half price on as your first. It's normally 3 RW, but only goes down to 2 RW.

2. Better Deals
This is the best of the three Trade Development points, but it's not amazing, and debatable whether it's worth spending two points to access. Each import price has a 10 RW tariff attached to it, this development point removes 5 RW of that tariff. So, taking firewood for example, its standard import price is 11 RW, with 10 of that being the tariff. With Better Deals the price becomes 6 RW, with only 5 of that being the tariff. This could make a difference over the long run if you were buying lots of a particularly cheap item as most of the cost is tariff. For more expensive goods more of the cost is the item cost so you save less percentage each transaction. This perk doesn't do anything to boost your export value, only decreases import value, so for most players who run an export surplus instead of an export deficit there is hardly an advantage at all.

Here's a good example that was pointed out to me of how this works in practice:
You need a constant supply of barley and you aren't farming it because of low fertility. That means you have to import your number of families x 2 Barley per year, so you save your number of families x 10 RW per year(5 RW per transaction). One barley costs 12 RW so this would cost 24 RW per year per family, with Better Deals it would cost 7 RW per barley or 14 RW a year per family. If you have 10 families that comes out at a saving of 100 RW total a year, or 300 RW total a year for 30 families. Those amounts of savings aren't really worth investing two development points in, it's easy to make that much by selling higher value items.

This development point does reduce the foreign import cost on livestock by 5 RW, but only if ordered from a Livestock Trading Post. Ordering from Hitching Posts, Stables, Trading Posts and Pack Stations remains the full import price with 10 RW tariff.

3. Foreign Suppliers
Allows you to build one firewood and one bread importing cart in your region on an open marketplace. One firewood costs 1 RW, one bread costs 4 RW for each import. Runs continuously until you destroy them or run out of RW. The price you pay is not affected by the Better Deals development point. Importing one firewood would normally cost you 11 RW, and one bread would normally cost you 14 RW. If you imported one firewood with Better Deals it would cost 6 RW, and one bread would cost 9 RW. There is a considerable savings to be had with the firewood cart and bread cart, however, why do you want to import firewood? It's far too easily available to buy with your limited starting RW. I'd say this is of limited use.
In Depth Analysis of Trading Behaviours
This section is a little more situational and hopes to help explain things behind the often asked question: "Why aren't my Traders importing/exporting X?" To be honest, the answer is usually: buy more horses, employ more families at Trading Posts. But, it is a little more complex than that. What follows are my observations and analysis of the statistics I uncovered. The spreadsheets in the following section are the results of the tests that I base these findings on.

1. Traders determine what they will export and import before leaving the Trading Post. So if you start an import after your trader has left they won't import that item on that trip. Mostly only important if you're in an early game scenario with limited funds and need the trader to purchase that item without depleting your treasury in a way that means you can't import that on their next trip. If you're in this situation then it's best to remove the families from the Trading Post, and reassign them to reset their behavior. This also means that if you have 4 families and you're 5 grain away from filling your import limit they don't all grab 5 grain. One of them will have pre-booked that allotment and the others will focus on importing other things.

2. What order of preference do Traders have? This is a complex system with different behaviors for each type of trader, but, there is a tendency overall toward filling the orders based on the ItemID list, which is the order that items are displayed in the pack station. While the priority for the items higher in the list is a bit more fluid, the items near the bottom of the list are almost always traded in much smaller volumes until the top orders are filled.
a.) This holds more true for imports, rather than exports. Exports tend to be controlled more by the amount of stock you can keep in your trading posts. So, having a granary and a storehouse next to each trade post that are filtered out to only collect export items is the best way to ensure your exports process in an orderly manner.
b.) I found that the ItemID list order was most noticeable with foot Traders, no route bought. They had a very strong preference for the highest item on the ItemID list in those scenarios, taking the average of multiple rounds of testing.
c.) Travelling Merchants (AI Foot Traders) tend to import an even, randomized amount of all imports, they pay no attention to the ItemID list, however they play no role in Major Trades.
d.) Free Merchants (AI Horse Cart Traders you've bought the route for) only import/export up to 50 of the item they specialize in. The biggest factor here is how far away their trade point is, you'll get more visits from ones that are closer due to travel time, but there's no way to know which trade point they'll be randomly assigned.
e.) When you put your traders on horses it does seem to affect their ItemID list preference. Their initial gathering seems to be more random than if they were on foot, but lean toward filling the ItemID list order over time.
f.) Particularly with a large amount of foot traders and a limited amount of RW I would be careful not to set an import limit that they can't easily fill on an item high on the ItemID list that is being constantly consumed. They can just get stuck on that trying to fill that order and not get to your other orders. With foot traders I would stick with a surplus limit of 5 X half the number of active foot traders you have.

3. How much of an item can I expect a trader to import/export? Your Traders will generally either collect 5 of an item on foot or 1 of one item and 4 of another item. If they're on a horse cart, they will either collect 50 of one item, or 1 of one item and 49 of another item. The selection of which item appears at least somewhat random, though with a preference for items higher on the ItemID list. Your Traders will occasionally use a different allocation of their carrying capacity under two situations:
a. The amount needed to fill a limit is less than their total. For instance, you are importing Hides, Salt and Clay with a Trader on horse cart and have imported 475 of the 500 hides you want. The trader will pick up 25 Hides and 25 of any combination of Clay and Salt.
b. The amount of RW does not allow for a full shipment of a more expensive item. For instance your trader on horse cart can't afford 50 Hides, but can afford 25 Hides, 15 Clay and 10 Salt.
AI Travelling Merchants will take any combination of items up to their limit of 10.
AI Free Merchants will take up to 50 of the item they have a route bought for.

Numbers and Spreadsheets
Steam won't allow me to upload the excel spreadsheet with all of my test results on it, so here are some screenshots of the front page of it. If you want to look under the hood, feel free to find me on the Manor Lords Discord. Also happy to correct anything I've got wrong in this guide, or in interpreting this data. Thanks for reading!


7 Comments
liberalpaw 2 Apr @ 11:08am 
Super helpfull, now i know why i have over 1500 goods in my storage and i cant sell it.
Vuk Teble  [author] 17 Mar @ 2:56am 
@NoClass81:
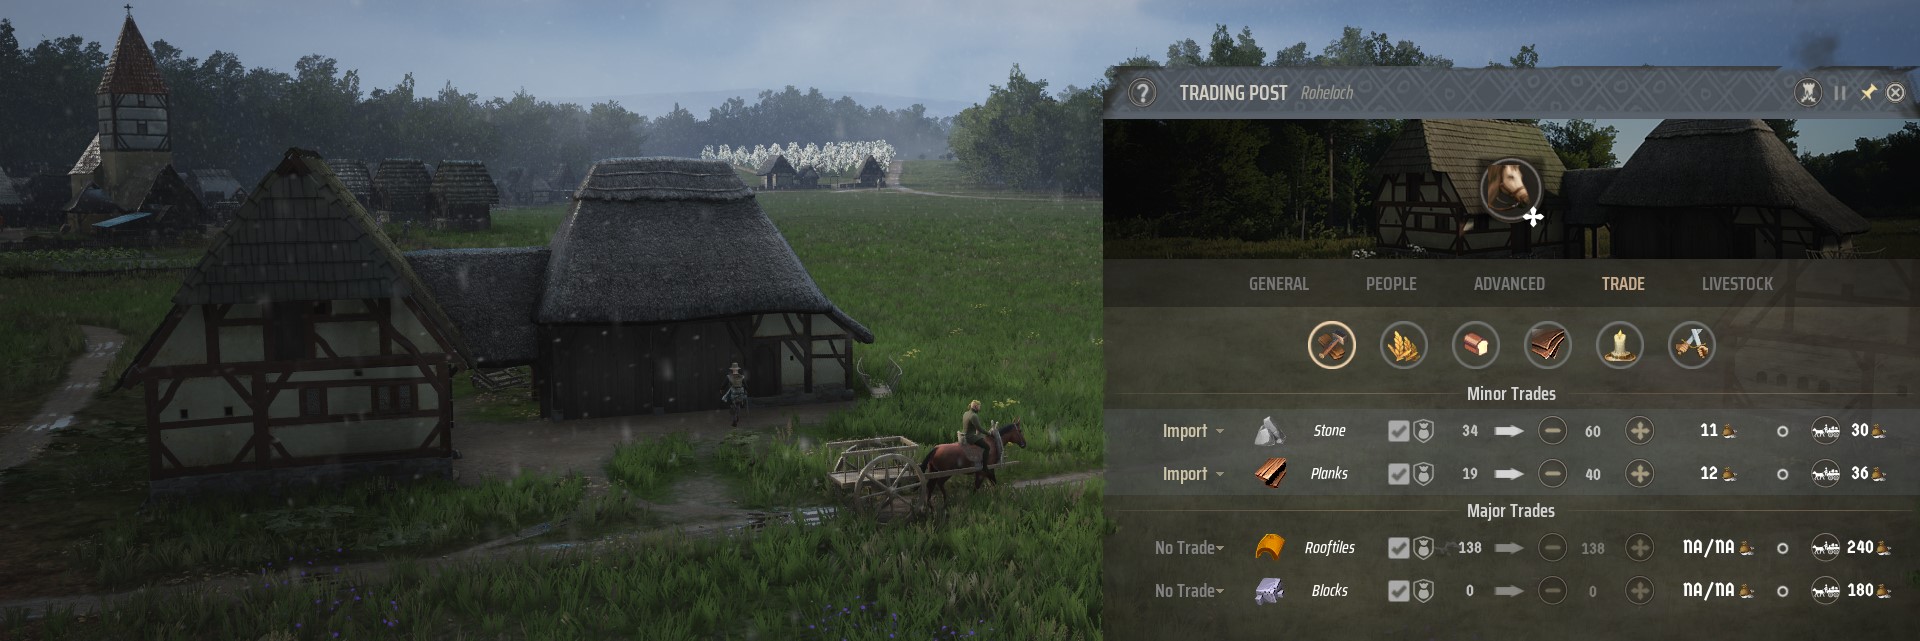
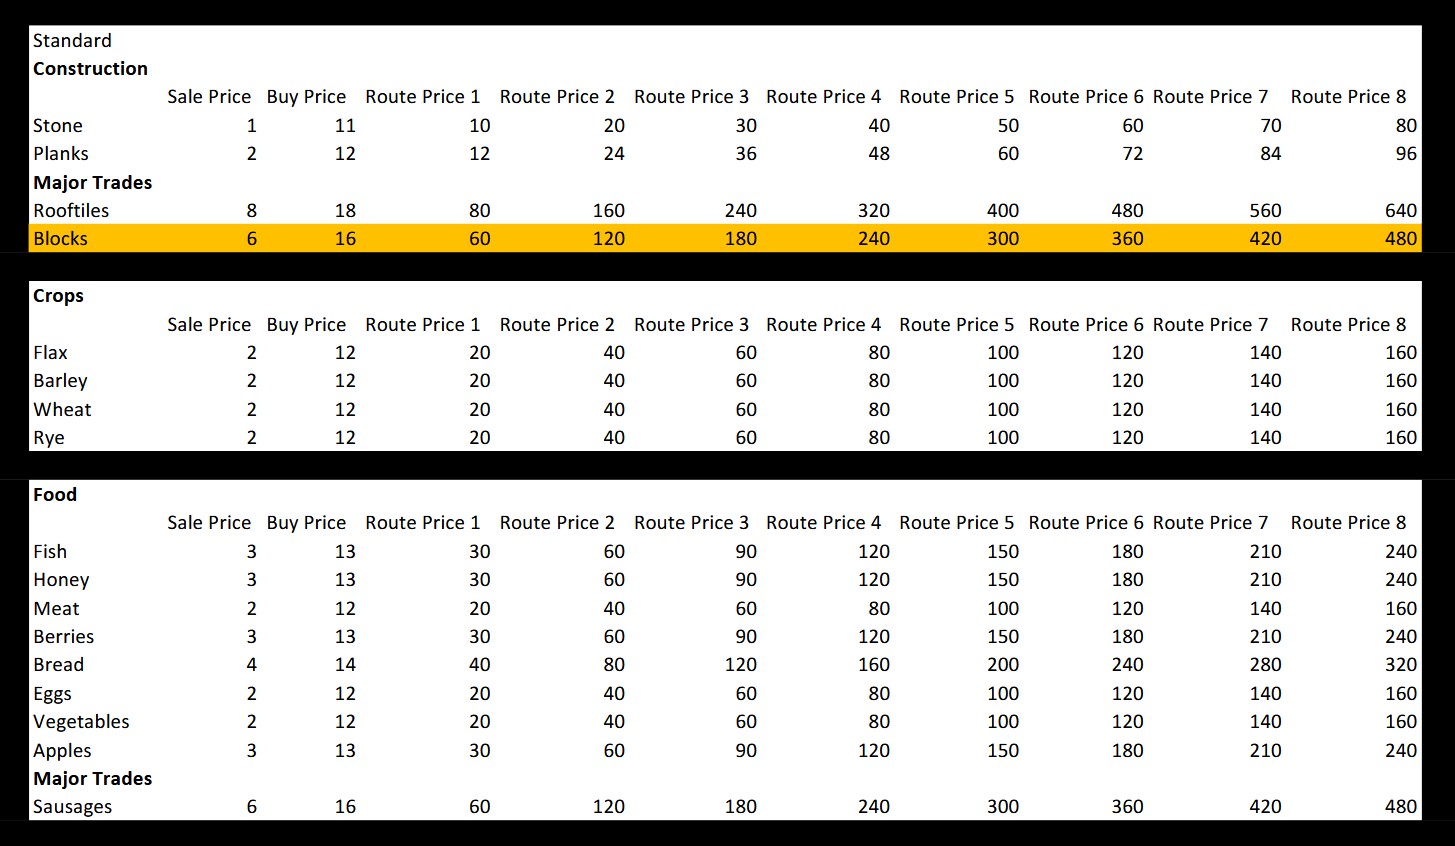
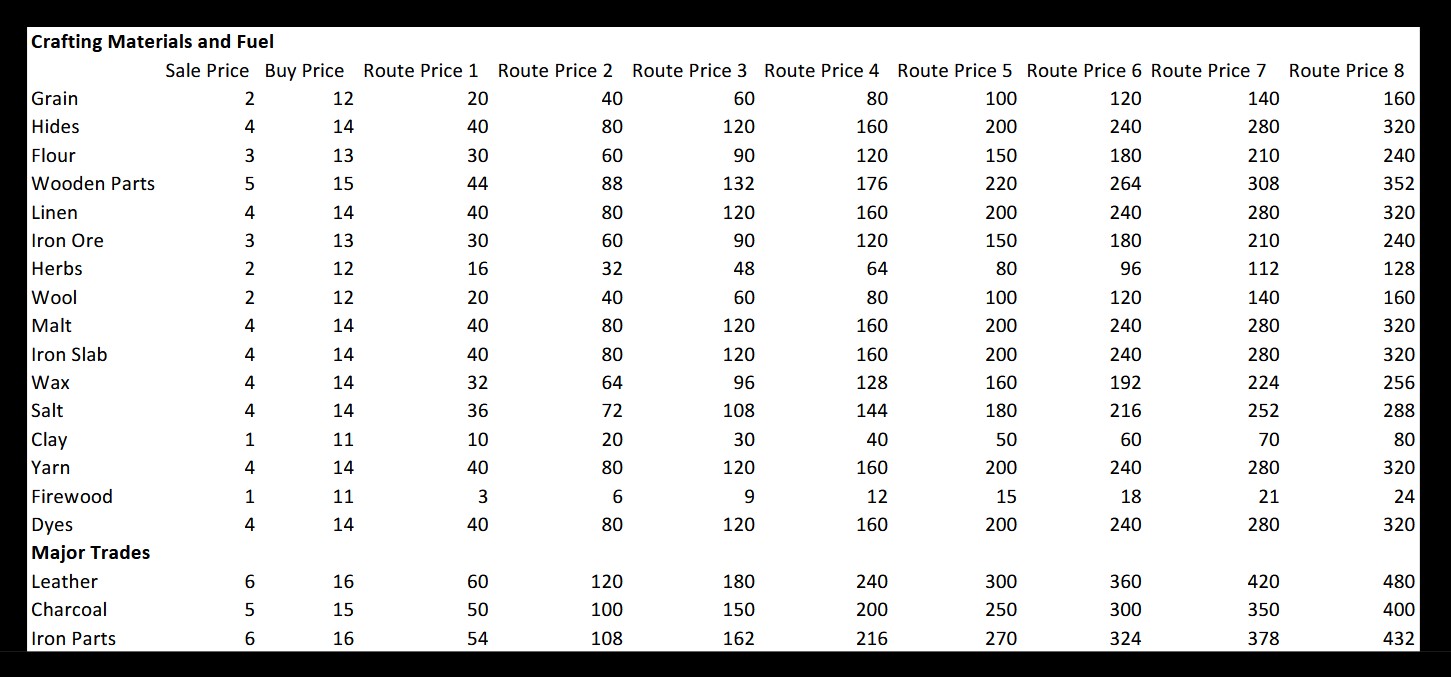
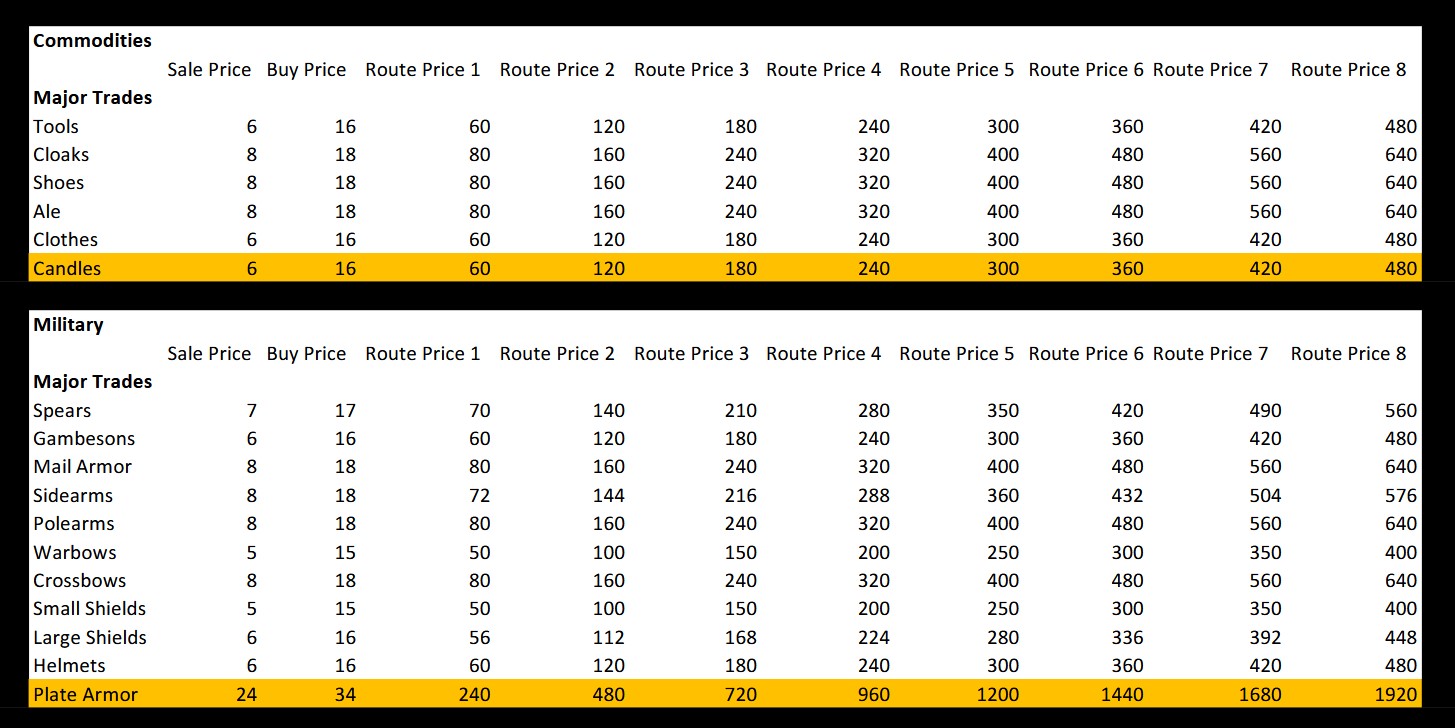
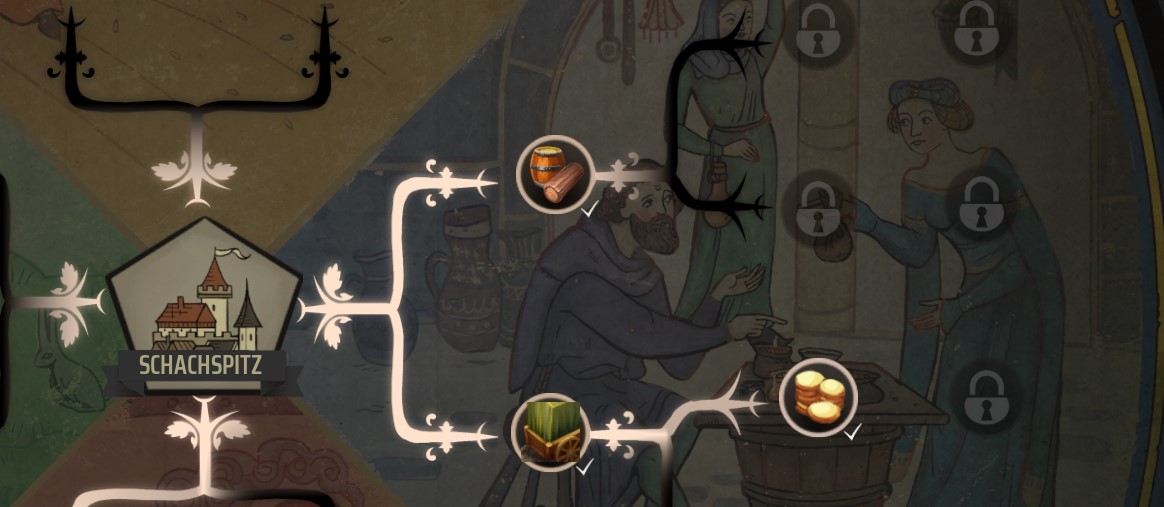
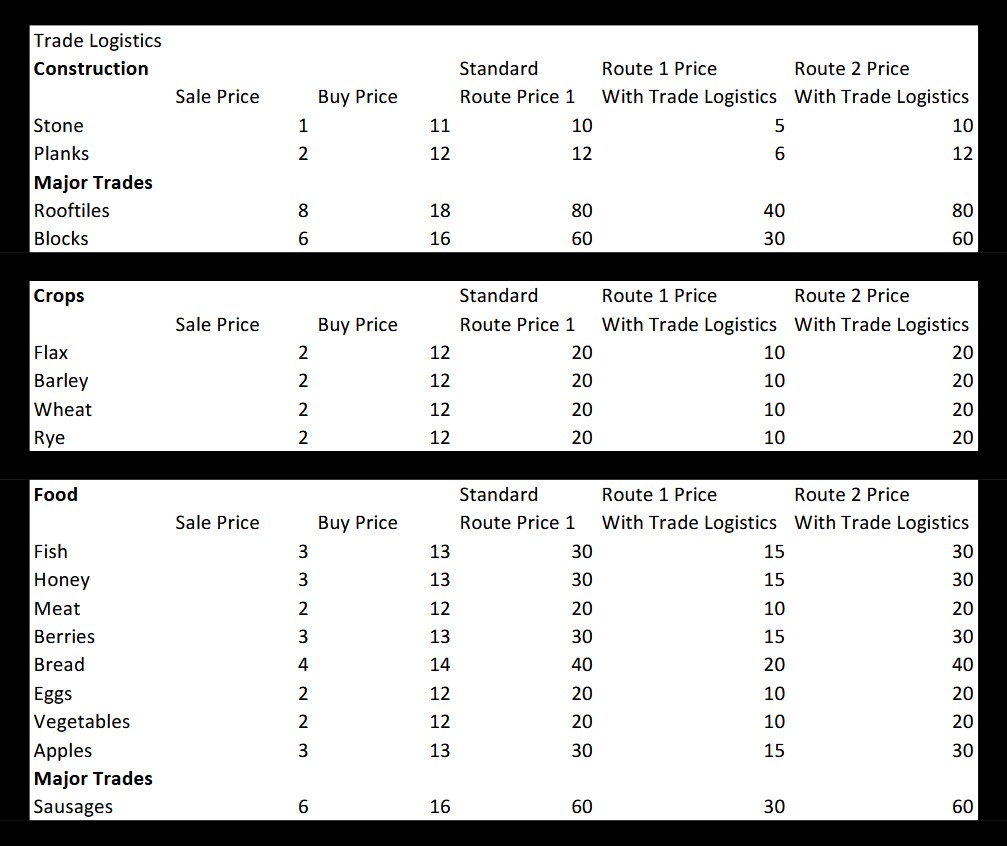
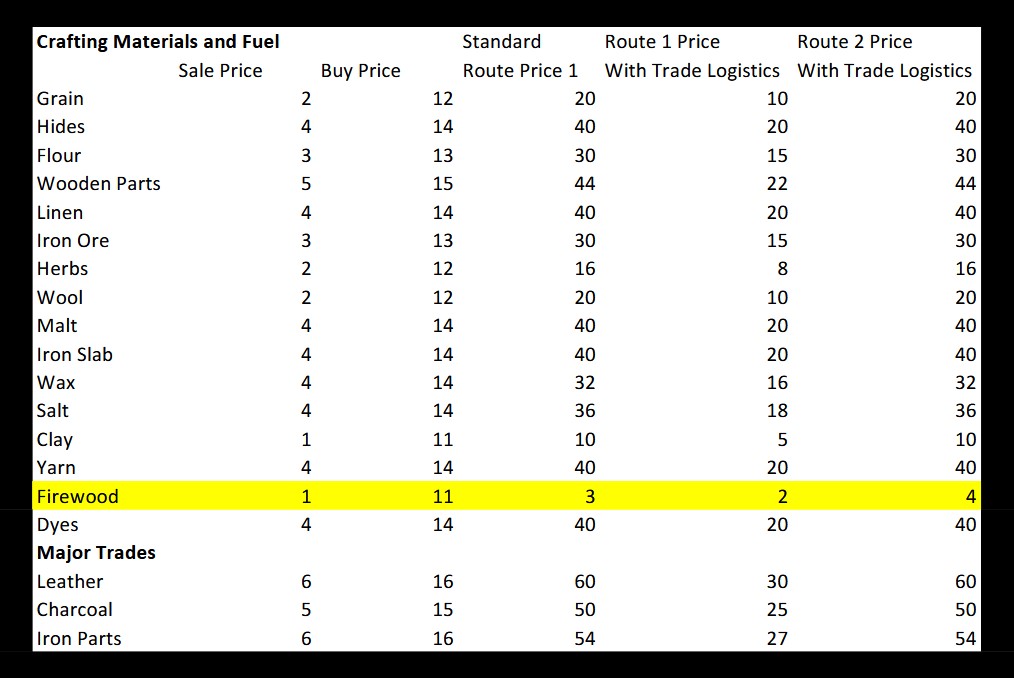
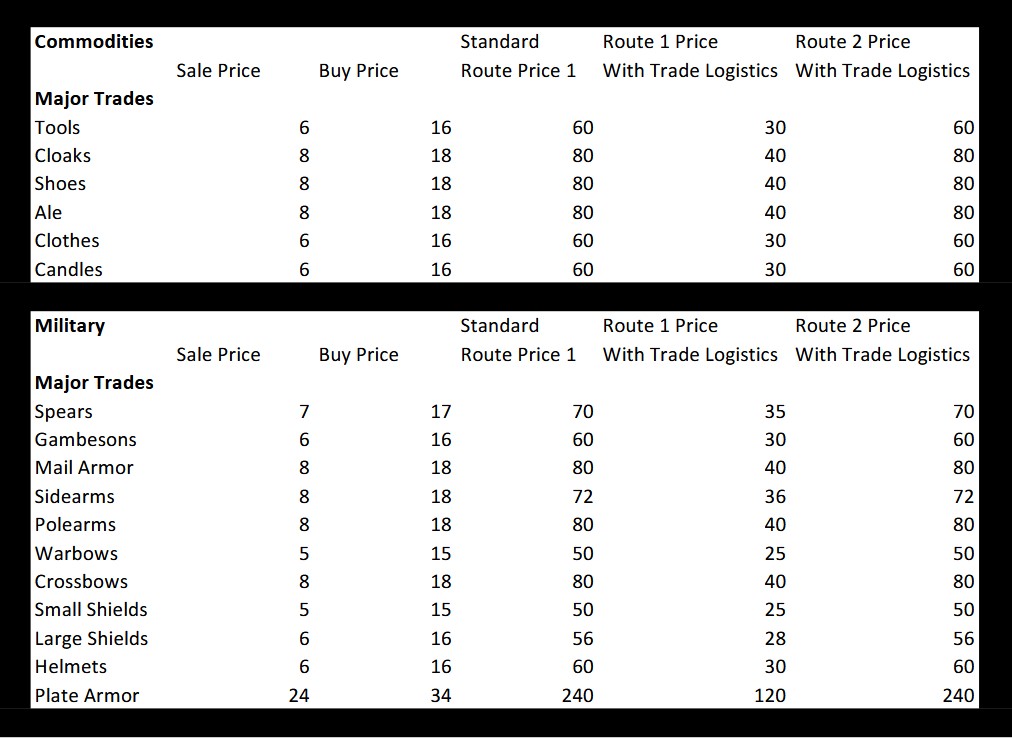
Your traders will only trade major trade items locally before purchasing the route. The route is required for major trades with foreign trade posts.

@hawkeye, Tasty, μ 'n' I, pekour - Thanks for the appreciation!
NoClass81 16 Mar @ 5:34am 
Love the analysis.

I definitely get confused about which type of trader is which from the various guides and tooltips. This guide is super helpful in decoding that.

Simple Q (since I haven't seen it said explicitly, or maybe I need to read more!):
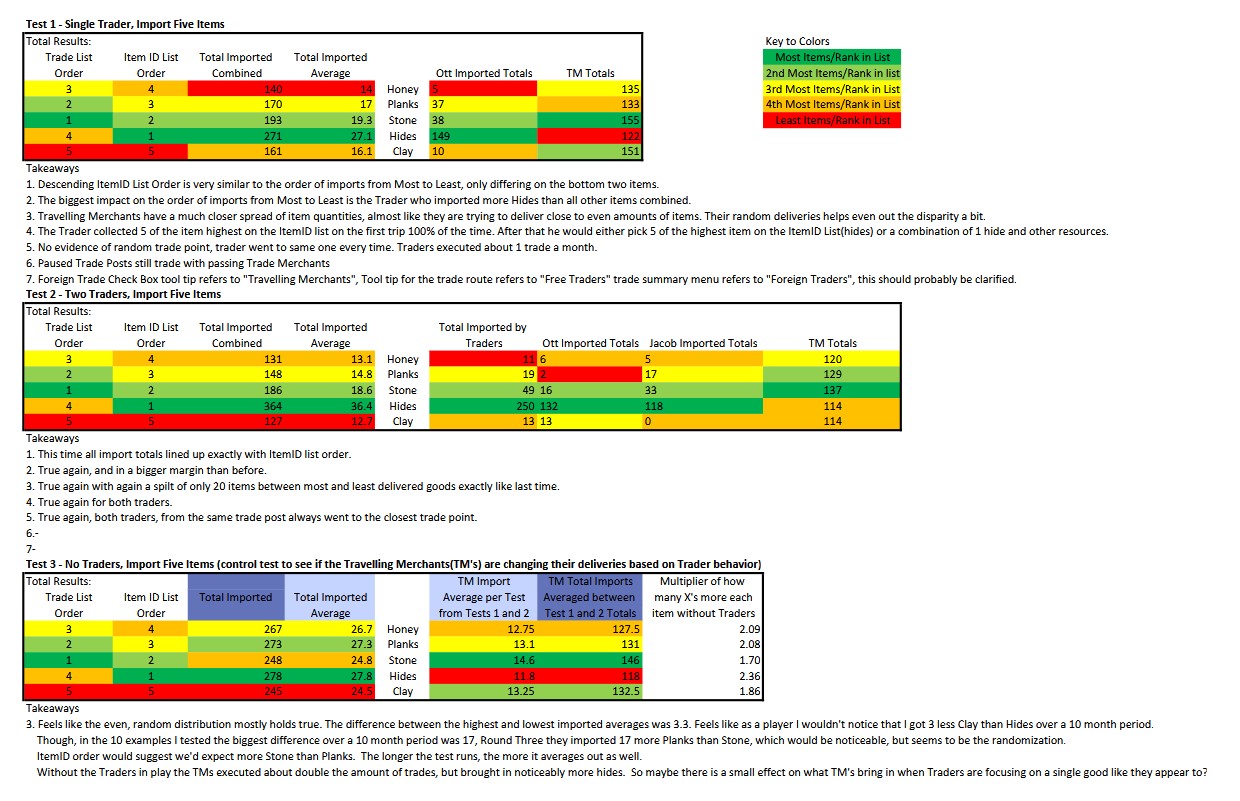
---Do player traders buy or sell major trade items before there is a trade route?

Put another wayy:
---Is my assigned trader able to purchase major trade items from the trade points before I buy a trade route?
hawkeye 14 Mar @ 6:23am 
excellent guide, I wish I had read it earlier.

(And I hope that the system gets a major revision ......)
Tasty 5 Mar @ 11:37pm 
thank you!
Chilled Sloth 23 Feb @ 4:21am 
fantastic work!
pekour 20 Feb @ 8:18am 
amazing guide!