CarX Street

CarX Street

429 ratings
STEP'S BIG TUNING GUIDE
By <#0ef>Step
This guide is a based on my previous guides "How to adjust your car for drifting" and "Grip racing tuning guide" you can find in CarX Drift Racing Online guide section.

Right now it is separated in 3 main sections:
  • Videos section with 5 videos covering the main aspects.
  • TL;DR section, for a quick competitive setup rules.
  • Main section, where every tuning part is described in detail.
Русская версия гайда

You can find me here:
Twitch[www.twitch.tv]
YouTube
39
30
5
7
18
7
6
3
10
2
6
3
2
3
3
2
2
   
Award
Favorite
Favorited
Unfavorite
Videos
In this section you will find 5 videos covering some of the tuning aspects. If you need more details, check out this guide further.

Wheels and body

Transmission

Engine

Suspension
TL;DR or Quick setup guide
This section is basically TL;DR for you.

There's no such thing as "universal setup", however I will suggest some basic tweaks that will save you time on adjusting your car.

Controller settings
Manual gearbox and manual clutch is the best combination. If you cannot use manual clutch, use automatic.

Guide on how to use manual clutch with ease:

Disable assistants, you'll get more control over your car.
Do not disable automatic countersteer!
Do not use Traction control for RWD and AWD, it prevents sliding by applying brakes to wheels.
For FWD it can be useful to prevent speed loss due to wheelspin, however without TC you will still be faster even with FWD.

Consumables
There are 6 types for tires, each of them has a different friction coefficient:
  • Street: 1.12
  • Street+: 1.18
  • Sport: 1.32
  • Sport+: 1.35
  • Racing: 1.6
  • Racing+: 1.7

There are also 2 types of fuel: regular and racing.
Racing fuel increases your overall torque by 10% and adds 5% to RPM limit.
While these numbers do not seem like a big difference, it is in fact very noticeable.

Car choice


There are 3 types of drivetrains available in the game: FWD, RWD, AWD.
As of 19/05/2025 any car can be converted to RWD and AWD. FWD choice is limited to 9 cars.

Interested in FWD only? Check out my dedicated guide:
https://sp.zhabite.com/sharedfiles/filedetails/?id=3371604854
Wheels
Minimum required is a square (all 4 wheels) setup with 265 tires. 3 bar pressure everywhere.
Your goal is to get 1.08 grip parameter in tuning section.
Staggered (different size) setup can be better.
For FWD use wider front wheels, for RWD vice versa.
For AWD adjust accordingly to desired behaviour.
Square setup is also a viable option, depending on your suspension settings.

Suspension
  • All prototype parts.
  • Very stiff spring rates. Adjust spring height afterwards, no more than a hand space should be between tire and fender. Reduce if you're flipping over the curbs.
  • Stiff rear sway bar, half stiff front sway bar. Reduce if you're flipping over the curbs.
  • Camber -6 at front, -4 at rear.
  • Ackerman angle 80-90°, steering angle is tune dependent, can range from 15° to 68°.
  • Wheel toe, front -0.09, rear +0.09. Alternatively can be left at 0 / 0.
  • Braking force - maxed out.
  • Brake bias, depends on your car's weight distribution. For a nose-heavy car, shift the brake bias at rear, 45-50. For a well-balanced car, keep it at 50-55.
  • For dampers, as a rule of thumb use these ratios, based on slow bump:
    slow bump x1 / fast bump x0.5 / slow rebound x2 / fast rebound x1.

Body
  • Prototype parts.
  • Stages of weight reduction will vary on your target weight. It is best to keep your car as light as possible. Use body swap to achieve such weight.
  • Prioritize your weight over power, unless the engine really struggles.
  • You can remove fuel tank, gaining around 40 kg. Your CoG will be higher, however.
  • If your car weight distribution is around 49/51 (more weight in the back), don't hesitate to shift some weight forward, sometimes it will improve handling.
  • Front aero is your everything, max it out. Rear aero can be reduced if you understeer a lot at high speeds. Air resistance should be set to minimum.

Transmission
  • T50S swap is needed for fastest shifting on automatic clutch only. Shifting speed will always be the fastest with manual clutch.
  • Final drive will depend on car engine and wheels size. Generally it will be 2.8 - 3.5 for tracks with many turns.
  • For gear ratios, look for the stock values of your car on Internet or use universal 6 speed H-pattern gearbox ratios from Quaife. Check out my guide above regarding gear ratio calculation.
  • For differential, use Clutch 65, ultimate.
  • AWD can make your car faster, but that's not guaranteed. For AWD, lock rear diff. more than front for RWD-like behaviour. Otherwise you will setup your AWD as a FWD car. There's no right or wrong.

Engine
  • It is best to use engines that are low power by default. That way you can apply more upgrades and adhust torque/power graph for your needs.
  • Many cars come with good stock engines and thus most of the time you won't need swaps.
  • All engines are different and will require different parts.
1. WHEELS
Always start with wheels and tires, they contribute a lot in how your car handles.
This section doesn't affect car class.

Table of contents:
  • 1.1 Spacers
  • 1.2 Rims
  • 1.3 Tires
  • 1.4 Tires: Street, Sport, Racing
- 1.1 Spacers
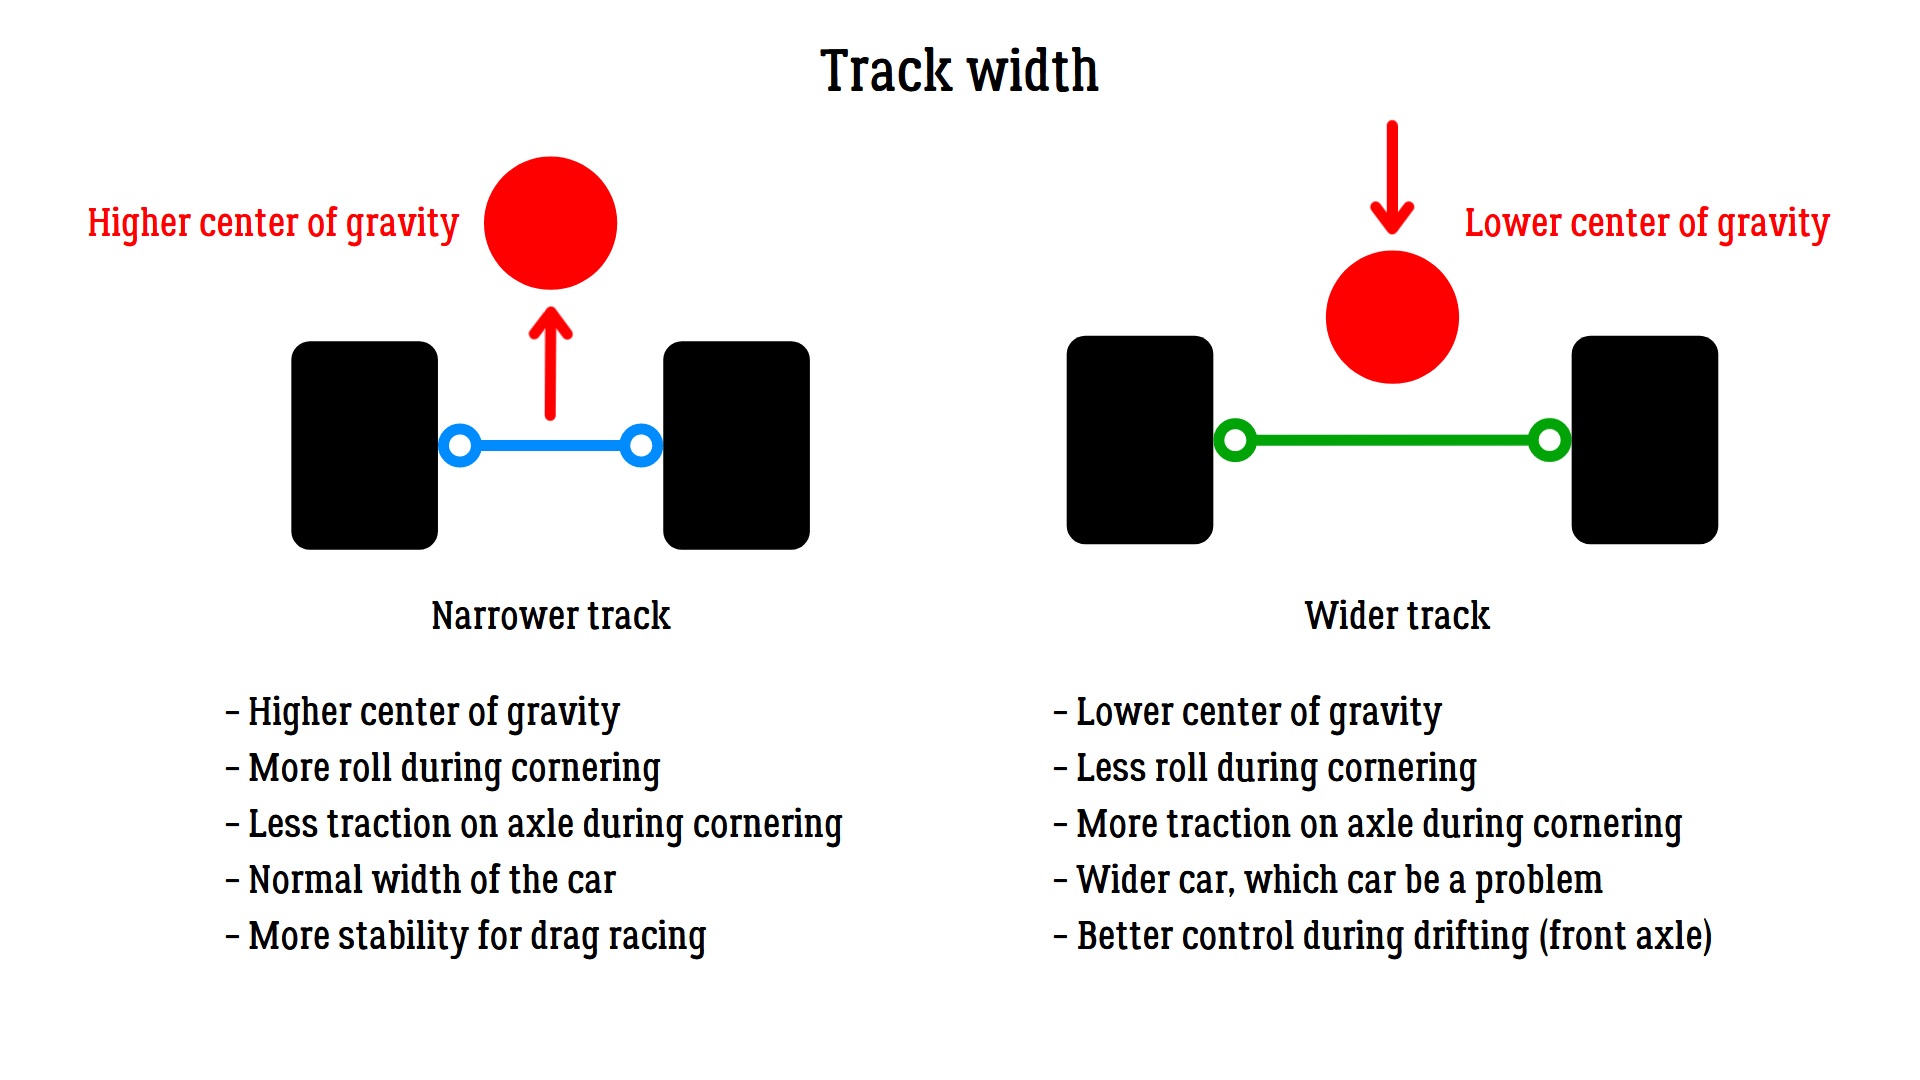
Front and rear spacers are used to adjust your car's track width in the game.

Only Ultimate spacers give you the ability to adjust the offset in tuning settings (marked with yellow gear icon).

Track width is used to give an axle more stability.

Wider front track is useful for drifting and FWD racing cars.
Wider rear track is useful for grip racing on RWD and AWD.

Try to create a balanced setup, extreme values are not needed.

Styling bodykits add to effective track width, allowing you to make tracks even wider.
This is especially useful for cars that are prone to flipping on curbs.

Always start with styling bodykits before tuning!


- 1.2 Rims
Rims in CarX Street are marked as IRL: 215/40 R18.

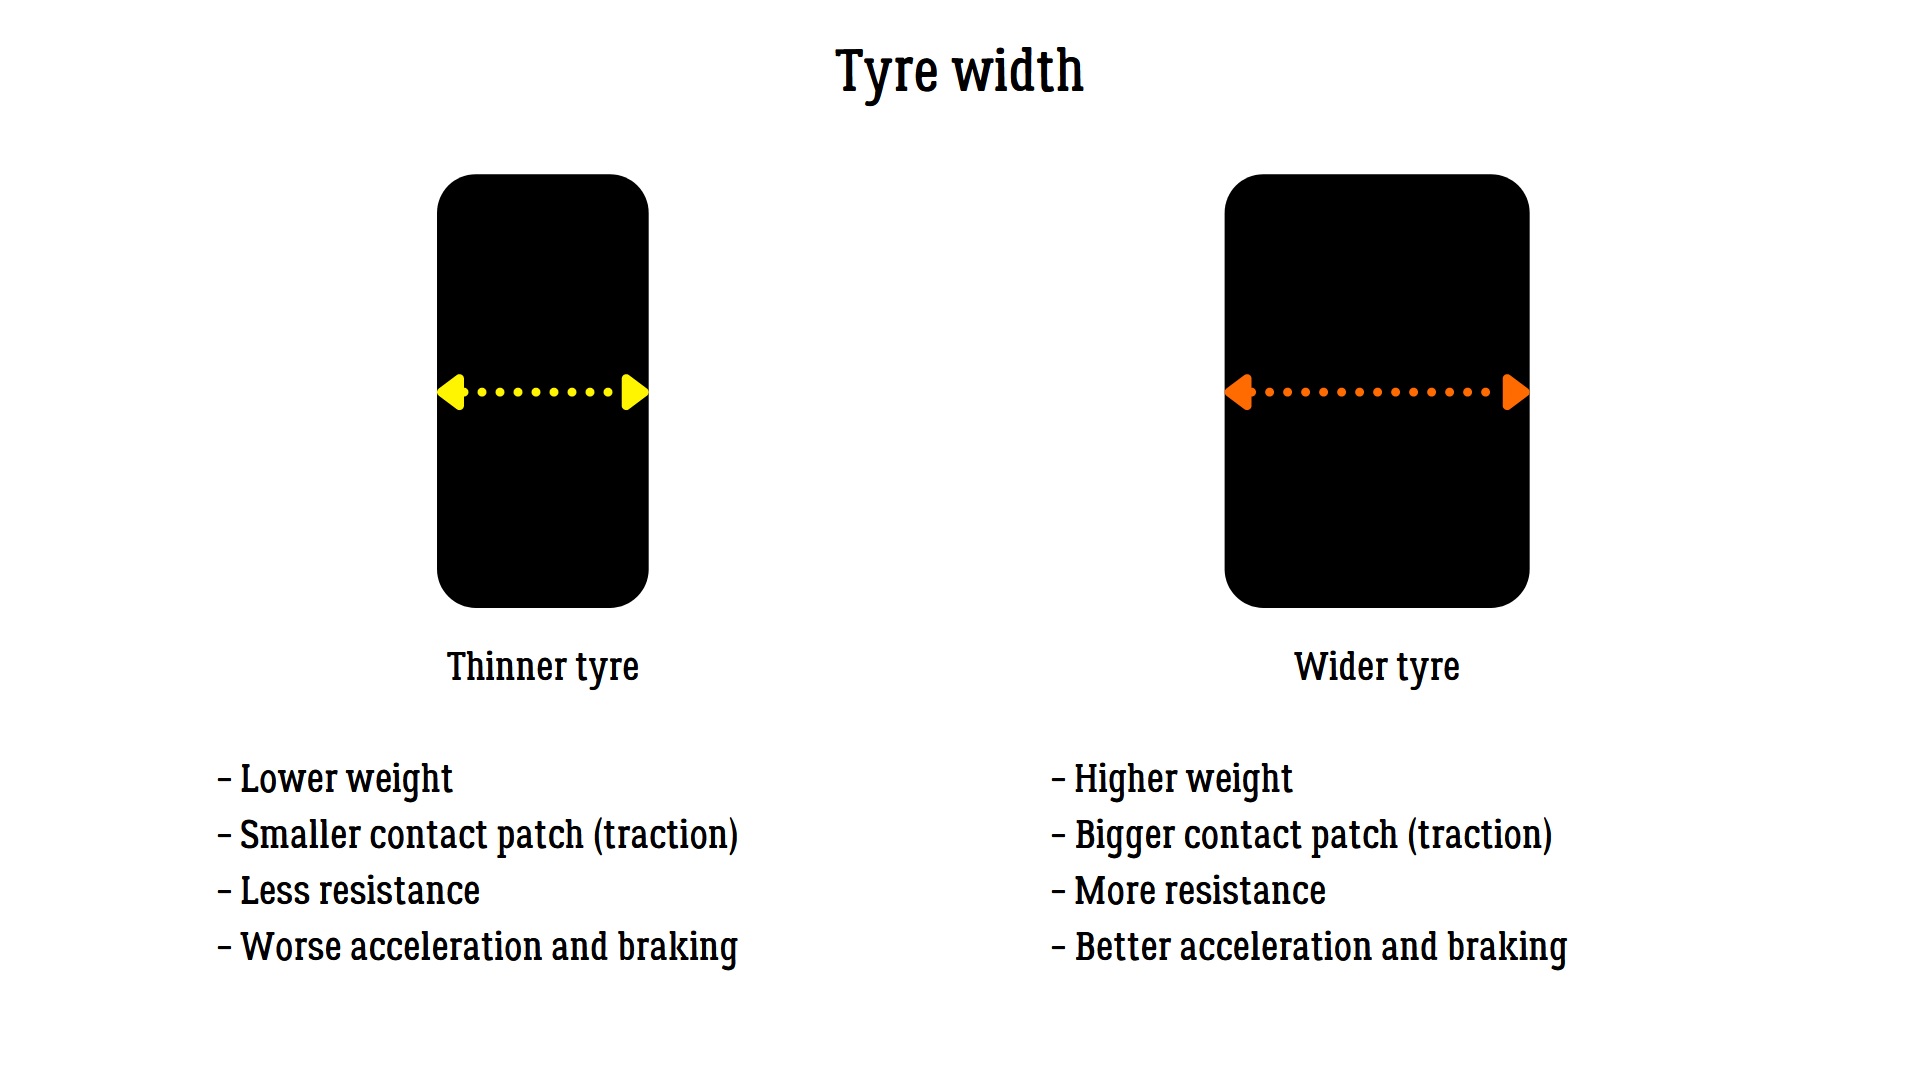
215 is the rim width in mm.
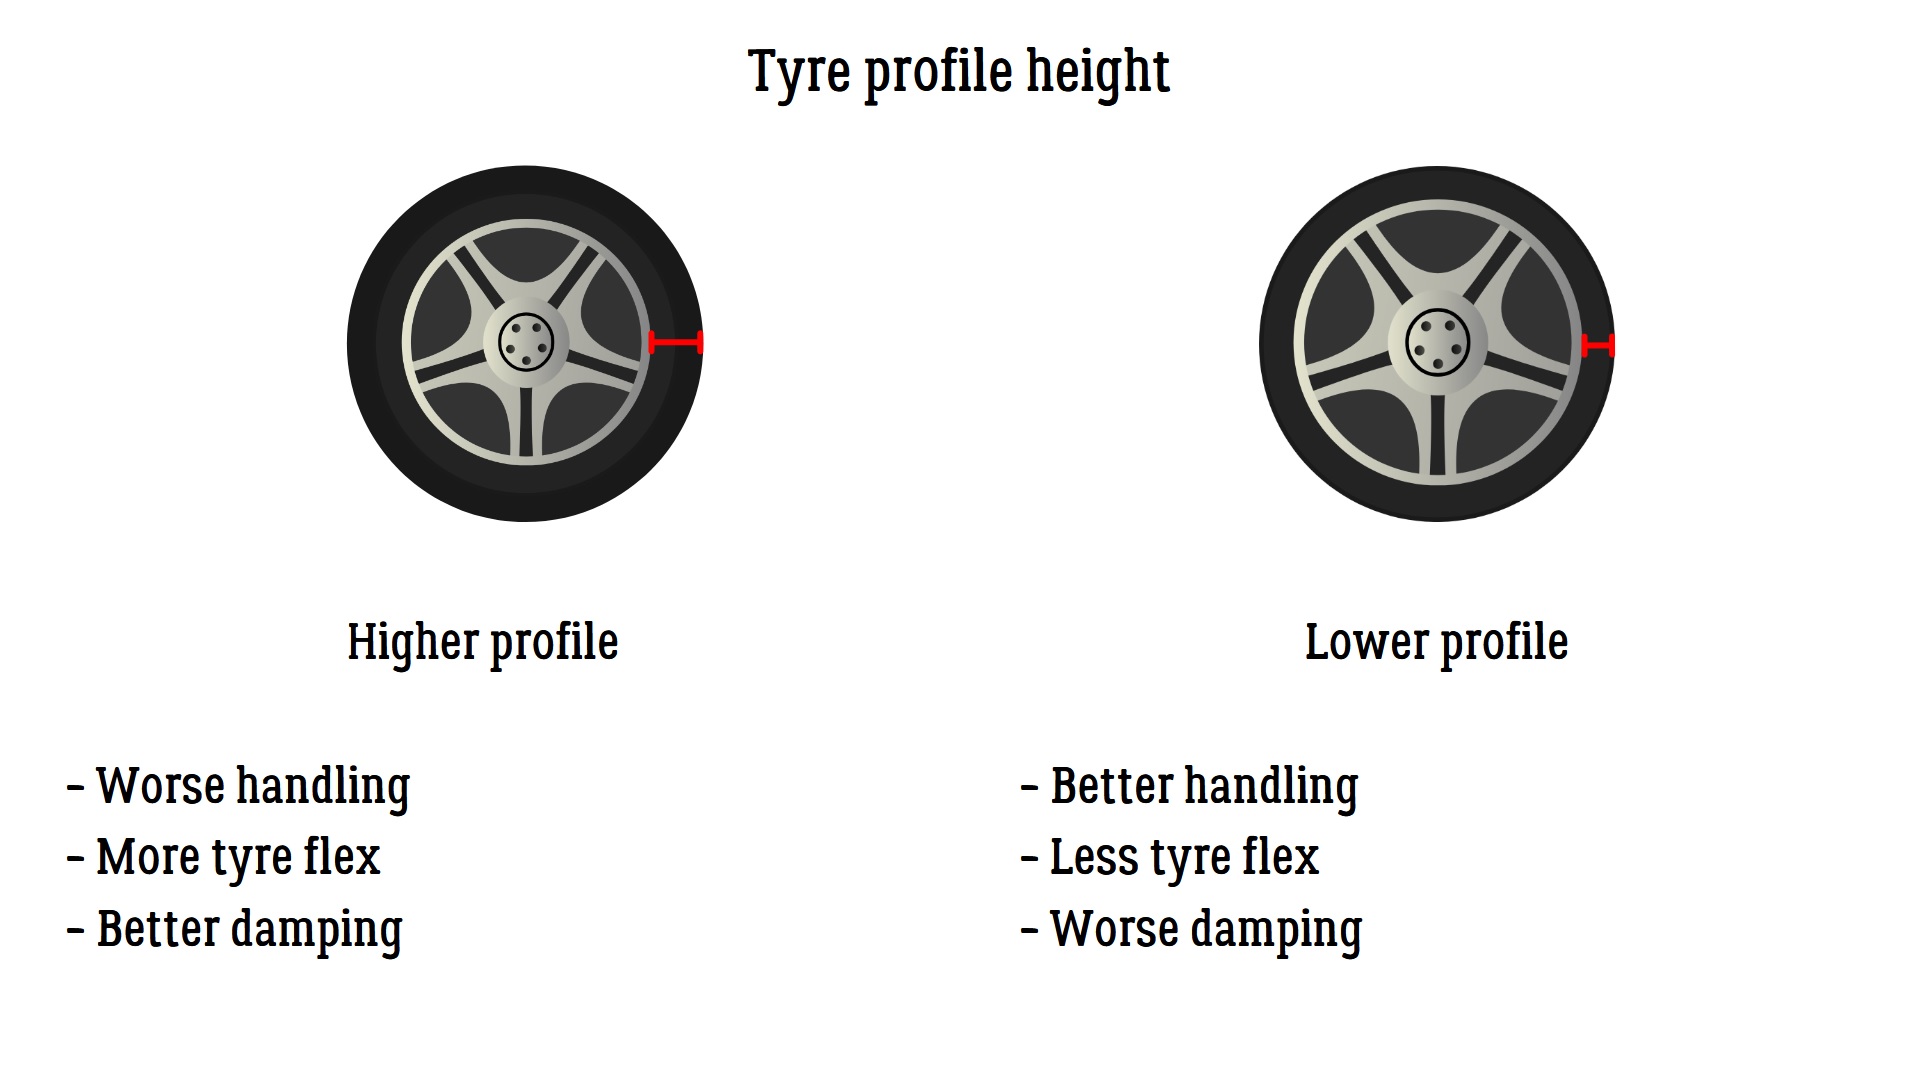
40 is the profile of the tire used with this rim in % of it's width.
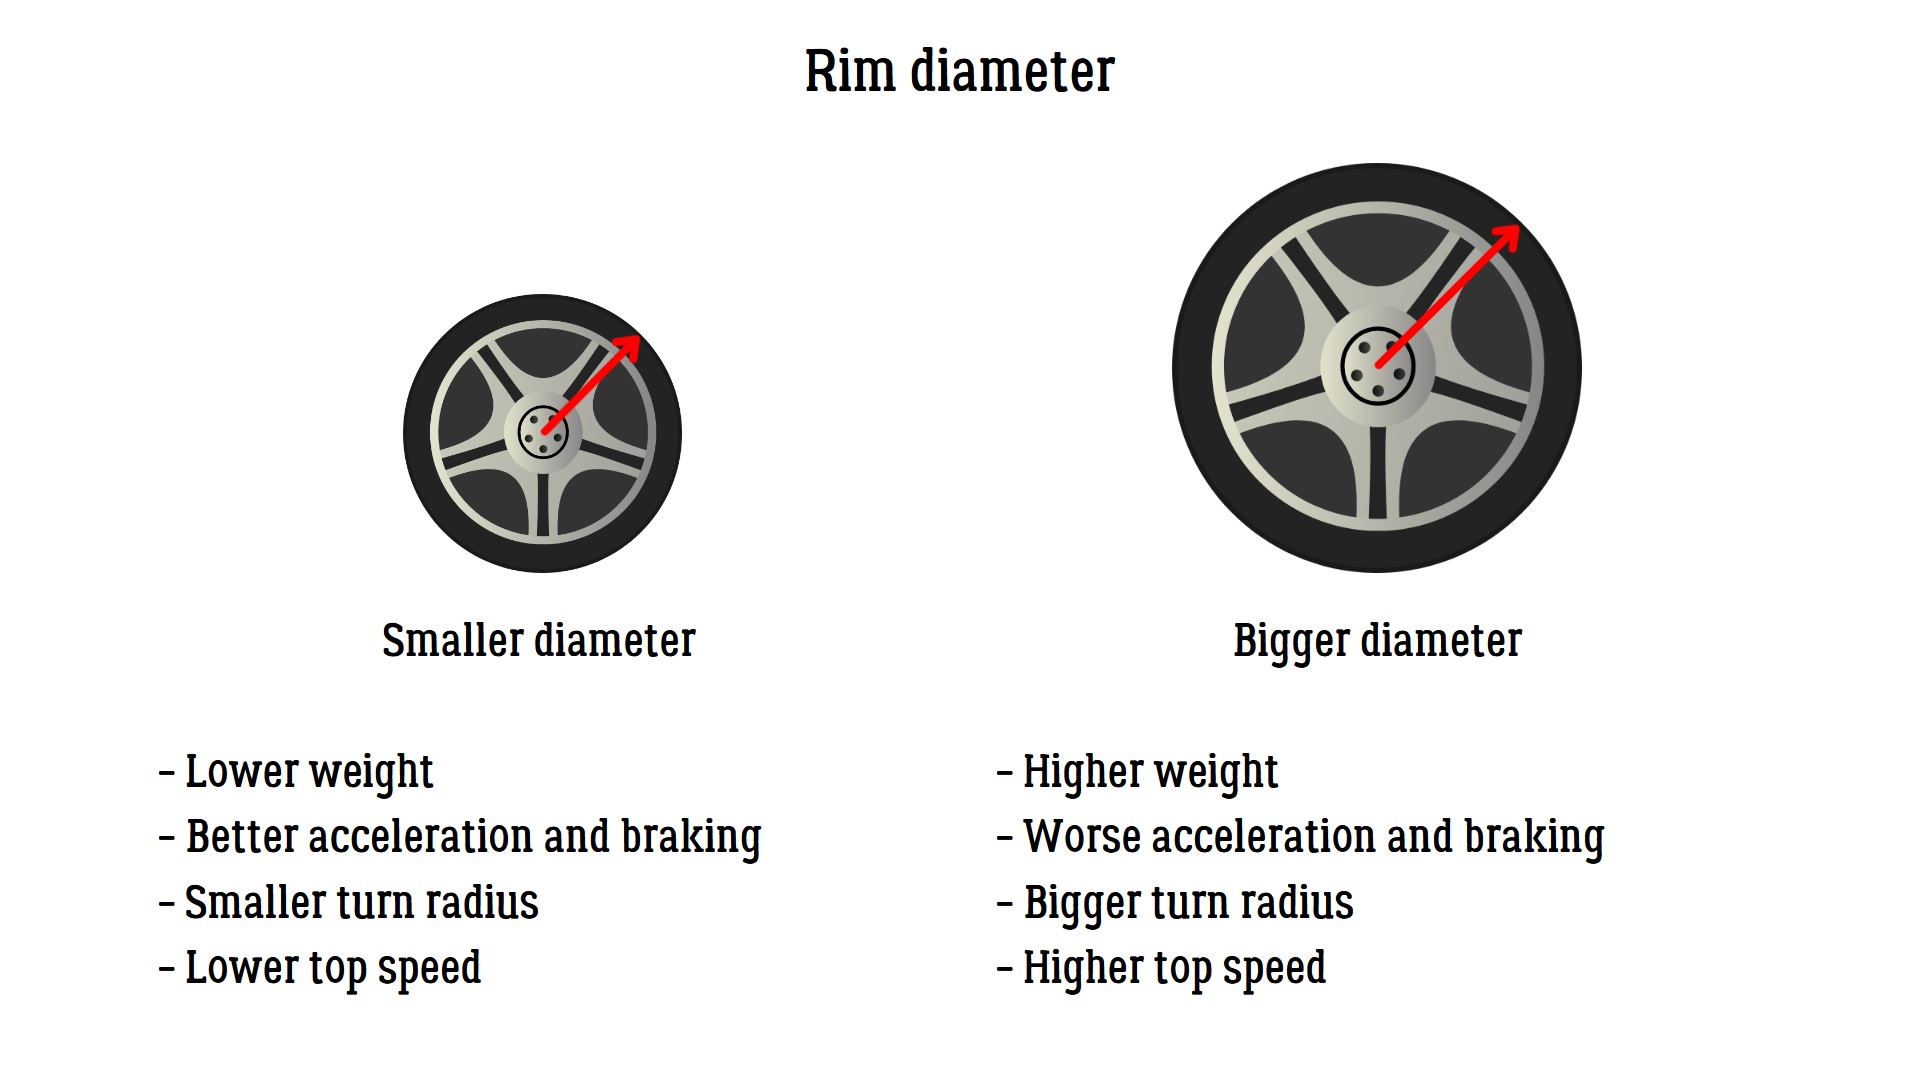
R18 is the diameter of the rim. In our case 18 inches.

Rim width


The bigger the rim width, the more traction you gain, but the more power you need in order to spin that wheel efficiently. Tire width of 265 is the minimum needed, because grip value of 1.08 will be achieved. See below for more info.

Tire profile
The smaller the tire profile, the more reactive is going to be your handling. At the same time you have to find the balance, as the profile cannot be very low. Very low tire profile can lead to frequent losses of traction because of impossibility of the wheel to absorb road impact.
Tire profile contributes to wheel's overall diameter.


Rim diameter


Very easy to understand setting.
Smaller diameter - faster acceleration, lighter input, lower top speed.
Bigger diameter - bigger top speed, slower acceleration, heavier input.

Grip parameter
Grip parameter you can see when adjusting rims/tires size is very important.
The maximum value is 1.08. It is available in any rim size, provided you use 265 width and beyond.

You can find that decreasing tire profile negatively affects your top speed. To combat this, simply lower your final drive ratio in transmission settings. It is as simple, as with bicycle gear ratios and wheel sizes.
- 1.3 Tires
Tires are available in two versions: Racing and Elite.

Racing are your standard tires, more "square shaped".
Elite tires are stretched tires (a bit tighter fit), more "oval shaped".

Both types allow you to alter the tire profile further, either increasing or reducing it.

Racing tires
Racing tires is the proper sized tires for your chosen rim. They provide the best traction and stability.

This option is generally better for grip setups.

Elite tires
Stretched tires are tires that try to combat sidewall flex by using smaller sized tires on rims. They're more oval shaped, and thanks to less sidewall flex they allow for lighter inputs and more tight cornering.

This option is generally better for drift setups.

Tire pressure


This setting is unlocked without installing upgrades.
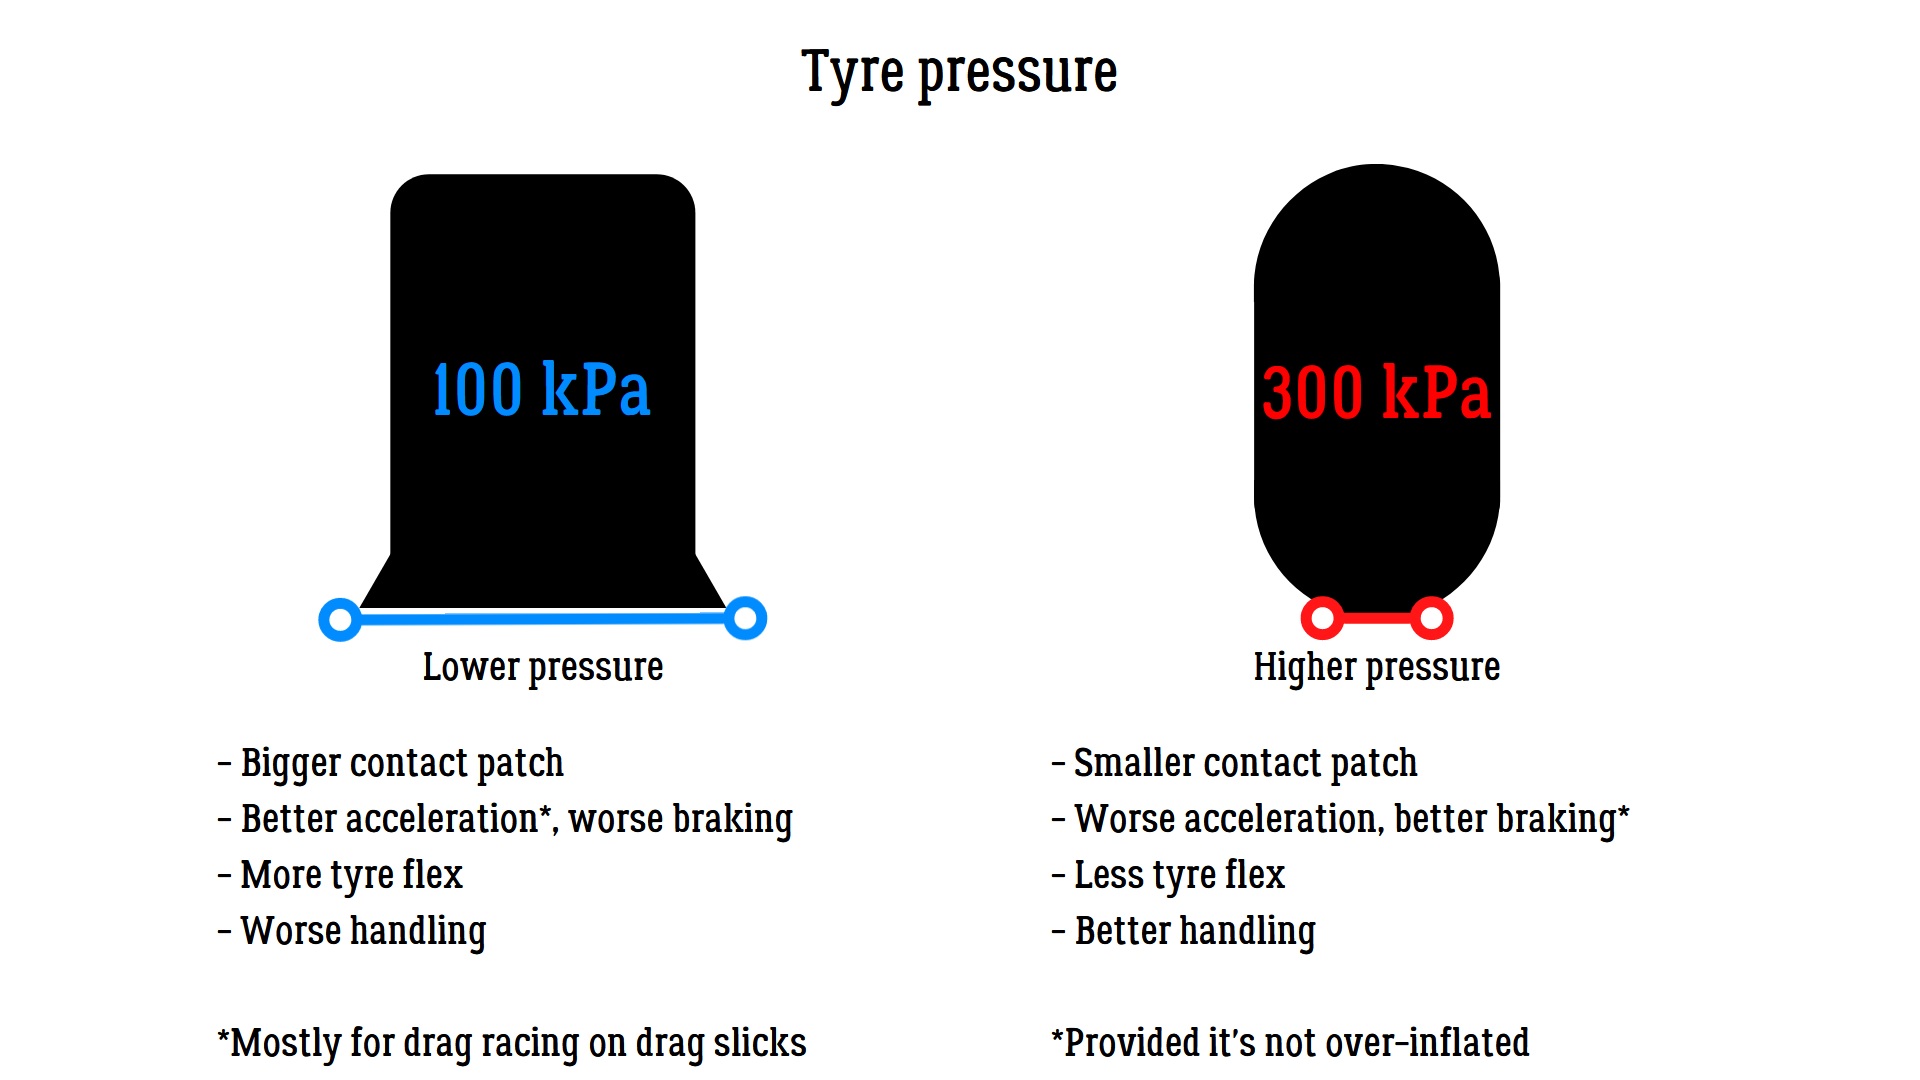
Tyre pressure determines how big is the contact patch (the amount of grip).

Higher pressure values make the contact patch smaller (the tyre touches less of pavement), lower pressure allows for more grip.

A pressure that is too low will not be beneficial for grip, as there will be excessive friction, that will slow you down.

As with CarX DRO, tire heat is not simulated, hence why you should use the values of heated tires: 3 bar.
- 1.4 Consumables: Street, Sport, Racing tires?
New players can find the driving very slidey and not responsive, this is because the starter cars come with street and sport tires.

For grip racing it's crucial to have Racing+ tires.

Street tires are ideal for drifting on moderately powered cars, cheap and make you slide all over the place.

Sport tires are better for drifting on high powered cars. You gain more traction and speed.

Here are the friction multipliers for each type of tires:
  • Street: 1.12
  • Street+: 1.18
  • Sport: 1.32
  • Sport+: 1.35
  • Racing: 1.6
  • Racing+: 1.7
2. SUSPENSION
Plays a huge role in your car's handling.
This section doesn't affect car class.

Table of contents:
  • 2.1 Suspension arms
  • 2.2 Stabilizers (Anti-roll bars)
  • 2.3 Brake system
  • 2.4 Springs
  • 2.5 Dampers
- 2.1 Suspension arms
This part unlocks following settings:
  • Camber
  • Caster angle (Front only)
  • Ackerman angle (Front only)
  • Steering angle (Front only)

Camber
Camber helps you gain traction in corners. At the same time, negative or positive camber negatively affects traction on straight line.

All my builds use negative front camber of around -6° and rear camber of around -4.5°.
Bear in mind that these are nominal values and not real values calculated in game.
-4.5° in tuning menu look more like -2° or -3° in reality.

As with CXDRO, those calculations are based on car springs height, stiffness, body weight, etc.

Caster angle
Caster angle is the angle of your front suspension to your car body.
Think of a chopper motorcycle and a sport bike.
A sport bike is nible and can easily corner, while a chopper is sluggish and only really can go straight.

Same with cars, lower caster angle makes your car very eager to react to your input. Think of tight cornering, chicanes, drift transitions.
Higher caster angle makes your car stable at speed, but makes steering slower, especially on high speeds. Another very important feature of caster is the increased dynamic camber in corners.
Higher caster values will allow you to get more of a negative camber. This is why it's important to take this into account when adjusting camber too. High caster and high negative camber will add up to each other and ruin your car's handling.

Default values are usually good, 6-7 degrees for most cars.

Toe
This setting is available from the start, without purchasing upgrades.

Toe is the adjustment of the wheels according to the longitudinal axis of the vehicles. Negative toe means that the wheels are facing "outside" hence why it’s called toe-out, the positive one gives the opposite effect, thus the wheels are facing "inside", alternatively called toe-in.

For grip racing, I would recommend to use zero toe on front and back for less resistance and more speed. Alternatively you can use a slightly negative toe on front wheels like -0.09 or -0.18 for easier turn-in. For rear wheels, you can use slightly positive values, +0.09.

For drifting I would recommend to use a negative setting on front and rear, as it may help you with transitions between corners and makes the car oversteer more.

Ackermann angle
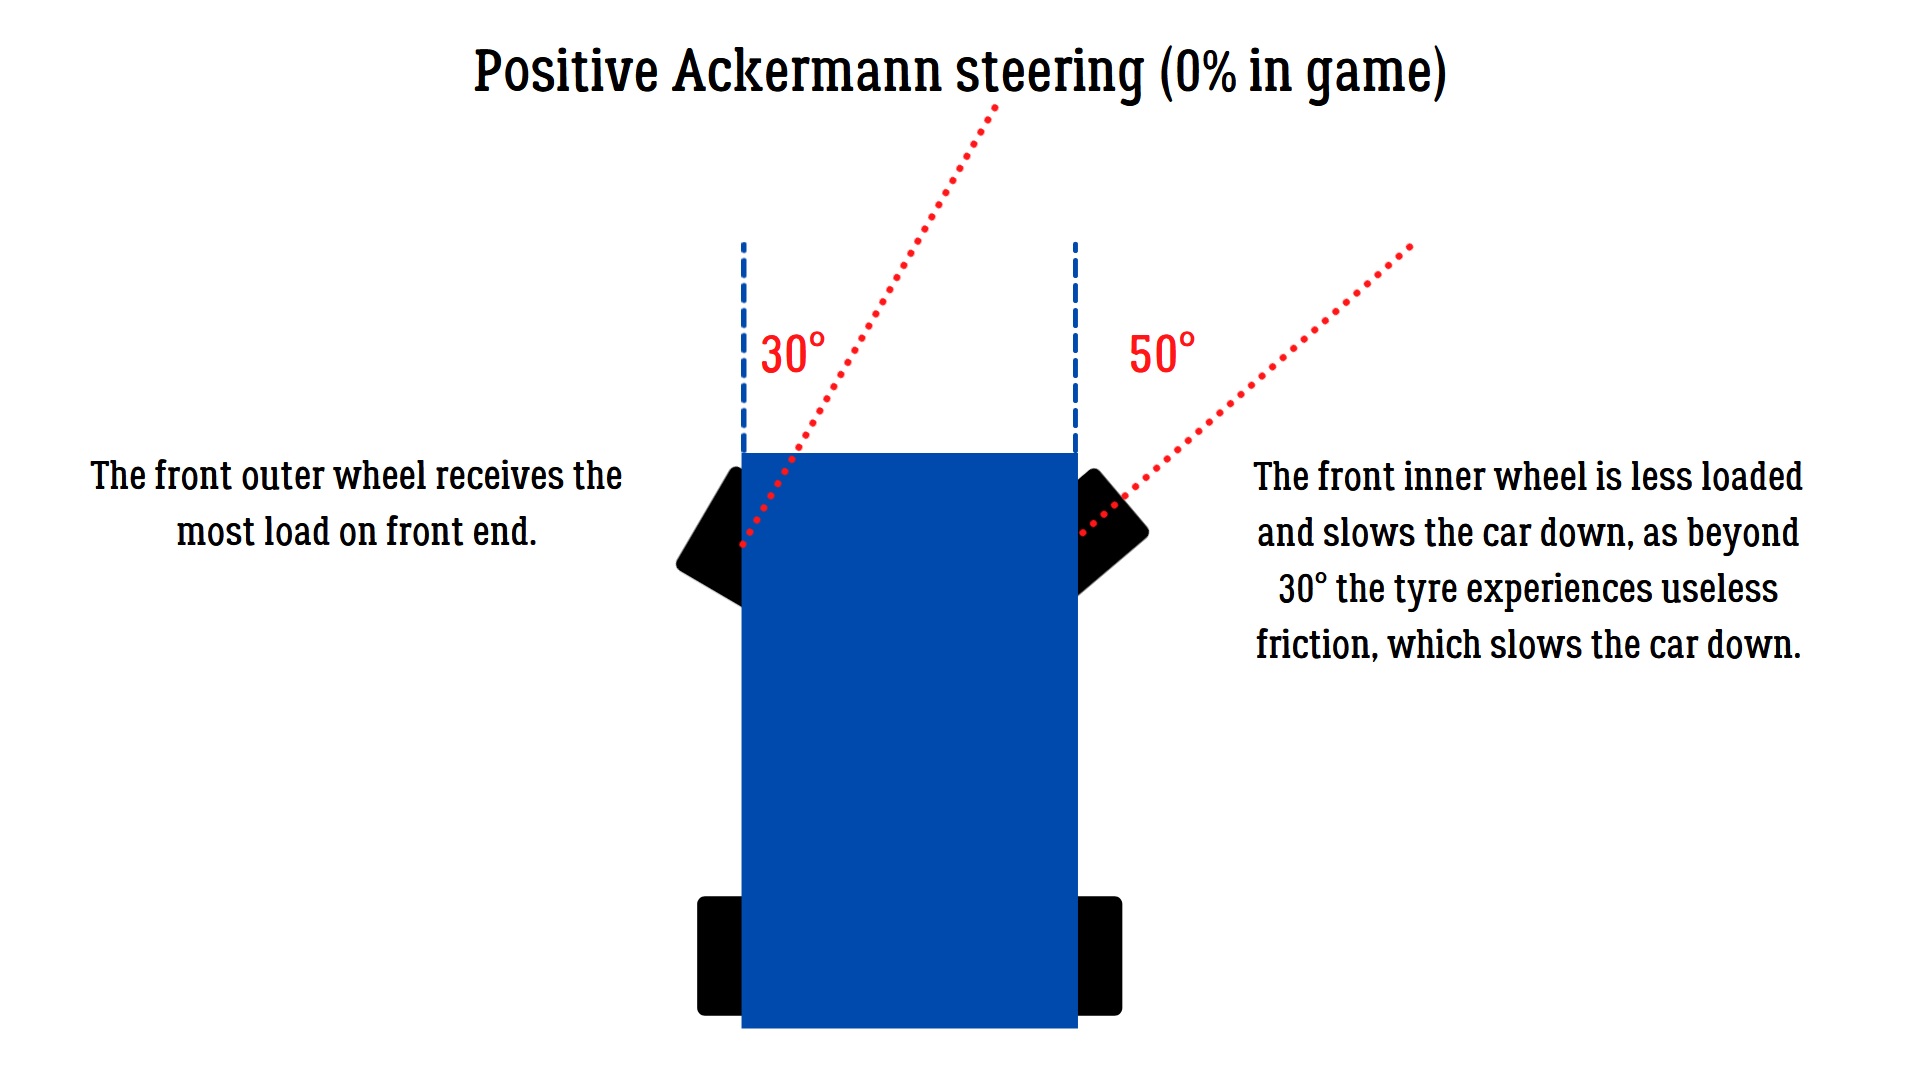
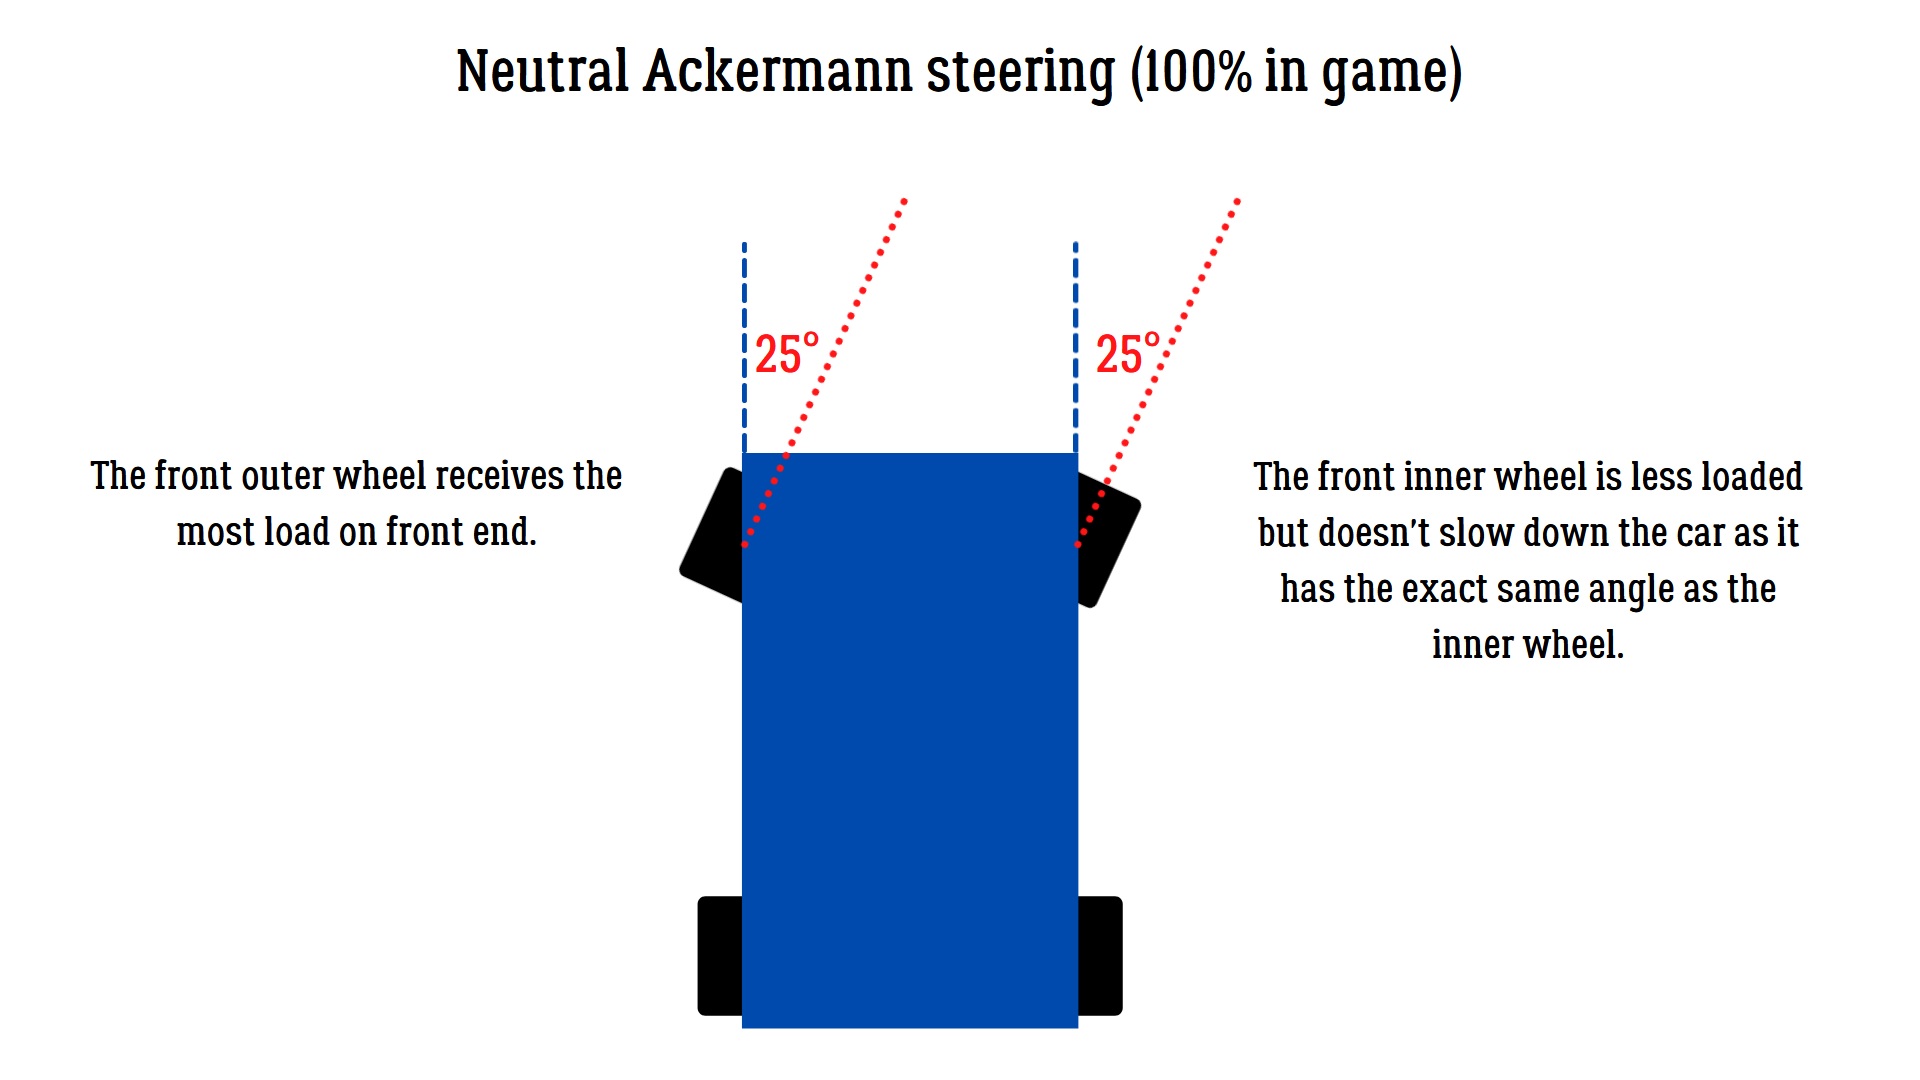
Ackermann angle allows to adjust difference between turning angle of front wheels.
You can think of it as a dynamic toe setting.
Values closer to 0% are positive Ackermann angle, meaning the inner wheel will turn more, than outer wheel.
Values closer to 100 allow to have almost parallel steering.
A good balance is somewhere between 70 and 80%.

For grip racing you'll want a more parallel steering, for drifting more Ackermann angle can be beneficial for your driving, depending on your preference.


Steering angle
Very straightforward setting.

For RWD grip builds use around 52-58°, while time attack cars don't need such angle, in-game speed sensitivity clamps the angle between lower values as you gain speed. For drifting, max this setting out.

For FWD and AWD you may run as low as 20°, as these cars don't risk to oversteer and you won't need to catch them. Lower steering angle provide better traction and generally makes you faster.
- 2.2 Stabilizers (Anti-roll bars)
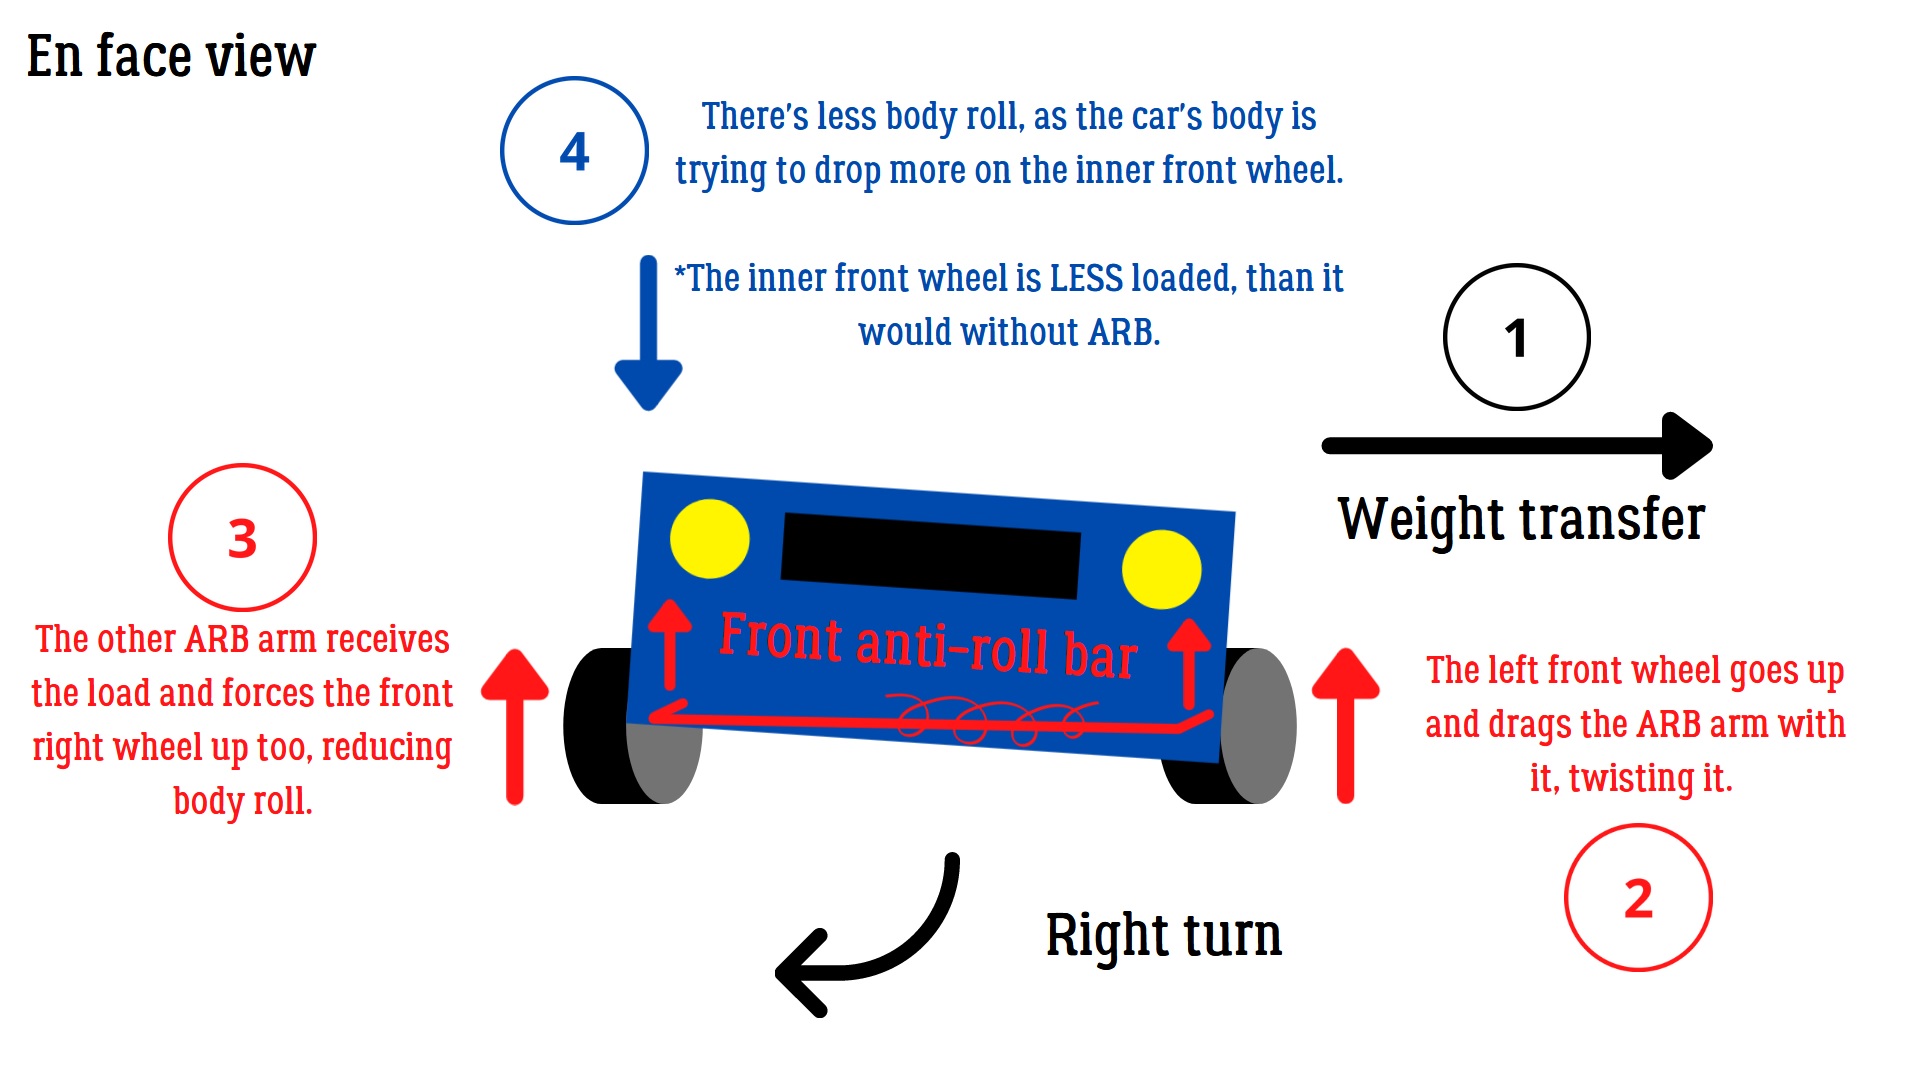
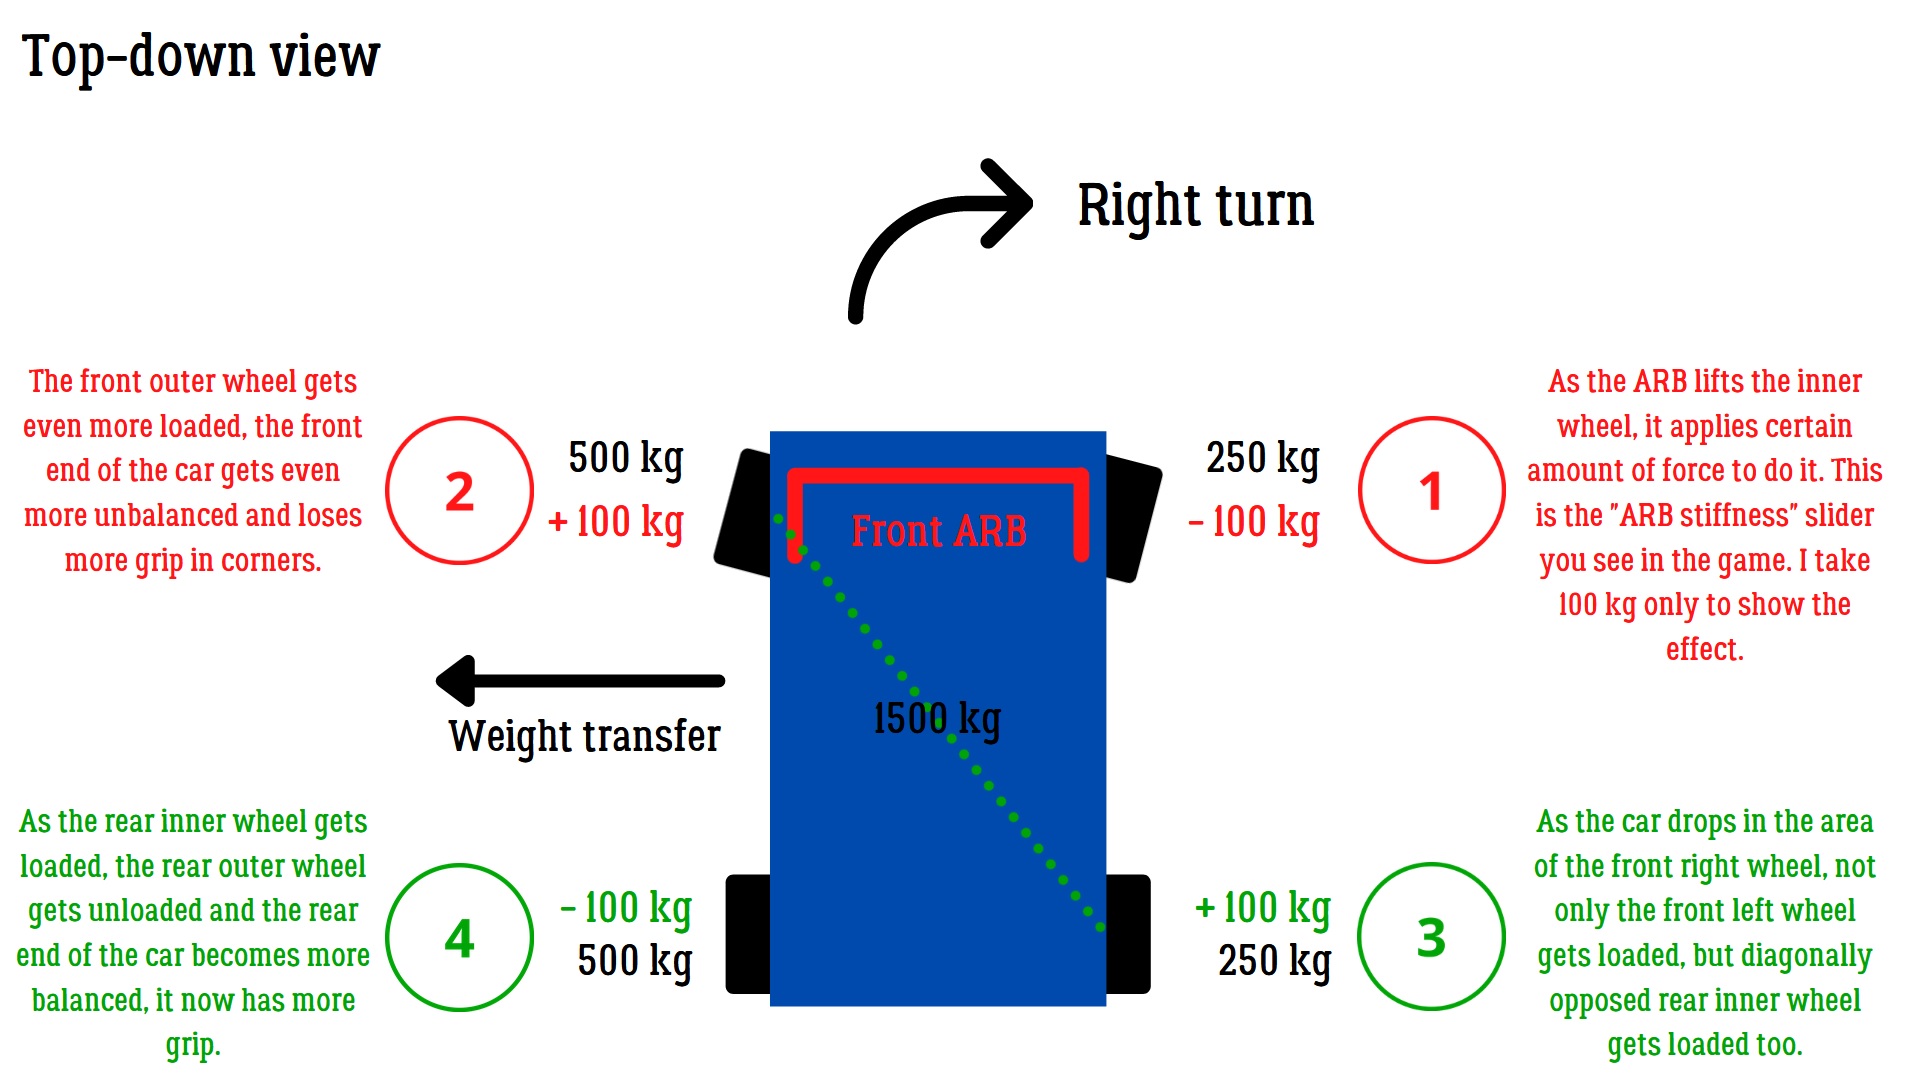
Anti-roll bars is a great setting that allows you to significantly change your car behaviour. Only Ultimate or Prototype stabilizers allow for tuning.

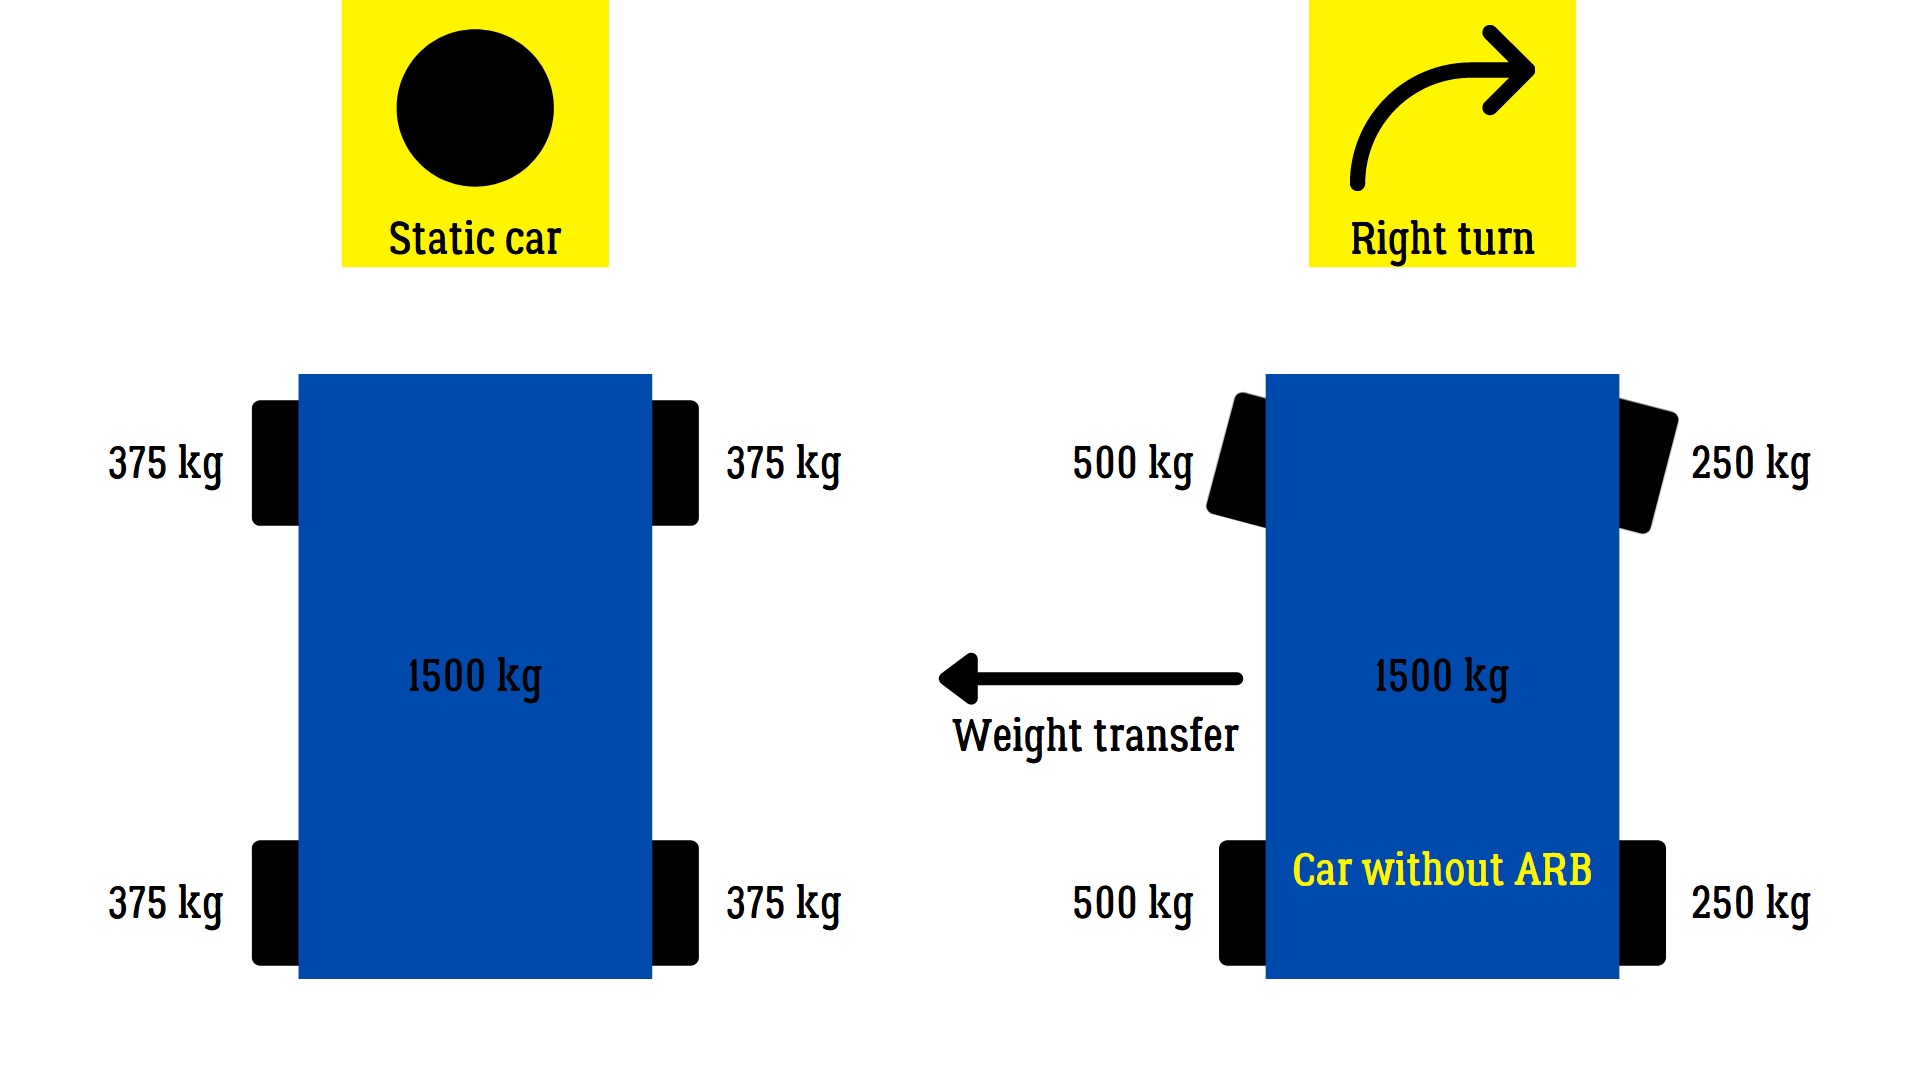
The anti-roll bar loads the outer wheel more and takes off load from the inner wheel, while forcing the latter up. This allows the car to roll less and reduces the grip on the end of the car where the ARB is installed. Meanwhile, the other end of the car becomes more balanced and starts to have more grip.

If you install a stiff ARB in front, you give more traction to the rear end. If you make your ARB in back stiffer than in front, you will give less traction to the rear. Fully stiff rear ARB and half-stiff front ARB can yield you good results.

Be careful though, as too stiff ARB can actually make your car flip over when using curbs/sidewalks or even entering a corner!


- 2.3 Brake system
Unlocks following tuning parameters: braking force and front brake balance.

Braking force should be maxed out, you can only lock wheels if the weight distribution is bad from the start or the brake bias is setup incorrectly. All cars in the game have ABS on by default.

Front brake balance determines how much of braking actually goes to front and rear.

More bias to the front:
  • More stable braking in a straight line
  • Worse braking while turning
  • More understeer at the corner entry (you feel like the car is resisting to corner, when you brake)

More bias to the rear:
  • Better braking while turning
  • Worse straight line braking (if heavily biased to rear)
  • More oversteer at corner entry

Brake bias will depend on weight distribution of the car.
If a car has 60/40 distrubtion, then it makes sense to use values around 45-50% on front. The car already has more weight on front, so even at 45%, front brakes will probably provide more stopping power.

On 50/50 car, you may want to use values higher than 50%, because there's a need to load the front end.

On a 40/60 car, typically an MR layout, it is better to use 40-50% values. This is done due to the fact that the rear axle bears the most load we'll need to take advantage of it during braking. Shifting too much weight in front would be a mistake as the rear end can in this case get destabilized.
- 2.4 Springs
This part unlocks Spring height and Spring stiffness settings.

Spring height
The spring height determines how high your car is.

Very low settings will not allow your suspension to work properly and you will lose control on weight transfers and when going over bumps.

Very high settings will make your center of gravity higher and increase the body roll of the car in the corner.

When adjusting spring height, you should lower your suspension but make sure that the suspension is still working.

Spring stiffness
The spring stiffness allows you to control how reactive the suspension will be.

Higher values (stiffer springs) mean very fast response but higher chance of losing the car at the same time, this is because you need to be much more precise with your inputs.
Lower values will make suspension’s response smoother and more forgiving.

As with ARBs, if your car flips over easily on curbs or on turn-in, soften your springs.
- 2.5 Dampers
This part unlocks Bump and Rebound settings.

Damper: slow bump and rebound
"Slow" defines weight transfers from driver's input. This includes braking, accelerating, making transitions and so on.

Bump determines how much resistance is applied on suspension’s compression.
Rebound determines how much resistance is applied on suspension’s decompression.

Higher values mean more resistance, slower reaction.
Lower values mean less resistance and faster reaction.

Extremely high values will not allow suspension to compress leading to a traction loss.
Extremely low values will provide the same effect as above, the car body will simply fall down, losing traction.

Generally, you want to find a sweet spot in which the car reacts fast enough to be controllable and smooth. Wrong setup will make it janky and unpredictable.

Damper: fast bump and rebound
The working principle is the same as for the "slow" parameters. The difference is that "fast" parameters work mainly for fast weight transfers, like hitting road bumps and other road imperfections.

Baseline damper setup

Let's take an example of front dampers.
Start with 10 000 for slow bump.
Make fast bump half of that, so 5 000.
Now make slow rebound twice the value of slow bump, so 20 000.
Finally, set fast rebound to the same value, as slow bump, 10 000.

For rear, this will be 8 000 / 4 000 / 16 000 / 8 000.

Don't be confused with lower values for fast damping, lower values mean FASTER response.

This is very basic approach, but it works on most cars for me.
3. BODY
The body settings affect your class rating, so bear that in mind.

Table of contents:
  • 3.1 Body swap
  • 3.2 Car weight
  • 3.3 Fuel tank
  • 3.4 Front aerodynamics
  • 3.5 Rear aerodynamics
- 3.1 Body swap
Body swap is only available for Streetcoins.

It reduces the weight of your car, increasing it's class rating (C) and overall rating (R).
It doesn't unlock any of the tuning settings.

I would advise to prioritize this part, because low weight is everything.
- 3.2 Car weight reduction
Car weight reduction unlocks following tuning settings:
  • Weight
  • Weight distribution in front
  • Center of mass height

Weight
This setting allows you not only to reduce the weight of the car further, increasing it's class rating, but also increase the weight of your car. This can be used as a Balance of Performance, to keep your car just under a certain class, while not sacrificing it's performance.

Weight distribution in front
This allows for a slight adjustment of weight distribution.

If you have MR or RR car, with more weight at the back, try to switch more weight to the front, otherwise it will understeer heavily.

If you have FR car, try to achieve a slightly heavier rear end for better launch and corner exits.

For an FF car, try to load the front for better traction and corner exits.

Center of mass height
Very easy setting, the lower the better.
- 3.3 Fuel tank
Fuel tank is a part that doesn't unlock any tuning option, but increases your fuel tank capacity.
This part however negatively affects your class rating, as it naturally increases the car's weight. In certain builds it can also be used as a Balance of Performance.

The Ultimate upgrade allows for 85 liters of fuel storage.

Use this part last, to achieve the desired rating and weight, otherwise leave it stock.
- 3.4 Front aerodynamics
Front aerodynamics allow for adjustment of Air resistance and Downforce settings.

Downforce
Front downforce is how much traction you gain with higher speed.
This allows your car to be more reactive and controllable on high speed.
This also helps at taking high speed turns.
Always max it out.

Air resistance
Always reduce it to have higher top speed and less drag.
- 3.5 Rear aerodynamics
This part unlocks rear Downforce setting.

Downforce
With higher downforce on the rear, your rear wheels will be more planted on high speed.

You want ideally to find a setting that allows your car to be stable during mid and high speed corners, but it should not be too high, otherwise your car will be understeering.

This setting is useful for all types of drivetrains.

⚠️ For my FWD cars with 67/37 weight distribution, I would still use rear aero that's superior to my front end aero.
4. TRANSMISSION
Transmission determines how efficient the power is transferred from engine to wheels.

Table of contents:
  • 4.1 Transmission swap
  • 4.2 Clutch
  • 4.3 Differential
  • 4.4 Gearbox
  • 4.5 Drive swap
- 4.1 Transmission swap
Transmission swap doesn't unlock any settings.
Bear in mind, that it's only available for Streetcoins.

A transmission swap can affect positively or negatively your class rating if it's lighter or heavier that the stock one.

Shifting speed is decreased by Clutch part. Shifting speed is only taken into account if you use automatic clutch. If you use manual clutch, this value is ignored, any gearbox will shift the fastest way.

T50S is the lightest gearbox in the game.
7 and 8 speed gearboxes from other cars allow for a better management of torque and power.
- 4.2 Clutch
Clutch unlocks Gear shifting speed tuning.

The Prototype part gives best result, the lowest shifting speed is best.

This is only true for automatic clutch, manual clutch is not affected by it. You can even run stock clutch without shifting speed penalty.
- 4.3 Differential
Differential determines how much power is shared between wheels of an axle.

Different differentials have their pros and cons and Ultimate doesn't necessarily mean better.

Stock
Not to be confused with open differential. Your car can come stock with a diff. lock of 10-20% already.

Open
Open differential allows both wheels to turn independently of each other. This will lower your car's overall speed in corners. It's main advantage is more durability (no information on how it will be used in game).

Welded
Welded differential is 100% link between wheels, they will always turn at the same speed.
Useful for drifting on underpowered cars, can also be very useful with the right build on FWD cars.

Viscous 60
Unlocks only Differential locking setting. Allows to lock your wheels from 0 to 100 and with values in between. Bear in mind that 100% of lock is not equal to locked diff (welded, spool).

Clutch 65

Unlocks only:
  • Lock, acceleration
  • Lock, coast
  • Preload

Lock acceleration determines how much of lock will be applied when you accelerate.
Lock coast determines how much of lock will be applied when you lift off the gas, braking included.
Preload is a value that determines the amount of torque, or the difference in torque between then wheels, needed to make the differential slip. When you accelerate in a straight line, the difference is minimal, hence the differential will be locked.

Clutch 45
A downgraded version of Ultimate Clutch 65 differential.

The adjustment range is limited. Use Ultimate for best results.
- 4.4 Gearbox
Gearbox allows for adjusting drives and transmission losses.

Final drive and gears
Final drive determines how short or long is your overall gear range.
Smaller value means longer gear and vice versa.

Each individual gear can be adjusted the same way. You should play around and look at the top speed and acceleration settings in order to get the best results. Alternatively, you can make a very short gearing for technical sections, like hairpins in western part of the map.

Use long gearing for higher top speed for races with a lot of straights.
Use short gearing for better acceleration on more technical circuits.

Important: when you change your tire profile/rim size, your real final drive will change, so adjust it accordingly.
Smaller wheel diameter - longer final drive (lower multiplier value).
Bigger wheel diameter - shorter final drive (higher multiplier value).

Video guide on how to adjust your gear ratios:


Transmission losses
The lower, the better.
- 4.5 Drive swap
Drive swap is only available for Streetcoins. It allows you to change the drivetrain of your car, changing it's behaviour completely.

Bear in mind, as with all swaps, this one affects both of your ratings, class (C) and overall (R).

RWD - Best cornering ability, easier drifting capabilities, can struggle on launch and lower speeds if overpowered. A universal soldier.
AWD - Best launch, best overall grip, best stability. Can suffer from understeer, as front wheels work too.
FWD - Doesn't have any obvious advantages over other drivetrains in racing application. However can be surprisingly competitive with right build and driving style. Very intuitive to use, hard to master.
5. ENGINE
The heart of your car.

Table of contents:
  • 5.1 Engine swap
  • 5.2 ECU
  • 5.3 Turbo kit
  • 5.4 Camshafts
  • 5.5 Intake manifold
  • 5.6 Fuel system
  • 5.7 Cylinder head
  • 5.8 Engine block
  • 5.9 Exhaust manifold
  • 5.10 Exhaust
- 5.1 Engine swap
Allows you to change your engine. Available only for Streetcoins.

Greatly affects your class rating (C) and overall rating (R).
While overall rating always increases with an engine swap, the class rating can actually go lower.

A swapped engine can perform worse than the stock one or even be heavier.

This is because your stock engine can be actually better than some of the available for swaps.
Can be useful as a Balance of Performance, to get in a class above or below.

Current meta builds use SR20 or K20 on lightweight cars, as these engine are quite competitive compared to most engines in game.
- 5.2 ECU
Unlocks Rev limiter and Turbo pressure settings.
Most of the time you can get away by using street or sport levels of ECU.

Rev limiter
This setting allows you to set your rev limiter higher. This can be useful to squeeze some extra speed on straights.

Turbo pressure
The bigger the better. Bear in mind, that increasing this setting affects your class rating and can potentially lead you to another class.

This setting will work if the car has a turbo installed from the car dealer, you don't need to install Turbo kit to tune it!
- 5.3 Turbo kit
Passively increases turbo pressure.

If a car already has a turbo, doesn't add or unlock anything in tuning menu.
If a car has naturally aspirated engine, adds turbo pressure setting in tuning menu, but doesn't unlock it (you need ECU for that).

Some NA engines can benefit from a small turbo as it improves the graph and makes it smoother overall.

Avoid high pressure values, the more pressure you have, the more time it will take for the car to get back to that pressure after each shift. You can observe this with the help of the turbo pressure HUD gauge you see in game.

Values below 0.6 provide better results. Values above 0.6 will make you lose torque and power.

This is the only engine part that increases weight.
- 5.4 Camshafts
Unlocks Torque at high RPM range setting.

From my experience this part is not crucial, its effect can be reproduced with other parts that give more advantages.
- 5.5 Intake manifold
Unlocks Peak RPM setting.
Allows you to adjust the peak RPM, improves your torque graph by "straightening it up".
Lowers the weight of your engine and targets torque at high RPM.
- 5.6 Fuel system
Provides torque on all ranges, increases peak RPM, cannot be adjusted.
Great part that should not be underrated.
- 5.7 Cylinder head
Unlocks Torque at medium setting. Heavily improves the shape of the torque graph and reduces weight. Passively increases peak RPM.
- 5.8 Engine block
Unlocks Torque at low setting.
Works great in pair with cylinder head, improves a lot the first half of the graph.
Reduces engine weight and increases peak RPM.
You would probably use it, but some low power builds can be better without it.
- 5.9 Exhaust manifold and exhaust
Great parts that work similarly.
They both evenly increase the torque graph thgoughout the whole range and they reduce the weight of the car.
They're not adjustable.
Additional information
Additional information will be published here, when the guide gets updated.

Thank you for your attention.

Update 13/09/2024: added more pictures to illustrate settings.
Update 14/09/2024: rework of Brake system section concerning brake bias.
Update 10/10/2024: adapted some phrases to current build of the game and added some minor info with recommendations.
Update 12/11/2024: added TL;DR section, which allows for faster setup. Completed many descriptions in the guide.
Update 10/01/2025: corrections in whole guide and removal of useless information.
Update 17/02/2025: added videos section with 5 videos covering all tuning parts.
Update 19/05/2025: corrections in whole guide and removal of useless information. Release of the Russian version of the guide.
38 Comments
Y@D@UNIL | PRODolbil 4 May @ 8:45am 
Почему оно все равно едет как утюг как бы я не настраивал даже ИИ подключил чуть лучше но все равно сносит ее
Kweeb 17 Apr @ 12:59pm 
I have. The car grips better with 1.7
<#0ef>Step  [author] 17 Apr @ 11:25am 
@Kweeb, I suggest you to simply try out 3 bar vs 2.2 or 2.5.
The game favors the least rolling resistance, which is achieved at 3 bar.
Kweeb 17 Apr @ 10:32am 
1.4 - 1.7 tire pressure is the best

Not 3...
Kweeb 17 Apr @ 10:31am 
Factors Affecting Grip and Recommended Pressure:
Terrain:
Rocky or rough terrain: Higher pressure (25-30 psi or 1.7-2.0 bar) is recommended to prevent punctures and rim damage.
Smooth surfaces or hardpack: Lower pressure (1.4-1.7 bar) can be beneficial for improved grip.
Deep sand or mud: Significantly lower pressure (15-20 psi or 1.0-1.4 bar) is needed for better traction.
Sand: 12-18 PSI is often recommended for sand due to the wider footprint it provides.
tenseiyabuki 16 Apr @ 3:07am 
Please post differential settings in 1.6.0
PLUTOSKI 13 Apr @ 1:14pm 
Holy fucking shit! You should be paid for this by CarX themselves.
Fujin_TK 26 Feb @ 11:43pm 
Damn, outside the evo, every other car I been tuning purely of vibes and performance lool
Kweeb 29 Dec, 2024 @ 6:40pm 
Separate the sections for grip and drift
Nozzakra 27 Dec, 2024 @ 10:09pm 
holy fk Amen