OCTOPATH TRAVELER II

OCTOPATH TRAVELER II

58 ratings
Gate to the Netherworld (Superboss Setup)
By Jedo
This is a breakdown of one of the many possible setups to defeat this game's Superboss.
2
2
   
Award
Favorite
Favorited
Unfavorite
Supplement to 100%
This is a supplementary guide to my other 100% Achievement guide here on Steam. https://sp.zhabite.com/sharedfiles/filedetails/?id=2938224161
EXP+JP Farm (Optional)
NOTE: If you plan to utilize the Fruits of Labor Support Skill, then it is a good idea to at least get enough JP to max out job skills learned and take advantage of the ++100 in P/E.Def from the skill. Like with most games, farming is not mandatory. All it gives you is more breathing room during your adventure. There's no shame in a bit of light grinding (unless your ancestors disapprove).

Step 1: Recruit Alrond
Costs 160k (Partitio) or 3x Octopuff Bowls (Ochette)
NOTE: You can guide him for free once Temenos is at least level 80.

Step 2: Equip JP, EXP, and Encounter-boosting Support Skills
  • Extra Experience
  • Hard Worker
  • Life in the Shadows
  • More Rare Monsters
  • Upgraded Accessories

Step 3: Equip JP, EXP, and Encounter-boosting Accessories
NOTE: If you need help finding some of the items mentioned here, check the Resource Spreadsheet linked on another guide here on Steam.
  • EXP/JP Augmentors
  • Brooch of Joy
  • Life in the Shadows
  • 3x Octopuff Pot
  • 2x Cait Powder

Step 4: Bring Ochette and 3-4 Merchants
  • Give Ochette A Step Ahead

Step 5: Search and capture Caits/Octopuffs
Search in level 45+ areas so you get the best possible version for exp gain reasons. Once you encounter one, follow these steps:
  1. On Ochette/your Hunter with A Step Ahead, Leghold Trap the Cait/Octopuff to prevent it from running away immediately. this gives you time to break them.
  2. With your Merchants, use the Hired Help (Mercenary) until the Cait/Octopuff is broken.
  3. Once broken, used Ochette/your Hunter's boosted Mercy Shot to get the Cait/Octopuff to critical HP. Capture the Cait/Octpuff and prepare extras as necessary to convert them into EXP food or Octopuff Bowls to re-recruit Alrond.
NOTE: Having one or both the Cait and Octopuff in Ochette's Provoke roster also serves the dual purpose of helping against the upcoming Superboss battle.

Step 6: Summon Alrond
Keep summoning him until you either (a) run out of summons and rolls or (b) roll x100 EXP. Once you run out of rolls or get your desired EXP roll, finish the battle to get your fat EXP multiplier. For more exp, eat Jewel Cakes (converted from Chubby Cait) to gain even more exp for 1 battle.
Rinse and repeat until you are satisfied.
Jobs, Skills, and Equipment
These equipment pieces are just suggestions. Some pieces are important (such as the right Axe for Armsmaster) so I will note them whenever appropriate. For the most part, I used them to just reach certain stats I was aiming for. NOTE: Ignore the 3rd Protective Necklace. I must have mixed footage of different setups while editing since I moved pieces around between attempts. Hitting close to the target stats is good enough.

Hikari
Secondary Job: Armsmaster
Support Skills: Summon Strength, Deal More Damage, Upgraded Accessories, Peak Performance
Notable Equipment: Lionheart's Axe (to use On the Hunt) and some +SP gear

Castti
Secondary Job: Conjurer (for HP Boost)
Support Skills: Fruits of Labor, Boost-Start, A Step Ahead, BP Regeneration
Notable Equipment: Lean towards +DEF/E.DEF since she's critical for sustained damage.

Partitio
Secondary Job: Thief
Support Skills: Fruits of Labor, Boost-Start, A Step Ahead, Upgraded Accessories
Notable Equipment: N/A

Agnea
Secondary Job: Cleric
Support Skills: Rise Again, The Show Goes On, Boost-Start, Upgraded Accessories
Notable Equipment: N/A

Osvald
Secondary Job: Apothecary
Support Skills: Upgraded Accessories, Fleetfoot, Fruits of Labor, Boost-Start
Notable Equipment: N/A

Throné
Secondary Job: Warrior (for HP Boost)
Support Skills: Summon Strength, Deal More Damage, Upgraded Accessories, Boost-Start
NOTE: I forgot to replace Boost-Start here.
Notable Equipment: Gear up for Speed, P.Atk, and Crit

Temenos
Secondary Job: Merchant
Support Skills: Rise Again, Fruits of Labor, Boost-Start, A Step Ahead
Notable Equipment: I used Alpione's Amulet to balance out party HP (ran out of HP Nuts).

Ochette
Secondary Job: Merchant
Support Skills: Upgraded Accessories, Fruits of Labor, Boost-Start, A Step Ahead
Notable Equipment: Lean towards +DEF/E.DEF since she's critical for sustained BREAK.
Stat Item Distribution (Nuts)
Use stat items only when you are satisfied with your equipment distribution for the battle. That way you can assess which characters are lacking in which stats post-equipment.
Phys. Atk. = Throné and Hikari Elem. Atk. = N/A (up to you - I didn't use Magic during this attempt) Speed = Throné (boost Aeber's Reckoning to the limit) Accuracy = Throné and Hikari Critical = Throné and Hikari

I even out HP and defenses so that I can achieve uniform healing (as much as I can at least). I gave SP guzzlers with low SP pools a little bit of extra Max SP just in case something goes wrong during SP-healing turns.
HP = even out party HP levels SP = A little bit to Throné and Hikari then doesn't matter Phys. Def.= even out party HP levels Elem. Def. = even out party HP levels Evasion = N/A
Beasts, Summons, and Learned Skills
Phase 2 Beasts
  • Ancient Frogking II - Sinking Ruins
  • Ocean Lizardking III - Roque Island: Anchorage (has synergy with Throné)
The 2 beasts above are heavily recommended to break Phase 2.
King Octopuff and Chubby Cait are nice to have but not necessary.
Island Frogking III isn't viable because Rainbow Shot can miss 6/7 times per summon.

Phase 1 Summons
  • Judge - Scales of Justice - can use 3-hit Staff/Light-based Magic
Location: Outside Timberain Courtroom

Phase 2 Followers
  • Elderly Man - Fatal Fang - 4-8 Hit Dagger + chance to Poison
Location: Clockbank Tavern 2nd Floor Balcony

-OR-
  • Merchant - Dumpling Maker's Skewer - 4-8 Hit Dagger
Location: Castle Ku: Entrance near save point

Summons will make more of a difference in Phase 2. The Judge in Phase 1 is nice to have but not necessary. You can only run 1 of the 2 Dagger followers mentioned above. I recommend the Elderly Man but the Merchant is cheaper and having just 1 of either one nearly guarantees you can break the boss every possible turn. NOTE: If you want to use another summon to go with Ochette during Phase 2, find any of the following skills (Thousand Blades, Spearfishing, or Squall of Arrows) for your other Phase 2 follower. The only time you can summon (with this setup) without wasting a turn on Ochette is after the other body parts are dead. As mentioned later again in this guide, that turn is a freebie.

Learned Skills
Since this approach uses Hikari for Phase 1, only these 2 skills are relevant:
  • Deep Analysis (Fully Boost = Reveals all Weaknesses)
Location: Scholar at Flamechurch: Cathedral
  • Wild Smash (Axe Multi-hit to help Break Omniscient Eye/Main Body)
Carpenter at Sai: Eastern District

If you are having trouble destroying the souls surrounding the boss, you can combine Deep Analysis with Sealticge's Seduction to fully analyze all enemies during Phase 1. This will greatly enhance your AoE On The Hunt and help you clean up the trash faster to focus on the eye.
Video & Explanation

Phase 1
  • Hikari - Damage
  • Castti - Sustain (Concoction)
  • Partitio - Sustain/Damage
  • Agnea - Buffs/Emergency Heals
Overarching Strategy:
Abuse Sealticge's Seduction to pummel everything with an AoE on the Hunt.

First Turn (A Step Ahead):
Castti - Medicinal Concoction - Pomegranate+Mighty+Strength+Diffusion
Partitio - Debuff with Hired Help -> Ruffian

Subsequent Turns:
Castti - Medicinal Concoction - Pomegranate x2+(Rotate between Mighty/Warding/Weeds OR Grape if needed)+Strength+Diffusion
Partitio - Hired Help -> Foreign Assassins to keep HP and SP topped up
Agnea - Use Sealticge's Seduction and Aelfric's Blessing on Hikari and then spread Aelfric's Blessing around as needed. Mix in Latent Power+Sacred Shield when available but prioritize keeping Hikari at his strongest.
Hikari - AoE On the Hunt or AoE Deep Analysis (if needed). Assist with breaks.

NOTE: The boss' first move aside from summoning is to cast heat (HP damage over time). Unless your attacks match the first wave of souls' weaknesses (they share Axe and Wind as a weakness), do not attack them needlessly outside of Hikari's On the Hunt, or else they will counter-attack.

Partitio can attack using Foreign Assassins freely after the first break because subsequent summons don't counterattack. (Boss Weakness: Dagger, Axe, Staff, Lightning, Light)

Also, don't waste turns to heal with Agnea unless necessary because Hired Help -> Foreign Assassins' Energy Thief is more than enough for consistent full healing.

Phase 2
  • Osvald - Sustain
  • Throné - Damage
  • Temenos- Buffs/Damage
  • Ochette - Buffs/Breaker

First Turn (A Step Ahead):
Ochette and Temenos' initial goal is to pass around Jam and Buffs during this initiative turn. We want to set up Osvald with Dohter's Charity as early as possible because he will be doing what Castti did (by spamming AoE Jams) for Team 1... minus the OP concoctions.

Subsequent Turns:
  • Pass Aelfric's Blessing around especially to Throné once she uses up her Latent Powers.
  • Refresh Dohter's Charity when necessary.
  • Ochette - Break the 2 bottom body parts using Ancient Frogking II (Hunter Multi-Provoke) so that Throné can annihilate the parts faster with Aeber's Reckoning (the top part is only weak to elements but it will go down after a few repetitions of Aeber)
Once the parts are down, the boss' shield points will go all the way down to 20. I suggest always prioritizing the break rather than aiming for the "best break timing". The boss adds some more shield points every turn and becomes stronger when alone so it's better to just keep it from attacking altogether.

**IMPORTANT** Between the turn you destroy all the body parts and the next turn is a freebie. The boss' shield can't be reduced during this time (14:26 in the video) until the next turn arrives so use this free time to Summon Elderly Man and/or Merchant for their single-target dagger-breaking abilities. These 2 Summons, combined with Ochette's Multi-Provoke (Ocean Lizardking III), guarantees the boss will stay broken as much as possible. The great thing about Ocean Lizardking III is that it synergizes with Throné by providing a speed buff that primes Aeber's Reckoning for the break.
  • (Boss Weakness: Spear, Dagger, Bow, ???)
Though the boss does not revive body parts, keep in mind that Phase 2 can change weaknesses if the battle goes on for too long. I don't have data on those weaknesses so just keep topping up your team with AoE jams to fully unload on the boss every turn. Good luck!
  • Ochette - Break and Debuff the boss with Summons.
  • Temenos - Rotate between buffing Aelfric's Blessing and Hired Help -> Foreign Assassins
  • Osvald - AoE Jam JAm jAM
  • Throné - Aeber's Reckoning until the end
29 Comments
Bender B Rodriguez 11 Jan @ 11:20am 
Took me about 5 tries but I finally got it! Phase 2 was rough especially when the boss kept removing all my buffs. I second the suggestion in this thread to have a chubby cait for Ochette. The buffs really saved me on my last attempt.
Nudge 5 Nov, 2024 @ 1:23am 
Thanks for making this guide! Phase 2 took a couple of attempts - but since phase 1 was so consistent it wasn't too bad.
For anyone looking for extra tips, I would highly recommend keeping a chubby cait and an octopuff in Ochette's roster (since you will most likely be grinding them anyway). If there are any moments where Ochette has high BP and can break Galdera with only a couple of the up-to 6 monsters she can summon in a turn when using Multi-provoke, spending the rest of those monsters on the cait and octopuff for the random buffs may save your attempt when Galdera tries to "revenge-kill" your party after he recovers from break. It's a relatively niche situation, but since you'll likely have these monsters in your party anyways it could be worth keeping in the back of your mind as it could give a little extra breathing room during a troublesome run (it saved my winning attempt!)
AnazelV 28 Sep, 2024 @ 8:15am 
I confirm this works. Got the achievement.
Thanks!
[IYF] MechMonkey2000 =^.^= 26 Oct, 2023 @ 5:07pm 
wait, how you can see what buff or nerf do you have right now?
Jedo  [author] 18 Sep, 2023 @ 2:31pm 
Thanks for the kind words!
shinryu495 18 Sep, 2023 @ 1:22pm 
Thanks for making the guide! Essentially did the same setup but with some less stats and with the average party level at mid 70's. No offense to the other galdera guide in the 100% achievement guide, but I thought this one was more informative, realistic, and well explained.
Jedo  [author] 15 Sep, 2023 @ 8:40pm 
Congrats friend!
GrimaceTheGrey 15 Sep, 2023 @ 8:26pm 
Fantastic guide. I did have to tweak two things to make it work for me.

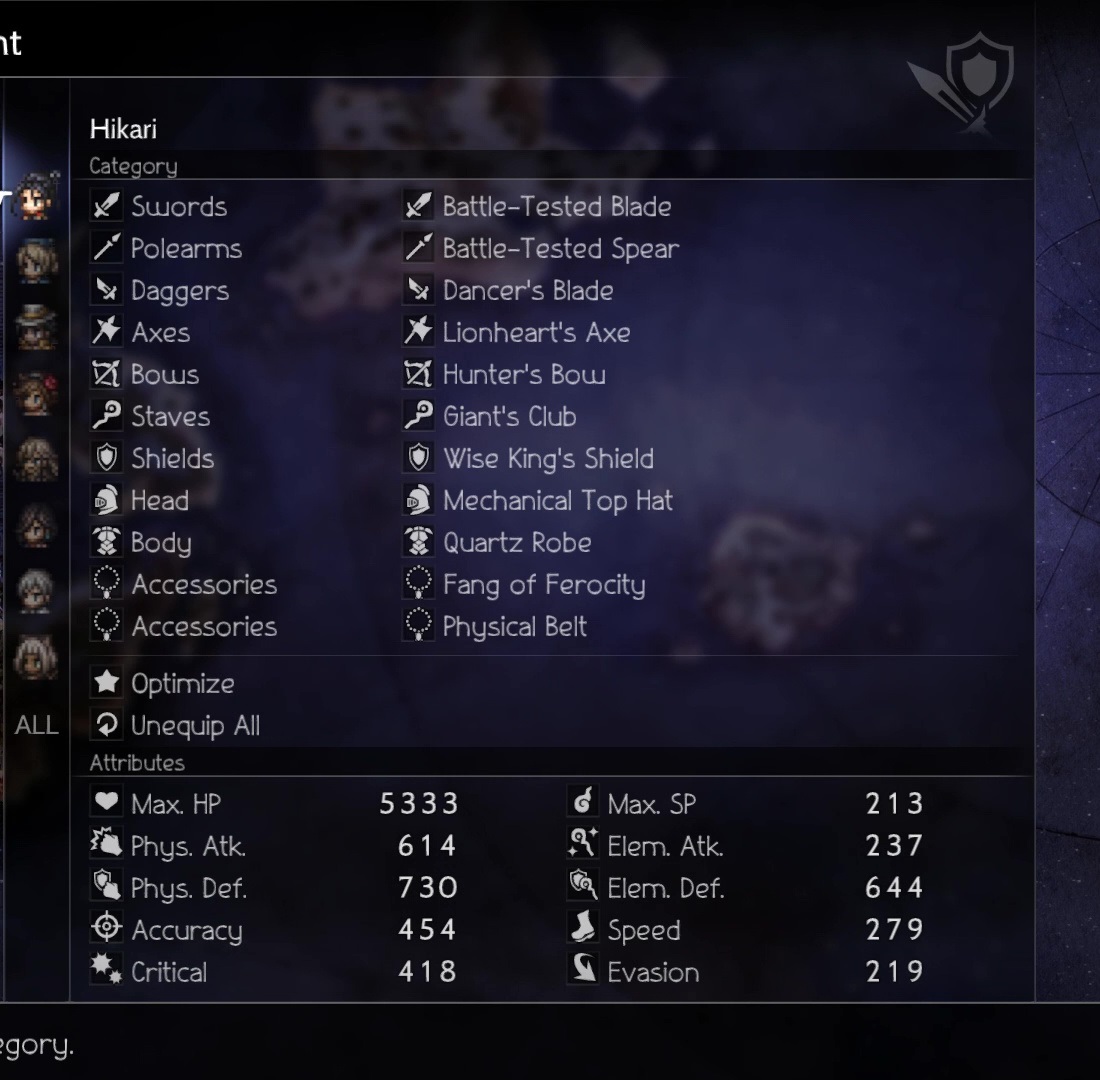
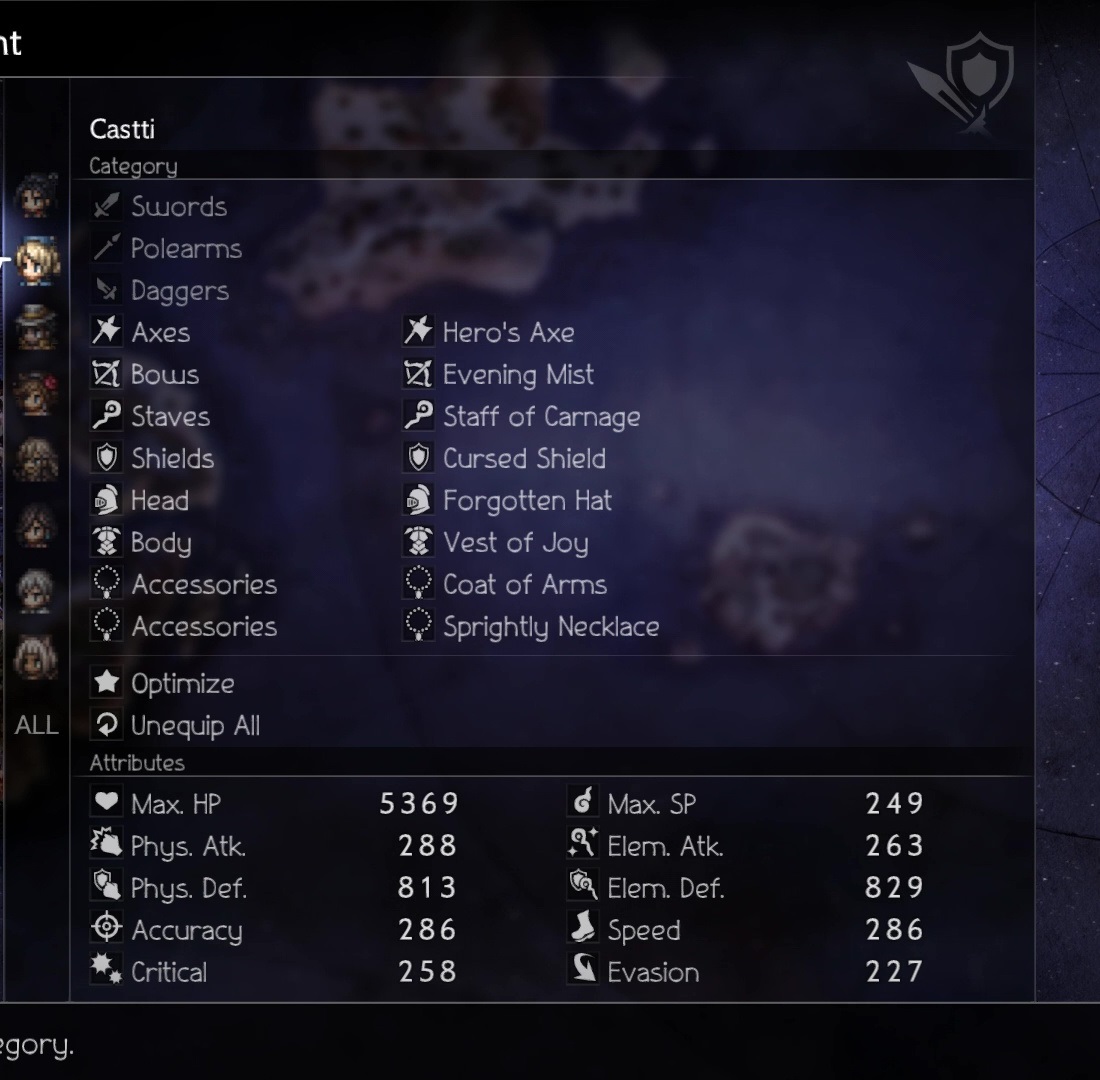
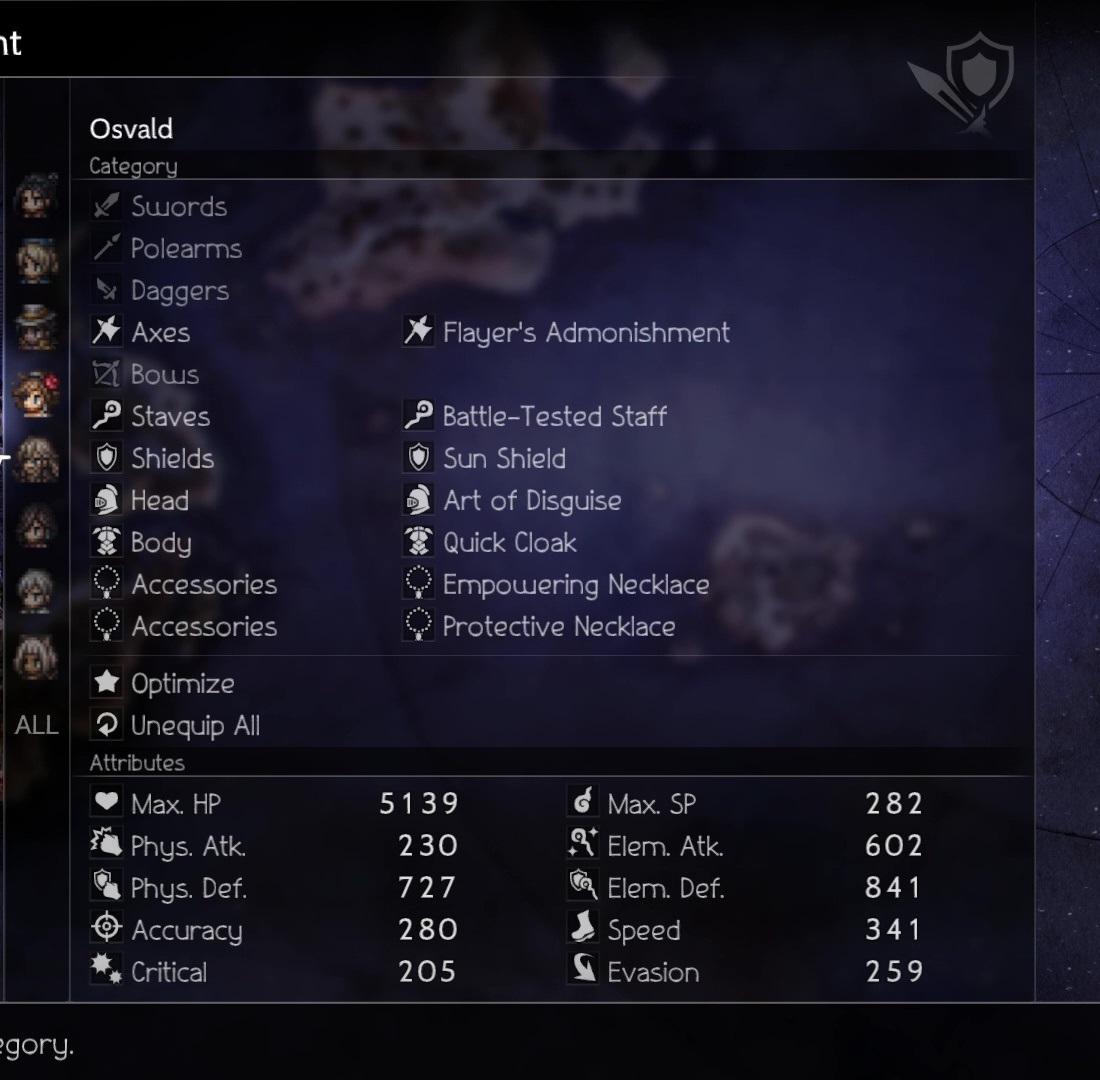
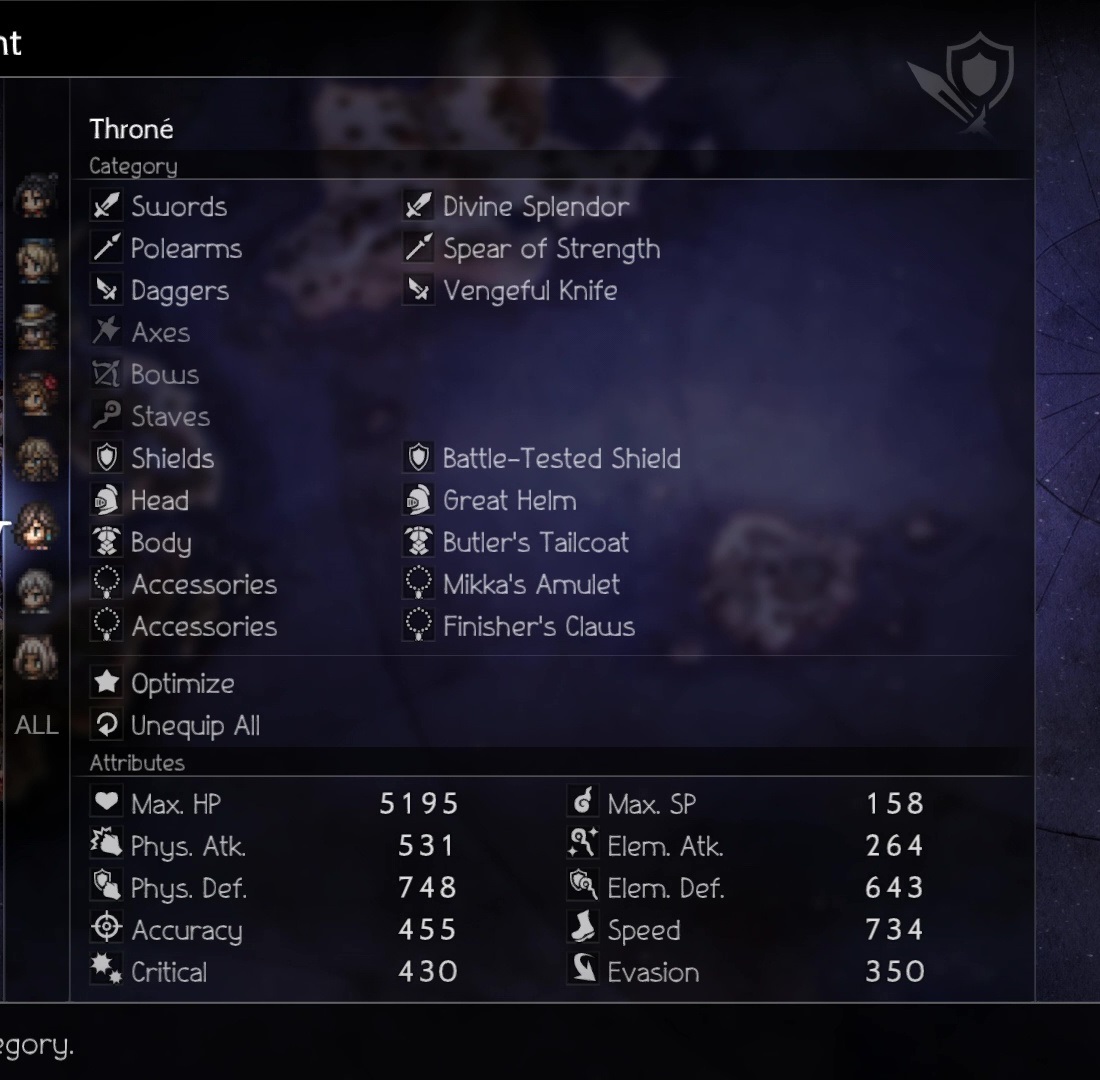
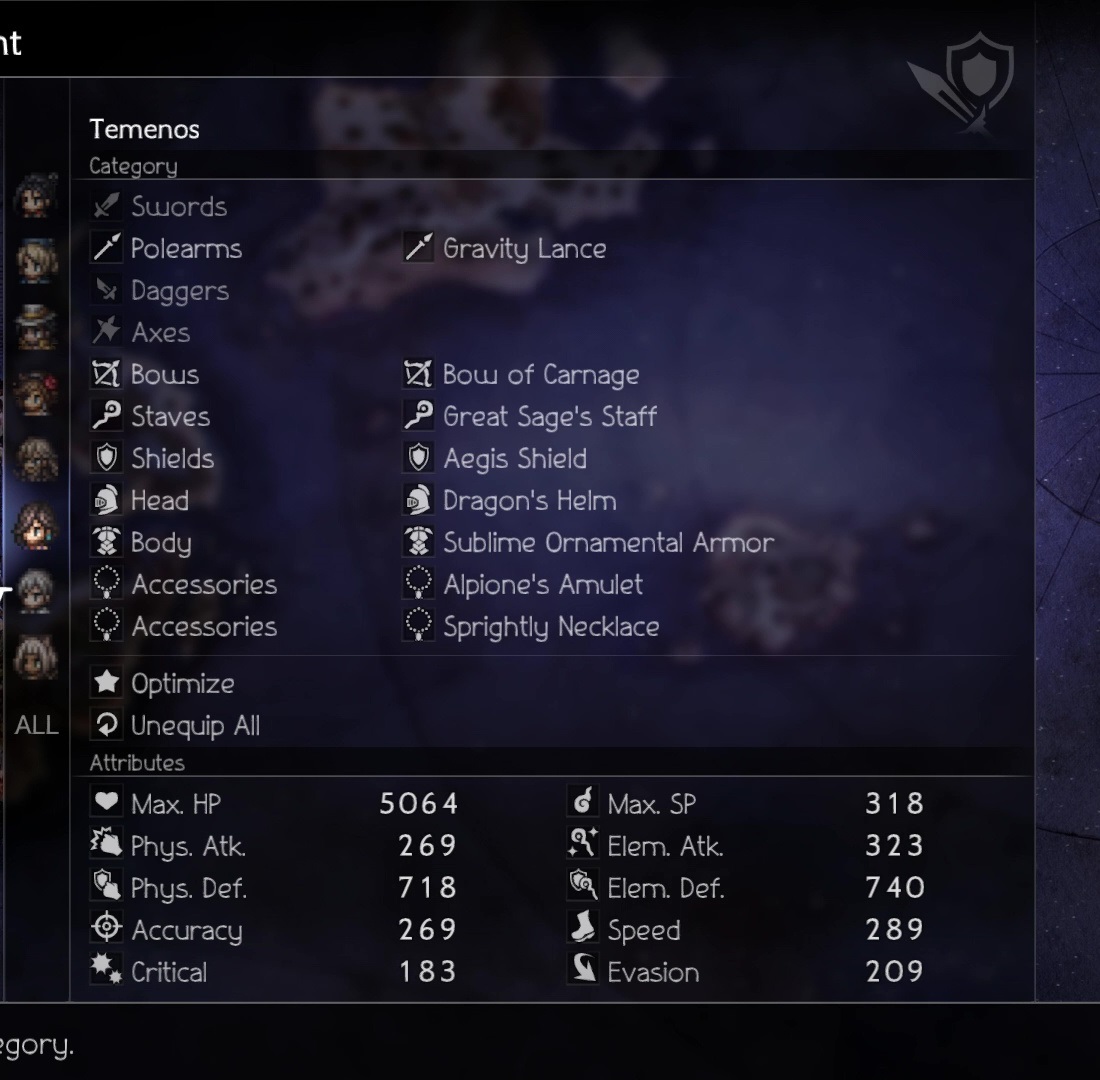
I swapped Osvaldo and Castii. I found I needed her muscle for the more difficult phase 2.

And I didn't run the shield of strength on Ochette. Because it makes her more likely to be targeted she just kept getting murdered.

But otherwise I followed the steps exactly for an easy win. Thanks much!:ot2_partitio:
Jedo  [author] 19 Jul, 2023 @ 9:26am 
@SlimyYoshi Congrats!! :squirtyay:
SlimyYoshi 19 Jul, 2023 @ 9:17am 
followed your guide and beat it on the third try. Struggled with phase 2 but got it done. Thank you very much!