Train Sim World® 2

Train Sim World® 2

Not enough ratings
The full manual for PZB,LZB and Sifa
By Brandschutztür
When i first wanted to try playing with all the german saftey systems i was getting emergency braked left and right and had to jump from forum to forum finding out just what i did wrong. If you feel the same then welcome to this guide where i will go over all the unanswered questions i had as a newbie and how to drive your train without worry of a random brake application.

This Guide will cover PZB,LZB as well as Sifa.
3
   
Award
Favorite
Favorited
Unfavorite
The Basics: How to get things set up
Breaker Switches

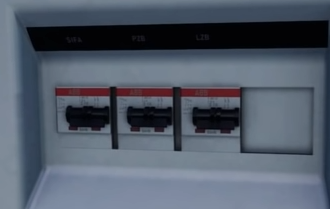
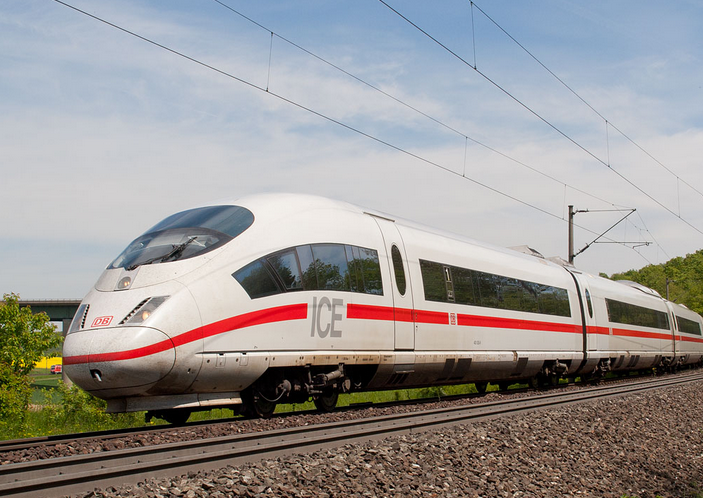
First things first we need to find and enable the switches for said systems. These are most commonly located in the engine room or electrical control panel just behind the drivers seat. There may be some exceptions like on the ICE3, where the switches are inside a fuse box to the lower right of the drivers seat.

When in doubt you can also use the hotkey Shift+Ctrl+Enter to enable them all from the drivers seat. Do keep in mind that enabling or restarting PZB while going faster than 45km/h will prompt an emergency brake so best do that at the start.


Zugart O/M/U

The Zugart in really simple terms is used to determine a trains maximum speed and braking time. In the real world railway workers have to calculate the weight of the train as well as it's effective braking force to get a certain value that specifies your trains Zugart. But thats worthy of another guide in and of itself, so to keep it simple:

  • Obere/Upper: Used on passenger trains or locomotive moves
  • Mittlere/Middle: Used for light-medium freight trains. Typically works for anything less than 1200t
  • Untere/Lower: Used for heavy freight
The PZB breaker will need to be restarted if you set a different Zugart while it is active

LZB: On or off?

LZB is Germanys cab signalling, allowing running speeds of over 160km/h. It's a mostly straight forward system that frees you from all the rules of PZB but if you don't feel like learning two systems at once I'd suggest running some medium speed passenger services, those can be safely ran without LZB.
Back to the drivers seat. What now?

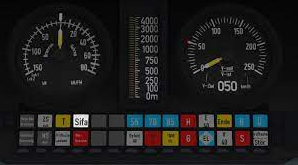
These right here underneath the speed display are your indicators. Just so you know what these indicators are that i will frequently mention in this guide. The most important ones also show up on your HUD

Begin the Journey
Proceed as normal and get going. Once the train has detected you're on the move the 85 and 70 will start alternating. This means you are in the restricted mode and are locked to 45km/h. IF and only if you can see the next signal is a full clear you may press the middle PZB button to lift this restriction.
Exiting restrictive is not possible with 1000 or 500hz active and releasing without making sure the next 500hz is off (i.e. the signal does not show red) is also grounds for an emergency brake.

Up to speed
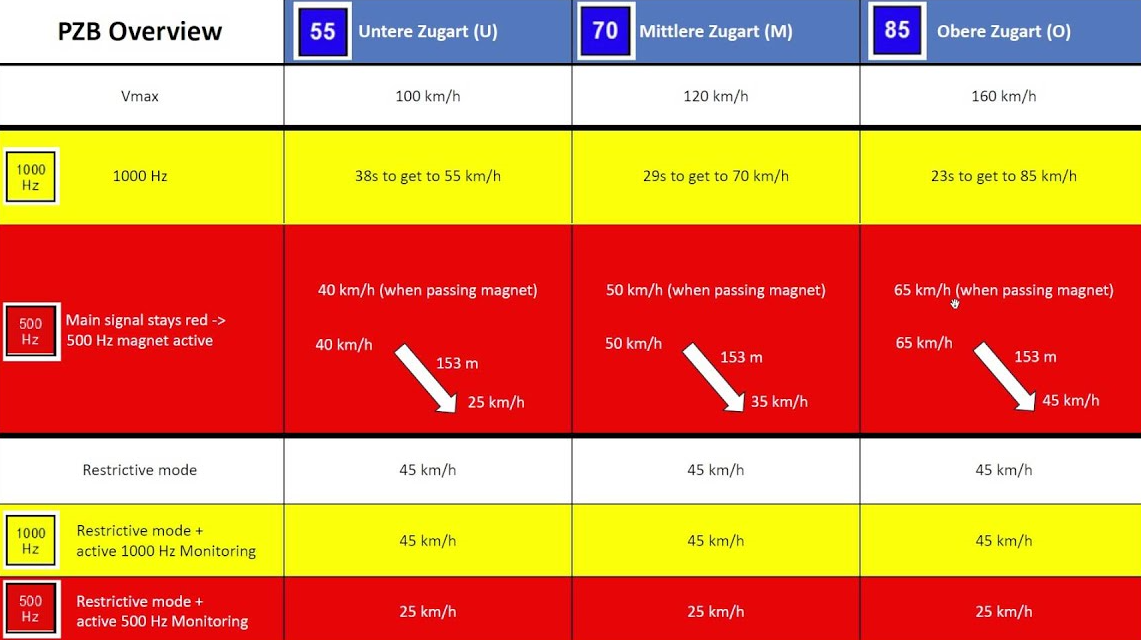
Following speed limits you should soon reach your routes high speed zone. The table below may look a little intimidating at first but lets go over it step by step.


This table is your cheat sheet of how fast you are allowed to go.
Focus on the first row for now.
Let's assume you are running a passenger service and are using Zugart O. From the rightmost column we can read that your maximum permitted speed is 165km/h. Although i would suggest staying 160, as if you go over 165 even by 1km/h the train will apply emergency brakes.
This application will have a red G and as such won't force you to a grinding halt, only below the permitted speed plus the time it takes for the brake pipe to recharge.

To understand the rest we will need a quick crash course on the signals.
Signals
Types of signals


As with other countries germany typically has its signals split into main and distant signals.

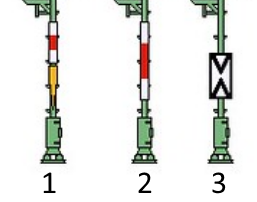
In example 2 we can see a main signal with the red and white board attached to the pole. This is the signal that tells you when to go or stop.

Example 3 has the Ne2 sign attached. This identifies a distant signal, which tells you what the next main signal is displaying. These also have a diagonal light pattern to better identify them at night.

Warning! If you see one of these Ne2 signs without a signal attached, this must be assumed as a caution aspect and be acknowledged with the left button.

Example 1 combines these two into one.
Theres also a yellow and white variant but in TSW2 this acts the same as a main signal

Reading the lights
There is already a great steam guide touching up on the subject and as this guide centers around the PZB system i'll give a brief rundown of the most common signal aspects and for a more detailed explanation check out the linked guide.
https://sp.zhabite.com/sharedfiles/filedetails/?id=1841393921

  • Green is go
  • Yellow indicates the next signal is red. Must be acknowledged.
  • Green and yellow means you must slow down for the next signal. By default this is 40Km/h unless specified otherwise. The distant signal of this aspect must be acknowledged but not the main signal.
  • Red is not to be passed not even by a centimeter unless given permission by the dispatcher.
  • If there is additionally a white light that means the distance to the next signal is unusually short.
  • If there's just one white light with nothing else, that signal has been intentionally disabled for you, you may safely ignore it.

If a signal has neither a colored board or an NE2 sign, that's a repeater. It mirrors what the next signal displays and is typically built in locations with poor visibility. Officially you don't have to acknowledge these in TSW since they rarely ever have a magnet to them but if you want to have that extra bit of realism, do acknowledge each non-green repeater signal like the real drivers do.

On a side note..
Upcoming speed limits; which do i acknowledge?
This is often linked to your Zugart mode. There anything close to your 1000hz speed must be acknowledged, such as 90 or 80 when driving on O. Though these can be ignored if you're already below that upcoming limit. Exception applies to very low limits such as 40 must always be acknowledged.
If you're unsure about a sign check if it has a magnet next to it. If it does chances are likely it expects something from you.
Braking the right way
And here we are. The part where emergency brakes can happen left and right.
So now that we know how to read the signals how do we actually respond to them?
As you know the PZB system features 3 buttons, as seen in the guide thumbnail. From left to right they are Override, Release and Acknowledge. I strongly recommend using hotkeys to control these. They are set by default on delete, end and page down.
For this section you wanna mainly focus on your acknowledge key.

Yellow inbound
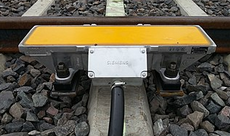
As you may have noticed the german signals have these little boxes lying next to the track.
These are the magnets Iv'e been mentioning and once a signal turns yellow or red they activate for your train to resonate with. Once the lead axle of your train has passed the magnet next to the yellow signal you have to acknowledge it by pressing and releasing the corresponding button. Note that it only registers once released again so don't hold it the entire time.
You will know it has worked if the 1000hz indicator lights up.
(While TSW does not simulate minor faults, real drivers typically press the acknowledge button twice just to make sure it properly registered, do with that information as you will)

1000hz active
Remember the table we went over earlier? Let's refer back to it now. Same process as before, we are running on Zugart O and just got a 1000hz activation. So we can read from this table that we have 23 seconds to slow down to 85km/h. You can also tell this by the flashing 85 indicator.
(Note that the flashing 85 is whats telling you to stay at 80, the 1000hz merely acts as a lock. So make sure to press release if you see it flashing and the signals ahead are clear again)
But be careful. The 23 seconds can be misleading as the train will detect it if you are braking too slowly, which can happen faster than you think when going high speeds.
Because of that, do make sure to start braking as soon as you see the yellow on approach to have that extra bit of time. And remember: Better to brake a little too hard than too little

Red signal approach
Next up is the 500hz magnet, typically located a few hundred meters before a signal. Refer to the table again. Here we can see that if we do not pass this magnet at 65 or lower we will get braked out. So if you got the 1000hz from a fully yellow signal be sure to get down to 500hz speeds before the red signal approach. Once the 1000hz indicator goes out there is a short deadzone until the 500hz. That's your last chance to slow it down to the right speed. If the signal is still red, the 500hz will light up and you will have to start braking immediately. Once again you can read off the table beneath what speeds the 500hz will (generally) leave you alone and let you slowly approach the red.
Congratulations you have properly braked your train without any emergency applications.


The Signal is green again
Heres an important thing you should know:
While under 1000 or 500Hz coming to a stop or driving below 10Km/h will apply restrictive mode. You can tell by the alternating 70 & 85. Normally under 1000 or no Hz, this caps you at 45km/h but under the influence of a 500hz magnet you should keep it down to 20. Exceeding 25 will have you stopped.
Once you have no more hertz indicators you can press the release button to lift restrictive and return to schedule. Still do remember that you may get another caution aspect soon.

If you were on approach for a red but it turned green by the time you got there, you can also press release if you got clear visual on the signal with no 1000hz indicators active. As mentioned earlier, releasing without checking for clear will get you shot down by the 500hz magnet.

Bypassing a red signal
A red signal has an active 2000hz magnet that will always stop your train. However if you are given permission to bypass this signal by the dispatcher you may use the PZB override button to ignore the 2000hz magent. Hold this button until your front axle has completely passed the red signal at which point the "Befehl 40" indicator will(or should) shortly light up, by itself the indicator merely means bypassing only works when <40kmh. On some trains it doesn't seem to work, on others it does. Thanks dovetail

Shunting and Replacement Signals
A 2000Hz Magnet will always be active if there's a red light anywhere on the signal, even if it's displaying a permissive aspect. The following aspects will need usage of PZB Override:
-Sh1: Two diagonal white lights as seen on the dwarf signals. Whenever you are not receiving movement authority by main signals and instead over Sh1, you are shunting. This would officially restrict you to 25km/h and you may turn off PZB for the duration of shunting.
-Zs1: Three white lights in an A-Shape or one flashing white light. Override and proceed at line speed as long as the signal is not capable of displaying a distant aspect, otherwise drive at max 40km/h.
-Zs7: Three yellow lights in a V-Shape. Drive on sight until the next signal, then drive the length of your train past the next signal, however 400m minimum. Adjust speed as per conditions. i.e. 40 for clear weather, 15 for night or unsightly weather, 5 for both.

The latter two are barely ever seen in TSW but if you're planning on playing other more in depth simulators then here you go.
I got a Zwangsbremsung what did i do wrong?
Zwangsbremsung with the letter G
G stands for Geschwindigkeitsüberschreitung/Speeding. This is usually triggered by either exceeding your designated Zugart limit or if running with LZB you failed to slow down with the Vsoll arrow.

Zwangsbremsung with the letter S
S stands for Selbstauslösung or self trigger. This can happen through various means but most commonly by failing to acknowledge a signal/sign or getting caught by a speed trap. Speed traps can be identified by the group of closely packed magnets somewhere along the track. If they shoot you down you were either going too fast or missed an upcoming limit change.
On locomotives with an MFA (screen) you can read up on what it was that caused the application. If it reads "WT nicht rechtzeitig betätigt" you failed to acknowledge something. This also handily displays if you are currently in a restricted mode and how much you're allowed to go.

Recovering from an emergency stop
Once your train has come to a complete stop you may recover the train by pressing the release button to drop the emergency brakes. Then wait for a couple of seconds for your brake pipe to recharge and you are good to go again. Just don't forget about any speed restrictions the Zwangsbremsung put on you.
PZB Conclusion: When to use each button
Acknowledge when:
  • Passing a full yellow or yellow/green distant signal
  • Passing triangle shaped signs warning you of upcoming speed limits close or under your 1000hz speed limit (refer to signals guide for more detail)
  • Passing a signal-less distant sign (Ne2)
  • Optional for the realism: When passing a repeater with a non-green aspect

Release when:
  • The next signal is a clear and you want to lift the speed restrictions
  • The LZB Ende indicator starts flashing (more on that below)

Override when:
  • Given permission to pass a red signal. Hold all the way until the lead axle has fully passed the signal
LZB
Once you've figured out PZB and want to start piloting some of those high speed engines LZB will be your best friend. If you have driven the french or british high speed rails before you will know about the built in speed limitor. Same principle here.


These 3 Icons represent the LZB system.
The B stands for Bereit/Ready, indicating it is active and ready to go

Entering LZB
If you see a wire running in the center of the rails thats how you know you've entered the LZB zone.
Secondly you will hear an audible buzzer sound and the Ü symbol lighting up standing for Übertragung/Transmission. The LZB is now in effect.

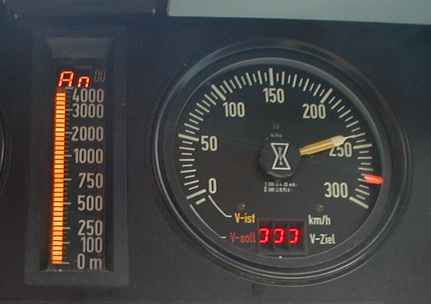
While this is active PZB is entirely disabled and you do not have to pay attention to restrictions or signals for the time being. Instead the LZB will be your helper in driving at the right speed. On your UI this will appear as a blue needle and on the analogue screen as a red "Vsoll" needle pointing at the best current speed. Use this in combination with the AFB, that automatically locks onto the Vsoll needle, and you essentially got your train running on autopilot.


Adhering the speed limits
Once you need to slow down the yellow bar in the center of your speed gauges will begin counting down the distance. Thats distance until you need to be the speed of the red numbers underneath your speed display. The LZB helps you in this field as well. First the G indicator will light up, informing you the train will have to start slowing down in a few seconds. Secondly the Vsoll needle will start ticking down for the optimal brake path. On trains with AFB this is all autopilot but on trains without it make sure to follow that needle closely. The G will start flashing if it does not like your rate of slowing down.

Exiting LZB

Once the LZB route comes to an end the Ende indicator will start flashing and you will get another buzzer sound. Confirm this by pressing the PZB release button and it will turn into a solid light. The second buzzer confirms you've exited the LZB zone and are back on PZB restrictions.
Do note that on some trains like the ICE3 you may need to restart the AFB system to regain power on the throttle lever. This is due to train drivers often leaving the AFB at maximum throughout LZB routes and this serves as a reminder to put it back down.
Conclusion: LZB+Sifa
B Indicator=LZB ready
Ü Indicator= LZB active
PZB is disabled with the Ü indicator

While in LZB simply follow the blue needle on the speed UI, upcoming speed changes are additonally marked with the speed and distance on UI and analog display
Once Ende starts flashing confirm it using the release PZB button
Do note the AFB (cruise) probably has to be reset when exiting LZB for you to apply power again

Sifa
The german dead mans pedal system. Will need to be reset every 30 seconds and will first remind you visually, then via sound and finally with a nice emergency brake. Unlike with some other locomotives this does not reset itself when interacting with other controls so it can feel quite needy at times. I'd recommend setting up an easily accessible hotkey such as the spacebar.
One exception with this safety feature is that unlike with the PZB you can cancel the brake application by resetting the pedal. ..assuming your brake pipe can recharge fast enough.
End
Hope this guide helped in understanding the complicated mess that is the Indusi PZB 90.

Remember: its always better to brake off a little too hard than too little, if you're on the fence about acknowledging something, just do it, no penalty to it. And have that cheat sheet ready.
Start ideally with the modern commuters and work your way up to the high speed lines. Practise makes perfect.

Good luck, engineer. May you drive that ICE with confidence.
6 Comments
Gongadze Gang 18 Mar @ 10:07pm 
Great guide, thank you!
If it's not so hard for you, can write on which routes in game are using LZB? Was looking into it, but could find only info about SKA, HMA and RT, which is embarassingly small count
Riley 24 Jan @ 2:01pm 
Thank you so much, Works perfect now
BÄNDE AN DIE HÄNDE [GER] 14 Dec, 2024 @ 1:04am 
Ey ich kanns leider nich liken weil ich das Spiel nur auf Epic besitze, aber dieser Artikel hat mir so fett weitergeholfen was die PZB angeht, einfach danke bro
gilglu 20 May, 2023 @ 2:30pm 
Thanks!
Brandschutztür  [author] 20 May, 2023 @ 2:00pm 
Excuse the late response but the reason you are getting braked off could be because you did not properly acknowledge the signal. Once the front axle of your train has passed the magnet you have 4 seconds to press and release the ball shaped acknowledge button. Once the 1000hz pops up thats when you know it worked. I've also updated the guide with some more details about proper operation, including the "what did i do wrong?" section.
gilglu 2 Apr, 2023 @ 5:29am 
For some reason I get emergency brakes at yellow signals even when following the guide.