Bad North

Bad North

198 ratings
How to Micro Your Way to Victory
By Samoth
From the obvious to the more secretive aspects of beating Bad North on Very Hard (or below), i.e. how to manage your troops/coins/space/items/etc.
4
8
2
   
Award
Favorite
Favorited
Unfavorite
Introduction

24 / 04 / 2022: Not the first edit, but first time listing the changes here. A few minor corrections for clarity's sake ("dual" not "double" wielders, my bad). Added some info some commenters pointed out.

If you found something of value in this guide, please like and favorite it!


This guide will tackle how to better use skills, items, units and enemies, but a basic knowledge of
how these work is expected. The knowledge in this guide helped me get through Very Hard and unlock all achievements, and hopefully you'll have learned something new by the end of it!

If you found something helpful, if you'd like to know more about something, or if you have any piece of advice to share, feel free to leave a comment!

What you need to know about the game

You've played the game, or at least seen some gameplay. It's like an RTS, but you don't get to produce units. You choose from what's available, and then you're on your own to fend off waves of invaders. That's why the focus of this guide will be on Economy, or what you do before getting into a level, and the meat and potatoes of this game, Micro (management). In both sections you'll find tips to improve your performance and git gud. Very Hard, the hardest difficulty, shouldn't be actually that hard, if RNG doesn't get in our way.

We'll aim at doing a succesful run, one in which:
-We lose no commanders*
-We protect all houses*
-We don't skip any islands
-We collect 430-470 coins
-We don't flee from any islands
-We make the most out of our resources

See the screenshot below for an example of a succesful run.


To make this possible, we need to enable "Restart" when we start the run. That way, we can abort a battle if it's not going well, especially if we lose a commander, and with that we can try to get the most of our every move in the campaign. If you don't like that, the tips in the sections below will still help you to make the most out of your run, especially the Micro section.

*Except maybe on the last island, where everything is allowed so long as we make it through, but that's up to you.


Economy
THE LAST STAND, OUR GOAL. Bad North is comparable to games like FTL and Risk of Rain in that, from the get go, you're already preparing for the final confrontation, and all of your decision impact your whole campaign. Sure, not collecting all the coins from a small island might not make a huge difference in the short term, but a few more battles down the line, you'll wish you had fought on every single island. The more coins, the more upgraded yours troops are, and the better your chances on every battle, particularly on the last one. With that in mind, let's try to get all the coins possible.

GREED AND THE SEA. Playing through a campaign on any difficult, you can get anywhere from 440 to 470 coins in total. To get all the coins, we need to (a) visit all the islands, (b) not flee from any island and (c) defend all houses.This is why resetting is allowed, as long as you can stand to replay islands. We'll also need to try to defend as many islands with the least number of commanders we can, otherwise the "mist" will prevent us from visiting all islands.

The "mist" advances every turn, consuming islands in its wake. It might cover one, two or even three islands on a single turn (three being more common on Very Hard, I think). At the beginning, we'll probably need to spend our coins wisely and try to beat islands with one or two commanders, even when we have four available. You'll feel a difficulty spike trying to do so, but I'll make our lives so much easier, and we won't have to worry that much down the line. Remember, we do it for the coins, and this might be the hardest the game will get if we do things correctly, having th ecoins to pay for the upgrades might make the latter part of the game easier if we're successful!


About the Philosopher's Stone This item gives you a coin every time the commander that has this item equipped is deployed. If you upgrade it, you get two coins, and you can upgrade it again for three coins. If you get this early, or even as a starting item, it can make help you get those important upgrades quickly.

Notice that the Philosopher's Stone needs 5 uses to break even on the first upgrade, and 9 on the second, so it might be wise not to upgrade it if you're at the end of your run. If you're ahead of the "wave" and can spare a few turns, you can advance to the next turn to use your unit with the P.S. again for extra gains.

HOW TO SPEND YOUR HARD-EARNED MONEY. I won't be too specific. You'll have to prioritize what you need right now to beat islands and not fall behind the "mist" in order to maximize profits, but also think about what your composition for the last island will be. Invest on the former in the early game, investing a bit on the Philosopher's Stone whenever possible, but save some money for the latter.

Consider fully upgrading some units and leaving some units as militia or as lvl 1 pikes or infantry. We're trying to get all the money we can so that we can spend it at the right moment to deal with a difficult island, and some units might be useful for a single island or just as a decoy.

For the early game, I try to get some level 3 archers quickly, but that's preference. I think pikes and infantry are useful even at level 1. If you use the tactics described in the Micro section, I think you'll agree. Remember that even militia are useful, and that any unit can be used as a decoy to support another unit, particularly archers. The second priority is skills, as they allow units to deal with their even their hard-counters with little to no losses.

Here are what I consider the better options for the end game:

-Archers. Particularly level 3 archers. Level 1 archers suck. You can beat the game with just archers if you get the right traits and items.

-Skills. Even lvl 1 infantry can beat some Brutes using Plunge. Even low-level skills are extremely effective on high-level units. You can use these as get-out-of-jail-free cards (more on that in Micro)

-Items, particularly the Hammer, but also the Bomb and the Mines.

I usually go into the last fight with two archer units, one infantry and one pikes unit, but you can even do without the pikes if you time your arrow volleys correctly. Try to decide which units you'd like to use and fully upgrade those. Remember, you can only bring four units! Upgrading other units won't help you at all on the last island.


Micro 1 - General Advice
I'll write this section as tips until I get around to re-writing this.

Take a deep breath and think. Like FTL, Dungeon of of the Endless and other strategy games, you should pause every time you need to think until it feels like turn-based strategy. Try to spot boats as soon as they spawn, slow down time with spacebar or by selecting a squad so that you can think and device strategies to fend off the hordes of enemies you'll be facing.

Skills. They're situational, complicated, and hard to use, but they're also life-saving. Very often you can delete hard counters with the right skill. A Pike charge can deal with an archer wave, even if the pikes and the skill are level 1, as long as the positioning and timing are correct. Items like the bomb, mines and the sledgehammers fill the same role, though except for the hammer, they don't replenish. Basically, even if the enemy counters your units, or if you get two boats on two different sides of an island, and have to fend off, say, archers, with a pikes unit, their skill will allow you to, and that might be all you need to beat an island.

Commanders. All units have one Commander. They are always infantry units, which, if things get messy, can be useful if just one or two infantry managed to sneak past your defences and you have to deal with them with a pikes or archer unit. They can push back enemies quite a bit, and are invulnerable until all other soldiers in the formation are killed. This is particularly useful in case you manage to separate your commander from the rest of the unit, as you can make it fight without fear of it dying. In a desperate situation, if your Commander has War Horn equipped, you can call extra units just as your Commander is about to die. Since you've added units to the squad, they won't, and you can even get your Commander to kill a few units for free.


A commander, separated from the rest of the squad. I can move those archers to fire from the side while keeping the Brutes distracted hitting the Commander, who'll never die, because the archers are not being attacked. This happened due to sheer luck, but if it does happen, you have to find ways to profit from it! If you want to try to pull this off, your commander has to wander off on its own, or they have to be stunned. Then you move that unit back, and when the commander stands up, you can task the unit with moving to the tile where you want to fight and then back. That way, the squad never gets in danger, but your Commander still fights. Useful when you're on the last wave, with few soldiers left, and every little thing helps!

Healing. Healing is your friend. You can use a unit to bait archers or delay a bigger melee army until another unit arrives, and then heal the poor bait unit. The only requirement is the commander must be alive. Usually healing lasts takes roughly one-and-a-half waves, pushing two. If you can fend off waves with archers or pikes, militia and infantry can rest and heal up. The opposite is a bit harder, which is why we have to be careful about such units.


Boats. Small boats are easy to push units off of. Medium-sized ans specially large boats have sterns at the back, which grant units on top a lot of pushback resistance. Brutes and Brute Archers are immune to being pushed off on any boat. Except for archers, units can't deal damage to enemies on boats (though I haven't tested using skills or items yet).

When boats come ashore, they may push back or even stun your units if they are on the tile where the boat landed. Stunned units are easy prey for any enemy, won't fight back and can't defend themselves. If your pikes are pushed back even a little, there's a good chance their formation brakes, in which case they become vulnerable to any melee attack, rendering them useless. What's tricky is that very often, boats land in-between two tiles, and pikes in particular often have to be very close to the landing tile, otherwise melee units just move past them. Bigger boats apply more pushback/stun, and I think (I haven't tested it) higher level units have more pushback/stun resistance, at least against medium ships when they land close but not quite on the same tile.

Getting the most out of your units. One time, I was repeatedly losing on the same island. I turned one of my militia into level 1 archers, I played again, and even though the archers hardly got any kills, but the enemy infantry (the ones with shields) got beat up by mine. Small things like shooting arrows at shielded enemies while charging with infantry, using infantry to block archers' arrows while attacking with pikes or your own archers, stunning Brutes with archers and then finishing them off with infantry or pikes, letting some enemies wander off to burn buildings (not completely) while hunting down some others with infantry, all of those things make your units stronger than the sum of their parts, and also make your opponent weak enough to be beaten by a weaker force.

On the other hand, you'll also need to find a way to cover all sides of the island. On Very Hard, boats are going to land on two to four different places at once. Try to come up with strategies to deal with this. Archers are incredible at dealing with 80% of your problems, so you'll have to get creative the other 20% of the time.

Re-rolling RNG. I don't recommend abusing this, but if a specific island is giving you lots of trouble, closing the game and opening it again will keep the layout of the island as it was, but will re-roll the enemy waves (where they come from, how many units of each type there are, in which order they turn up, etc.).
Micro 2 - Archers and Pikes
Archers. They are wonderful. You can beat the game on hard with just archers (and a bit of luck, and patience, and a few resets). Sure, they're trash when they're not upgraded, and do just barely enough when they're upgraded to level 2. But once they're level 3, they're accurate enough, shoot very fast, deal considerable damage, and can push lots of enemies off boats. Mind, as some other poster mentioned, you should try to shoot boats diagonally or even from the side, since units that are pushed back from the front will land on the back of the boat, while those that get pushed from the side will fall off the boat.

I know a lot of people swear by infantry, but you know what's better than beating a wave as soon as it lands with minimal losses? Not letting the enemy set foot on your isle to start with.

Other ways of maximizing the destructive power of archers:

-Ring of Command: 16 archers is a lot and can reliably kill huge boats of militia, push vikings and huscarls easily, and kill brutes. The popular trait is nice and all, but it's nowhere near as effective.

-Heavy Weapons trait. Can help you consistently push shields and huscarls.

-Bringing at least 2 archer squads will let you cover different sides and increase pushback.

-Cliffs increase range but practically do away with pushback. 3-blocks-tall cliffs can practically shield you from archers.

-Strategical use of their Volley skill can reduce or delete enemy squads

Be wary of archers and brute archers, every archer you lose is like 10% of the squad's firepower (except when wearing Ring of Command). You can move your least important squad side to side to bait archers and brute archers while you fire at them with your own. Careful with Brute Archers, they'll prioritize shooting archers until they land, even if other units are closer!

Notice that Brutes gain a lot of health against archers on Very Hard difficulty. You can still push them onto the water (not if they are on a boat), and you can usually stun them, but it gets trickier.

Chokepoints and pikes. They're best friends the two. You've probably noticed that low level pikes struggle against big numbers of enemies, or against multiple strong enemies such as brutes. If you find good chokepoints however, enemies are bottlenecked and die far more easily to pikes; level 3 pikes can deal with almost anything if they get on a hill (except for archers and huscarls). Before battle, when you're choosing your units, try to find bottlenecks and places where your pikes can hold back enemies on their own. Hills, tunnels and thin paths next to flooded tiles are excellent bottlenecks that greatly amplify your pikes defensive power.

If I remember correctly, hills in particular negate the dual-wielders' jump-attack ability, keeping your pikes safe (though I think you need to place your pikes directly at the end of the uphill path, but on the middle (see image).

As a rule of thumb, on an open tile with no obstructions, level 1 pikes should be able to deal with up to 2 brutes, and possibly a few enemy militia on top (if they play nice). I've just had level 2 pikes lose against 4 brutes, though adding in a militia unit was enough, and I think level 3 pikes should fend off 4-5 brutes. RNG is involved, so take this with many grains of salt. Be careful that lots of enemy militia can swarm pikes, particularly at lower levels (one big boat of 16 of them will crush your pikes). Caves make things a bit easier on your pikes, sort of like a 1,5x power multiplier, and cliffs make your pikes pretty much invincible if there are no ranged enemies or other ways to access the cliff.

Bear in mind that the AI will often choose the shortest path to your houses, even if they are obstructed. The way different enemies prioritize your burning down buildings or attacking your units depends on lots of factors. Usually, archers will stay put as long as they have something to shoot at. Brute Archers wander around and will prioritize shooting down your units. Brutes in general prefer attacking head-on, but might be tempted to burn down houses if given space. I think double-wielders prefer attacking troops, not that I would know, killing them before they land is a top priority!

By the way, if you need to revise what traits do, here's a guide:
https://sp.zhabite.com/app/688420/guides/
I think the best ones are Heavy Weapons (for Archers) and Ironskin (in the case of Archers, they can take an arrow and not die). Sure-footed is good for Pikes so that they're not pushed back and out of position. Also good are Energetic, Fleet of Foot for decoy infantry (or when things go south with Pikes or Archers and you need reinforcements QUICK), Rousing Speeches, and I guess Popular and the discount traits.
Enemies 1
The strategy in this game is, at first, kind of a Rock-Paper-Scissors in real time. As you've seen in the previous sections, you can make your units more versatile and beat rock with scissors if you understand the game and time your reactions correctly. Understanding your enemies helps, specially when you're getting landed from three different sides and all you have are scissors,

General considerations.
There are counters and hard counters in this game, but you can get away with using any unit against any other when you use skills, as long as you have a plan and get the timing right. Some other ways to counter counters are discussed in the previous sections and below.

For "regular" infantry, having overwhelming numbers will help you minimize casualties. You can also choose to fight with a unit to cut down your enemy numbers, then retreat, send that unit to heal, and advance with another, more valuable unit.

Here's a guide to identify the enemy icons in-game: https://sp.zhabite.com/sharedfiles/filedetails/?id=2364511282


Militia.
The basic enemy unit. No protection against ranged attacks, and does average damage.

Militia trade more or less equally against your own militia with equal numbers. Come in groups of 3 to 18. They can overwhelm low level pikes with sheer numbers. I haven't tested how many you need to overwhelm level 3 pikes, but it's better not to take any chances against a big group.
Counters: Archers, pikes.

Vikings/Shields.
Basic enemy unit, with a shield.

Immune to arrows from lvl 1 archers. Level 3 archers can do some damage if you know how to use them. They might or might not be stronger than militia in melee combat, but I've noticed they fight less effectively when being shot at by archers. May come in single boats, in groups of 3, 5-6, or in big boats of around 15. They don't have much pushback resistance, so if you can shoot at them from an angle, or ideally from the side, you can push them off their boats.
Counters: Pikes, Lvl 3 Archers

Archers/Bowmen.
"Basic" ranged unit.

They can only shoot arrows at units (with no minimum range). Shields can block their arrows taking the ocassional unlucky loss to RNG-blessed arrows (Level 3 shields are pretty much immune to these). If they engage against pikes, they simply fire from outside their range, so pikes are useless unless the archers are stunned. You can fight fire with fire and use your own archers, but you'll take losses, unless you fire from very tall cliffs. Thing is, even infantry take losses against archers, because they have to lower their shields to strike. The only other safe option to engage with them (save for skills) is to lure them into shooting at your infantry while your own archers shoot them down, or if you're desperate, running side to side with militia or your own archers.

They come in groups of 3 to around 15 if you're unlucky. Once they land, they'll stay put and shoot if there are any targets in range. If not, they'll go torch the nearest building.
Counters: Shields, Shields AND Archers.

Brutes.
Tank melee unit. No protection against arrows, but can tank lots of shots.

These come in small groups, or even alone, but feature a lot of health, and their attacks deal a ton of damage and pushback. The only good thing is, they're quite slow, and they are not immune to stuns from archers or pikes. A volley of arrows or letting them run against your wall of pikes will stun them, leaving them open to being finished off by infantry. This is the only time when it is a good idea to use melee against these, and only when they come in low numbers. In Very Hard, they get a huge health boost, so much that archers become very ineffective. Just two of them can overwhelm low-level pikes. If you use Charge (Pikes) or Plough (Infantry) against brutes, the skills need to be high level, or they won't kill them (and the stun might not be enough if they're in high numbers).

They come in groups of 1, 2, 3 and i think I've seen 4. They CAN'T be pushed off boats, and when they land, if you tru to push them off the island, they'll still be blocked from falling off by the boats (so shoot from the side, perpendicular to the shoreline they landed on). They prioritize attacking units to burning buildings, which is good if you have pikes prepared.
Counters: Pikes, Archers

Enemies 2
Brute Archers.
Tank ranged unit. No protection against arrows, but can tank lots of shots.

This is the most disruptive and perhaps most run-ending unit. They have long bows that can kill three units in a single shot, and their range is so long, again with no minimum range, if you don't see them spawning, you will only realize they're close by the stretching sound of their bows, at which point it is already too late. The only thing in your favour is that, again, like Brutes, these are slow, and leave themselves open from shot to shot.

Like archers, it's debatable whether there are counters to this unit. Infantry is inconsistent. I've had (level 3) units tank many shots without a single loss, and other time in which they were absolutely decimated. Distance might influence their damage. I'd say whatever unit you can hide behind a house or a cliff, and quickly get in range when they land, can be a counter unit. Even pikes can deal with these, although not very effectively. The faster you get to them, the less units you lose. Remember, their shots are just as effective at close range, so try to stun them and kill them fast! Also their vertical range isn't great. Maybe from far enough they can shoot at units on a 3-units-tall cliff, but when get in range of your archers, they can no longer shoot them down at that height.

They come in groups of 1, 2, 3 and I might have seen 4. They CAN'T be pushed off boats. They prioritize killing units over burning houses. Before they land, they prioritize archers over infantry, so it's harder to distract them. Running side to side can be an effective strategy to keep your units alive.
Counters: Hiding and fighting at close range, stuns, skills, Infantry, Archers on very tall cliffs can help.

Huscarls/House Jarls/Axe Throwers.
Strong melee unit with a deadly skill.

These are like regular shield enemies, but with taller shields (less chances of arrows connecting by chance), more pushback resistance, perhaps more damage (testing is needed), more health, and more importantly, a special axe throw attack. What's so special about this attack is that pikes counter most melee units, and archers usually get close to their targets to shoot. As soon as Normen land, they'll throw their axes at the first unit they encounter very accurately (if multiple units are at about the same distance, they might prioritize pikes and archers), killing some soldiers in the target unit. Only Infantry can defend against this attack without losses. The strategy is, whenever possible, have your infantry in front of pikes or archers, have them absorb the volley of axes, and then retreat behind in the case of pikes.

They come in groups of 1 to 8. They might throw their axes as they're landing. Once they've thrown them, they can't use that skill again. Testing is needed to confirm if they thorw axes up cliffs.
Counters: Infantry (sorta), Pikes (after they've used up their axes)

Dual Wielders.
Elite infantry unit with a leaping skill. No protection against arrows, and die from a single arrow.

If Normen are upgraded shields, these are upgraded militia. They deal a TON more damage, and have considerably more health. They're glass cannons basically. They also come in big groups. These are a great late-game incentive to use archers, as you don't want them anywhere near your troops, not even pikes. Their leaping skill guarantees they'll kill at least one soldier each when they engage against Infantry or Pikes, and since they get within your pikes minimum range, they can break down their whole position, even in groups of 3 or 4. Your only safe bet for taking them down when they land is to use skills. Having pikes on a specific position upon a cliff can also effective at taking them down without them leaping on you (see above, though according to some commenters this might not be 100% consistent).

They come in groups of 2 to 15 if you're really unlucky. Archers can just shred through them, but you really need to prevent them from landing. They mostly prioritize attacking your units over torching your buildings. Some commenters suggest high level infantry can defend from their leap attack a little bit better than other units. As always, try to shoot them down from the shore, and if they land, either use a pike charge or the usual combo of infantry + archers behind.
Counters: Archers, Skills.
Closing Thoughts
It's my first guide, and I don't have a lot of time, so I tried to be as concise as possible. I might re-write, expand and add sceenshots later on, but I hope what you read was helpful to you and helps you enjoy this fantastic game even more. Feel free to leave a comment if you found this useful!
21 Comments
MasterEtienne 21 Jan @ 4:49am 
Amazing guide. Showed me how amazing elite archers are with ring of power. Thanks alot
Sir Eats Alot 29 Jun, 2024 @ 1:22pm 
awesome dis guide helped so MUCH
CrossBlade 1 Jun, 2023 @ 11:10pm 
I just found out something that may or may not already be known, but basically, Dual Wielders won't set buildings on fire and only chase after my troops it seems, right? So if I have just my commander remaining for example, and I make him replenish troops after taking on an overwhelming number of Dual Wielders, they will WAIT and do NOTHING until all my units are replenished.

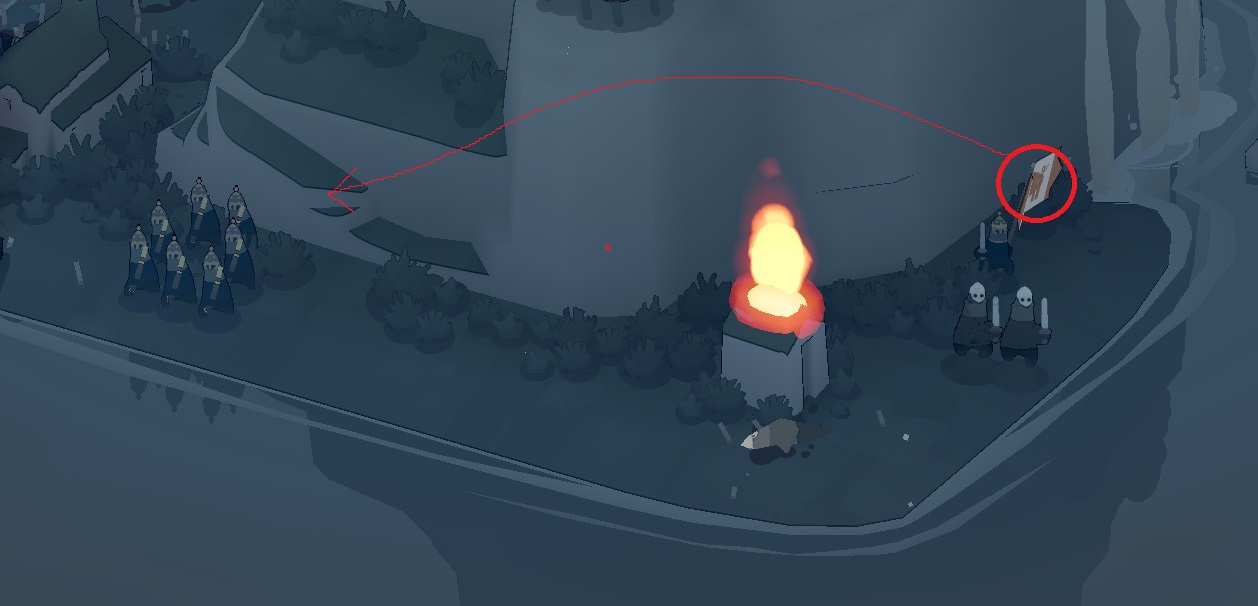
I'm betting this can be done an infinite number of times as long as you have your commander replenish units, and the last units alive are dual wielder enemies. This is highly valuable for winning islands with just one infantry unit
jackofclubsblog 17 Feb, 2023 @ 7:25pm 
Just wanted to add the comments below are not meant to be critical. This is a great guide and has a lot of useful info. I just wanted to clarify a minor point that might help in the decision-making process.
jackofclubsblog 17 Feb, 2023 @ 6:45pm 
Here is how the numbers work out:

Base Stone 1 2 3 4 5 6 7 8 9 10 11 12
1st Upgrade -3 -1 1 3 5 7 9 11 13 15 17 19
2nd Upgrade -11 -8 -5 -2 1 4 7 10 13 16 19 22

The base profit from the un-upgraded Stone is 1 per turn. On turn 5 the base profit is equal to the profit from upgrade 1 minus the cost (10 - 5 = 5). On turn 7 the second upgrade is equal to the base profit (but not the first upgrade, interestingly). By turn 8 the second upgrade beats all other options.

This means that you should always take both upgrades as early as possible if there are at least 8 turns left in the game. If there are only 6 or 7 turns left, a single upgrade is slightly more profitable and if there are 5 or less, don't bother upgrading at all. But you can usually manipulate the remaining turns to make it work in you favor, so I recommend always upgrading twice on the turn you assign the Stone.
jackofclubsblog 17 Feb, 2023 @ 6:43pm 
Notice that the Philosopher's Stone needs 5 uses to break even on the first upgrade, and 9 on the second, so it might be wise not to upgrade it if you're at the end of your run.

Not quite. The break-even point is the point when you have covered the total cost of the upgrades and are beginning to turn a profit. That is the third use for the 1st upgrade (3 turns x 2 gold = 6 minus 5 for the cost 1 gold profit) and the 5th for the second (5 x 3 - 14 = 1). What you are referring to is the number of turns until the profit exceeds the profit gained from earlier upgrades. But even then, the second upgrade is cheaper than you suggest (7 turns vs 9) because it gets to use the profit from upgrade 1.
Exto 17 Jan, 2023 @ 2:56pm 
.
bluebaron788 25 Dec, 2022 @ 7:05pm 
being a micro manager i played 3 islands on easy to see how it worked then completed very hard in one sitting
Camoes 31 Oct, 2022 @ 5:36am 
Great Job Thanks
Stirling 29 Sep, 2022 @ 11:08pm 
Know I'm late to the party, but Brute Archers will *never* burn down buildings. You can keep ducking into houses to heal endlessly and you'll be able to kill them without risking any money.