Boundless

Boundless

29 ratings
The Methodology to Forging Everything
By Vansten
This guide intends to showcase what boons are, the exact process behind getting the boons you want and how to efficiently increase those boons to higher level’s once there on your tool.
3
4
   
Award
Favorite
Favorited
Unfavorite
UPDATE - Check the official forums for the updated forging guide!
The guide I made on the official forums is much more updated, and due to steams clunky editing I will not be updating this one.

For the latest up-to-date information, please check it out instead:

https://forum.playboundless.com/t/guide-the-methodology-to-forging-everything-v2-2-aoe-bombs-added/26188
Understanding how the forge works.
For this, I recommend going practicing on the test server if you are a PC player – you can give yourself everything for free using debug, so it’s great for testing. To do this, simply right click on boundless on steam, select properties, click the Beta tab, and opt into the beta.

After you have put your tool into the forge and begun the forging process, you than have the option to put in ingredients into your tool on a round-by-round basis. These ingredients all have various effects which will be explained below. In addition, all ingredients cost vigor and/or stability to use, which will be explained in more detail later.


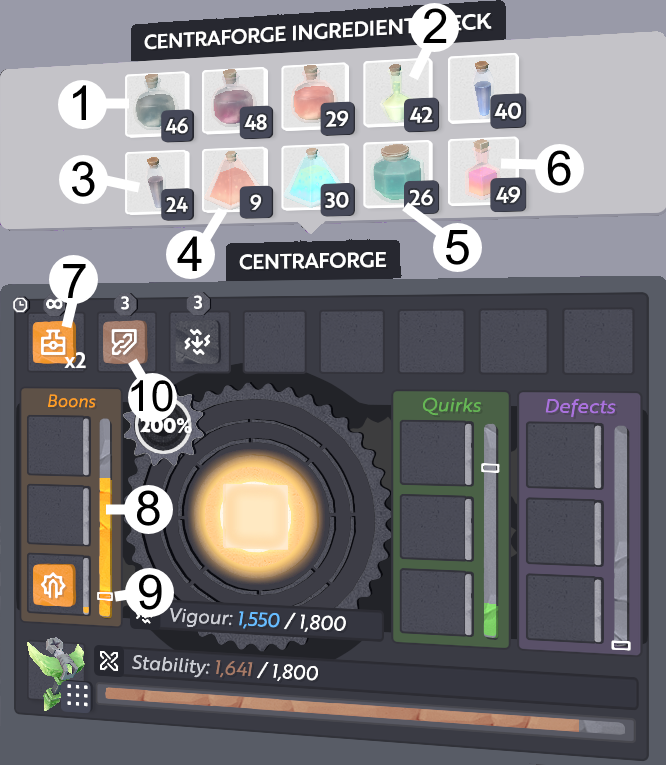
The Gum (1) and the Catalyst (2)

In game, there are 6 types of “ingredients” able to be used in the forge. We will talk about the first two – Gums and Catalysts.

1.) Gums - Essentially, Gums allow you to influence the outcome of what boons you get. When used, it gives the player a buff icon in the forge (7)

Gums are separated into categories, such as Special, Effect, and Longevity, increasing the outcome of getting any boon relating to their field. Stacking more of the same gum further increases the odds of getting any boon relating to their field

Referring to the forge trait list document[docs.google.com], if I were forging a slingbow and I put 3 Longevity gums into the forge, I would have a very high likelihood of getting Either the “Heavy Duty” boon, or the “Long Range” boon

2.) Catalysts – specifically Vigor Catalyst II, simply allow you to remove these buff icons. This is useful, for example, by allowing you to forge one boon onto your tool, such as Heavy Duty boon, than remove the Longevity Gum to place on an Effect Gum to try and forge another boon, such as Devastating Damage boon.

In addition, when used with Draining Boon Compound I (more on that later), you receive a rather nice portion of spent vigor back, allowing you to forge better equipment.


The Compound (3) and the Resin (4)

Both of these serve critical roles in the forging process – without them, it would be impossible to forge anything.

3.) Compounds allow you to obtain what is known as Boon Points (8). Whenever a compound is used, the boon bar is filled, and the game rolls a counter (9); if this counter lands in the boon bar, the game gives you a random boon. The boon it gives you can be influenced by Gums.

There are a lot of different compounds available for use – the ones I use will be covered below.

* Pure Boon Compound II & III – compared to other compounds, this has the advantage of giving only Boon points – other compounds are often cheaper, but have a negative attached to them, such as also filling up the quirk or defect bar
* Draining Boon Compound I – fills the Boon bar as much as Pure Boon Compound III does, and is also uses less Vigor in doing so, however it also fills up the Quirk bar by a lesser amount, and gives the draining boon debuff, which removes a small portion of Vigor. However, with the use of Vigor Catalyst II, we can convert this debuff into even more Vigor

Using all 3 together is key to creating forges that maximize boon points while having little to no quirks.

4.) Resins

There currently exists two types of Resins – both of which are very important.

Deconstruction resin allows you to basically reset your forge if you’re not happy with how it’s going. Level 1 – 3 gives back 25% - 75% of your ingredients back. I recommend using only level 3 – as the cost of ingredients to craft it is much less than the cost of ingredients to craft all other components needed in forging.

Setting Resin is basically the “I’m finished” button. Once it’s used, the tool than goes into the Centraforge’s que before being ready to use.


The Paste (5) and the Solvent (6)

These two ingredients are arguably less important than the previous 4 mentioned. None-the-less, they can be used to help forges last longer or to better pick boons.

5.) Pastes have a large variety of uses. Similarly to gums, they provide useful player buffs (10), however these are round-limited buffs, meaning they often only last 3-5 rounds, and rather than influencing which boon is picked, provide different benefits.

These benefits can include reducing vigor or stability costs, increasing boon point gain, or reducing quirk and defect point gain.

6.) Solvents are essentially your “undo” button. They simply allow you to remove boons, quirks, or defects. Two notable solvents include:

Boon Removal Solvent – Simply removes a boon, and rerolls a new boon. This “new boon” can be identical to the one that was just removed however.

Boon Transmute Solvent – Removes a boon, and rerolls a new boon. However, this “new boon” will never be the same as the one that was just removed. This is also much more expensive to craft, requiring roadrunner feathers.
A quick word on boons
For this, I will be referring to this spreadsheet[docs.google.com], which documents every available boon, as well as what tools they are restricted to.

Now, there are quite a large number of boons on that spreadsheet, but we only need to focus on the following:
Boon
Category
Restrictions
Description
Devastating Damage
Effect
Tools, Slingbows, Fists, Bombs
Increases a tools damage – by far one of the most desirable boons.
Flanker's Force / Low Blow / Cross Purposes / All-rounder / Random Acts
Special
Tools, Fists, Spanners
This boon is what gives AoE tools their AoE. Each level reduces a tools damage but makes it affect more blocks, which is why forgers try to forge devastating damage alongside this one to counteract its negative effects.
Heavy Duty
Longevity
All except Bombs
Makes tools last longer
Double-Shot / Triple-Shot / Quadruple-Shot / Quintuple-Shot / Sextuple-Shot
Special
Slingbows
Reduces your damage by 40-50%, but makes you shoot more projectiles. Quite effective, but also extremely difficult to obtain
Far Reaching & Long-Range
Longevity
Grapples, Slingbows, Fists
Makes a slingbow or, more importantly, a grapple, shoot further before expiring. Arguably one of the most important boons for grapples.
Regenerator
Special
Bombs
Regenerates the landscape. Does not regenerate natural resources however
Hot on Their Heals Boon
Special
Bombs
Allows bombs to heal allies, using the bomb's damage value as its healing value. Much cheaper than using healing potions in the long run.
Transformation
Effect
Chisels
Allows chisels to change blocks to other similar types

Now, I’m sure you’re wondering just how you put these amazing boons onto your tools. Let me explain…
The Step by Step Process to Forging (and reducing RNG)
The following information will list the exact process behind forging various pieces of equipment, ranked in difficulty from easiest (lowest RNG and/or cost) to hardest (highest RNG and/or cost).


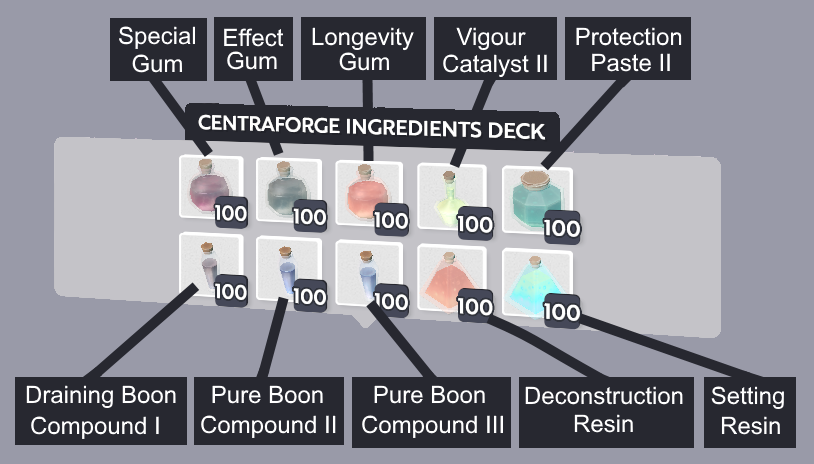
This is the standard deck I use for most of these forges. In addition to this, I also use Trait Reduction Gum, Glow Gum, Lightness Gum and Transmute Solvent in some of my forge

Most forges generally start by putting two gums of the type of boon you want i.e Effect Gum, using 1-2 Draining Boon Compounds, and resetting if you don’t get the desired boon first time. This is cheaper than using Transmute Solvent, and saves on Vigor and Stability. **Vigor and Stability act as the limiting factor in forging – once either one runs out, it is impossible to continue forging that tool** .

When wanting multiple boons on a tool, we start with the boon that has the lowest chance of being chosen. For example, referring to the Forge Trait List shown earlier, using a Special Gum on a Slingbow has a roughly 1 in 4 of having Multishot Boon being chosen, whereas using a Longevity gum on a Slingbow has a roughly 1 in 2 chance of having Heavy-Duty (Durability) Boon being chosen.

Once the forging process is done, we put in a setting resin to complete the tool.
Methodology to Forging Regen/Healing Bombs
Difficulty: ⭐

Referring to the Forge Trait List[docs.google.com] shown earlier under the bomb column, we can see that the “Regenerator” and “Hot on Their Heals Boon I / II / III” are both considered “special boons”.

Unless you are trying to also forge AoE and Damage onto your bombs, it is recommended you swap out longevity gum for *trait reduction gum*, which makes it cheaper and easier to forge these bombs by reducing the chance of getting additional boons once you’ve acquired the desired boon.

Methodology

Round 1: - Special Gum

Round 2: - Special Gum

Round 3: - Trait Reduction Gum

Round 4: – Trait Reduction Gum

Round 5: - Draining Boon I

* Repeat round 5 until you reach max level of Regenerator or Hot on Their Heals
* If you accidently get a second or undesired boon while doing so, use Deconstruction Resin III and try again
Methodology to Forging Chisel Changers
Difficulty: ⭐

Chisel changers are simply chisels that have the Transformation boon, allowing them to change blocks to other similar types. The only difference here is if you use stone, metal, or gem chisels, given how some blocks will only change when hit with a higher-tier chisel changer.

Unless you are trying to also forge extra durability onto your chisels, it is recommended you swap out longevity gum for *trait reduction gum*, which makes it cheaper and easier to forge these chisels by reducing the chance of getting additional boons once you’ve acquired the desired boon.

Methodology

Round 1: - Effect Gum

Round 2: - Effect Gum

Round 3: - Trait Reduction Gum

Round 4: – Trait Reduction Gum

Round 5: - Draining Boon I

* Repeat round 5 until your chisel has the Transformation Boon
* If you accidentally get a second or undesired boon while doing so, use Deconstruction Resin III and try again
Methodology to Forging Loot Sticks
Difficulty: ⭐

Loot sticks are, essentially, any item that has auto looter attached to it – which auto loots any dead creature corpse and gives you the contents. The best lootsticks also emit light, to make nighttime hunting easier. The 2 boons we will be trying to get are Magnetic Collector, and Glow, and we will be using a Chisel for better RNG

It is recommended you swap out Longevity Gum in your deck with Trait Reduction Gum, and Effect Gum with Glow Gum.

Methodology

Round 1: – Special Gum

Round 2: – Special Gum

Round 3: – Draining Boon I

* If you get no boons, repeat Round 3
* If you get a boon that isn’t Magnetic Collector, use Deconstruction Resin III and try again

Round 4: – Vigor Catalyst II

Round 5: – Glow Gum

Round 6: – Glow Gum

Round 7: – Pure Boon III

* If you get no additional boons, Repeat Round 7 until you do
* If you get a boon that isn’t Glow, use Deconstruction Resin III and try again

Round 8: – Vigor Catalyst II

Round 9: – Trait Reduction Gum

Round 10: – Trait Reduction Gum

Round 11: – Trait Reduction Gum

Round 12: - Pure Boon III

* Repeat round 12 until you reach max level of Glow and Magnetic Collector
* If you accidently get a third or undesired boon while doing so, **and** the boons are not near max level, use Deconstruction Resin III and try again
Methodology to Forging Grapples
Difficulty: ⭐⭐

For this, I will be aiming to forge a grapple with the fly fast boon (which increases the grapple’s projectile speed), as well as both longevity boons, increasing durability and grapple distance.

It is recommended you swap out Effect Gum for Lightness Gum

Round 1: - Lightness Gum

Round 2: - Lightness Gum

Round 3: – Draining Boon I

* If you get no boons, repeat Round 3
* If you get a boon that isn’t Fly Fast, use Deconstruction Resin III and try again

Round 4: - Vigor Catalyst II

Round 5: - Longevity Gum

Round 6: - Longevity Gum

Round 7: - Longevity Gum

Round 8: - Longevity Gum

Round 9: – Draining Boon I

* If you get no additional boons, repeat Round 9
* If you get a boon that isn’t Far-reaching or Heavy-duty, use Deconstruction Resin III and try again

Round 10: - Draining Boon I

* If you get no additional boons, repeat Round 10
* If it takes more than 3 tries to get an additional boon, use Pure Boon III instead
* If you get a boon that isn’t Far-reaching or Heavy-duty, use Deconstruction Resin III and try again

Round 11: - Vigor Catalyst II

(Optional) Round 12: – Longevity Gum

Round 13: - Protection Paste II

Now comes the difficult part – getting these 3 boons to higher levels. In the previous step, by putting Longevity gum down, means there is a good chance range and durability will be leveled up first over projectile speed. The next steps also depend on if the quirks you’ve likely obtained are positive ones worth filling out, or negative ones you want to avoid.

  • If you want to get quirks, or don’t care about them, simply keep using Draining Boon I, remembering to use Protection Paste II every 4 rounds. If the next turn would drop you to below 220 vigor, instead use Vigor Catalyst II, and repeat until out of Vigor or Stability (ensuring Stability does not drop below 0).
  • If you want to avoid quirks, use Pure Boon III if the boon bar is less than 2/3 full, otherwise use Pure Boon II. The trick here is that you can still use Draining Boon I for a few times and then Vigor Catalyst right after to get vigor back, but only if none of the quirks you’ve likely gotten by now are close to filling up.

In addition, remember to use a single Longevity Gum after using Vigor Catalyst if you wish to level up those relevant boons first
Methodology to Forging Slingbows
Difficulty: ⭐⭐

There are quite a lot of customization options available when forging slingbows. The method below, which aims to put Devastating Damage and both longevity boons (durability and longer projectile flight time), is the one I prefer simply because of the minimal RNG and cost involved, compared to trying to forge a slingbow with multishot and damage boons.

Methodology

Round 1: - Effect Gum

Round 2: - Effect Gum

Round 3: – Draining Boon I

* If you get no boons, repeat Round 3
* If you get a boon that isn’t Devastating Damage, use Deconstruction Resin III and try again

Round 4: - Vigor Catalyst II

Round 5: - Longevity Gum

Round 6: - Longevity Gum

Round 7: - Longevity Gum

Round 8: - Longevity Gum

Round 9: – Draining Boon I

* If you get no additional boons, repeat Round 9
* If you get a boon that isn’t Long-Range or Heavy-duty, use Deconstruction Resin III and try again

Round 10: - Draining Boon I

* If you get no additional boons, repeat Round 10
* If it takes more than 3 tries to get an additional boon, use Pure Boon III instead
* If you get a boon that isn’t Long-Range or Heavy-duty, use Deconstruction Resin III and try again

Round 11: - Vigor Catalyst II

Round 12: – Effect Gum

Round 13: - Protection Paste II

Similarly to when forging grapples, now comes the difficult part – getting these 3 boons to higher levels. In the previous step, by putting an effect gum down, means there is a good chance damage will be leveled up first over the other two boons. The next steps also depend on if the quirks you’ve likely obtained are positive ones worth filling out, or negative ones you want to avoid.

  • If you want to get quirks, or don’t care about them, simply keep using Draining Boon I, remembering to use Protection Paste II every 4 rounds. If the next turn would drop you to below 220 vigor, instead use Vigor Catalyst II, and repeat until out of Vigor or Stability (ensuring Stability does not drop below 0).
  • If you want to avoid quirks, use Pure Boon III if the boon bar is less than 2/3 full, otherwise use Pure Boon II. The trick here is that you can still use Draining Boon I for a few times and then Vigor Catalyst right after to get vigor back, but only if none of the quirks you’ve likely gotten by now are close to filling up.

In addition, remember to use a single Effect Gum after using Vigor Catalyst in order to ensure devastating damage reaches level 10
Methodology to Forging Hammers, Shovels and Axes (New Method)
Difficulty: ⭐⭐⭐
Thanks to wade4423 on the fourms, I have managed to develop a better method to forging hammers. The following method uses Corruption Boon instead of draining boon, and can be used to get a hammer strong enough one-shot T7 rock.

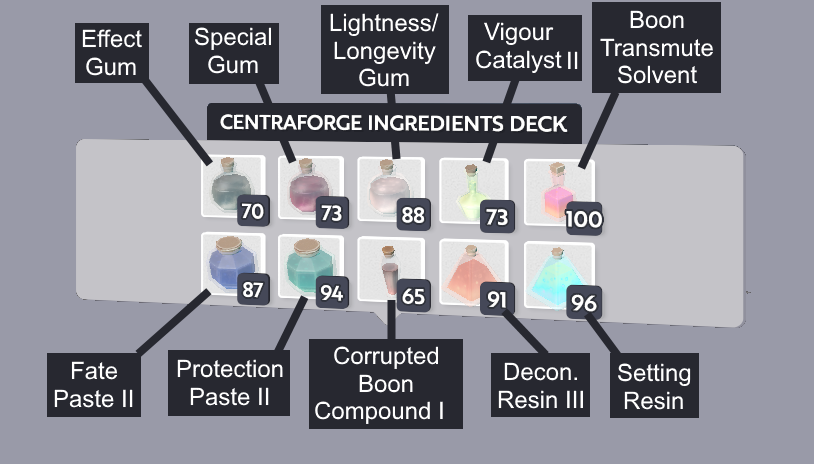
For this method we will be using the following deck:


We will be aiming for AoE 4, Damage 10, and either Heavy Duty (durability) or Busy Bee (faster speed) depending on preference.

Round 1: - Effect Gum

Round 2: - Effect Gum

Round 3: – Corruption Boon I
  • If you get no boons first try, or If you get a boon that isn’t Devastating Damage, use Deconstruction Resin III and try again
Round 4: - Vigor Catalyst II

Round 5: - Special Gum

Round 6: - Special Gum

Round 7: Corruption Boon I
  • If you get no boons, repeat round 7
  • If you get a boon that isn’t Flanker’s Force / Low Blow / Cross Purposes / All-rounder / Random Acts (hereafter referred to as “AoE Boon”), goto round 8
  • If you get a boon that is AoE Boon, skip to round 9
Round 8: - Boon Transmute Solvent

If you get a boon that isn’t AoE Boon, use Deconstruction Resin III and try again

Round 9: - Vigor Catalyst II

Round 10: - Longevity or Lightness Gum

Round 11: - Longevity or Lightness Gum

Round 12: - Corruption Boon I
  • If you get no boons, repeat round 12
  • If you get a boon that isn’t Heavy-duty or Busy Bee(unlikely), use Boon Transmute Solvent
    Round 13: - Vigor Catalyst II
Round 16: - Effect Gum

Round 17: - Effect Gum

Round 18: - Protection Paste

Round 19: - Protection Paste

Round 20: - Fate Paste

Round 21: - Fate Paste

At this point, you should have an AoE boon of a random level, Devastating Damage, and (hopefully) Heavy-duty boon. If you don’t have Heavy-duty boon, than don’t worry.

The aim now is to develop Devastating Damage to higher levels without over leveling AoE.

From this point, you should keep using Corrupted Boon I until Devastating Damage reaches level 10 (or 8 if you only want to 1-shot tier 6 worlds). Than use Vigor Catalyst to receive a bunch of spent vigor back.

After this, use two Special Gums, one Protection Paste, than one Fate Paste, and keep using Corrupted Boon I to level up AoE Boon to 4. Than use Vigor Catalyst to receive a bunch of spent vigor back.

After this, use two Longevity or Lightness Gum (depending on which 3rd boon you picked), one Protection Paste, than one Fate Paste, and keep using Corrupted Boon I until out of vigor or stability.

If at any time the AoE Boon is close to leveling up to level 5, simply use Setting Resin.
Helpful Links
Forge Trait List[docs.google.com]

* Shows a list of every possible Boon, Quirk, and Defect, as well as what category of gum is needed to obtain them

Boundless Forge Materials[docs.google.com]

* Make a copy of the Forge Materials Spreadsheet - it can help you determine the rough cost of each forge by inputting what ingredients you used

Boundless Damage Calculator[www.pfiffel.com]

* Shows how many hits are required to destroy blocks or kill creatures
Closing Thoughts
Hopefully this guide has helped you understand the forging process a little bit better. I tried to be as detailed as possible in the procedures, while also breaking up the guide into readable sections.

If you have any thoughts, recommendations or criticism, feel free to comment below!
4 Comments
NathanHoltBeader 15 Dec, 2019 @ 6:32pm 
Thanks! I found a lot of interesting things on the forum. It's interesting how the Boundless documentation made it sound like stabilizing and invigorating pastes were much less powerful than they are.
Vansten  [author] 15 Dec, 2019 @ 3:11am 
Ahhh, sorry I didn't see this until now! Yeah forging multiple items at a time uses multiple components at a time as well.

I am much more active on the fourms, and my guide there is more up to date and well put together if that interests you:

https://forum.playboundless.com/t/guide-the-methodology-to-forging-everything-new-hammer-forging-method/26188/1
NathanHoltBeader 14 Dec, 2019 @ 6:29pm 
The reason I had that problem was that I was forging a stack of items for the first time. You can't save on materials by forging an entire stack at once.
NathanHoltBeader 8 Sep, 2019 @ 8:26pm 
I put some components into my forge and when I started forging, a lot of them disappeared. Some of them were there when I finished forging the item, but my boon compunds were mostly destroyed. Have you seen that problem before? Do you have any recomendations about it?