Epic Battle Fantasy 5

Epic Battle Fantasy 5

106 ratings
(PRE-V 2.0)List of Every Key Item and Equip in EBF5
By DaGamerDude584
ALERT: This guide is outdated, and only applies to the free version of the game, or the deluxe version before v 2.0.

This is a complete guide, describing how to collect every single key item and piece of equipment in Epic Battle Fantasy 5. Use ctrl+f to find things, because the list is looooooong.
2
   
Award
Favorite
Favorited
Unfavorite
Note:
IMPORTANT: This guide has some inconsistencies since some skills and equips changed places. Key items are all still accurate. To see a guide for v 2.0, see here.

This guide tells you where to find every unique/limited item in the game, including equips, skills and everything that appears under the “Key Item” tab (except for holiday quest items). This guide was made to be used for indexing and completion purposes, and does NOT include puzzle solutions.

Locations are marked as such: Area, screen (referred to as “rooms”), specified location.
Use ctrl + f to find specific things. These key words should also work:
  • (Buff)
  • (Debuff)
  • (Special)
  • (Physical skill)
  • (Magic skill)
  • (Sword)
  • (Staff)
  • (Gun)
  • (Bow)
  • (Toys)
  • (Male hat)
  • (Male armor)
  • (Female hat)
  • (Female armor)
  • (Flair)


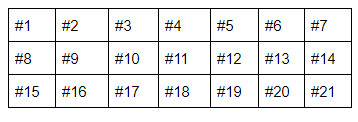
To find equips by where they are on forge/equip menus, use one of two formats:
  • grid placement of free version, equip type
  • equip type, grid placement of deluxe version
based on the following model:


or for Flairs (on the equip menu):
Key Items (part 1):
Copper Key:
  • Farmer’s market, chest hidden behind food stall
  • Iron Fortress, room north of spooky side room, toilet in right cell.
  • Wild Tropics, block puzzle in explorer’s hole
  • Lost Ruins, behind the temple

Gold Key:
  • Hope Harbor, Native Family, behind open tippi
  • Mystic Woods, Monolith Room, chest guarded by Big Mud Slime
  • Greenwood Village, Ruby of Death basement, chest on upper bridge segment
  • There are six posiedon skulls in the game. Each of them can be found along the Rainbow River, which goes along nearly a perfect row near the bottom of the world map. There is also one skull that can be found per room. Therefore, the leftmost Poseidon skull is the fourth room from the bottom, second room from the left. In this room, there's a bunch of trees to the left that hide an exit. Go through this exit to find a gold key.
  • Rapture, Hidden Switch in room east of fourth dungeon entrance
  • Glitched area in Frozen Valley (west of Poseidon Boss room), northmost (unguarded, partially hidden) chest

Diamond Key:
  • Iron Fortress, spooky side room, framed treasure chest
  • Anna’s balcony (rightmost balcony area), in some foliage in the bottom left corner
  • Lost Ruins, flower code 1-4-5-7-8-9 (as if it were a dialpad)
  • Rainbow treasure from Poseidon skull in blue teleporter area

Topaz Key:
  • Iron Fortress, first booster puzzle, storage area
  • Redpine Graveyard, hidden grave switch
  • Rapture, behind Fire Orb (accessible via torch/The Candle area)
  • Rapture, Zombie Hydra chamber, chest from lighting torch for second time (after beating the boss)

Coral key
  • Second Floor of Hope Harbor food shop (not farmer’s market), just south of middle bed.
  • Secret nook (in the right) in Greenwood Armory
  • Glitchy room (from area south of Grand Gallery Entrance), chest guarded by coral boulder
  • Chest found after north exit of 3-stone-block ice puzzle room in Frozen Valley
  • Treasure horde just after Poseidon
  • Rapture, cloud path chest (not guarded by toxic squid) in room east of fourth dungeon entrance.


Wooden Key:
  • Greenwood barn (Must complete Pablo’s quest)
  • Mystic woods, secret area in leftmost balcony area (enter the right tree from behind)
  • Sapphire of Dreams basement, chest guarded by Haunted Mirror
  • Chest behind Redpine Barn
  • Chest accessible via blue teleporters (accessible from Rapture)

Newspaper:
  • Matt’s House
  • Greenwood Village, Grumpy guy’s house, secret in toilet

Left Sock:
  • Matt’s House, secret in leftmost cabinet drawer
  • Greenwood Village, food/material shop, next to Ronja (right vendor)
  • Given to you by Mungus in Rapture (must have completed his quest beforehand)

Right Sock:
  • Matt’s House, secret in cabinet drawer next to NES
  • Greenwood Village, Grumpy Guy’s house, chest next to bed
  • Given to you by Mungus in Rapture (must have completed his quest beforehand)

Earthenware:
  • Outside old Jerry’s house (left of Matt’s house)
  • Right next to boulder encounter in room left of Hope Harbor food shop
  • In center of room left of Hope Harbor Monolith
  • Next to Hope Harbor Kitchen entrance
  • Left of Hope Harbor Equip shop, by cactus patch

Chocolate:
  • Hope Harbor material shop, behind the counter
  • Hope Harbor Kitchen (left of equip shop), behind barrels
  • Jerry’s house, secret in drawer below, then to the right of TV
  • Greenwood Village, Grumpy Guy’s house, secret in drawer
  • Given by Molly in Rapture (must have completed her quest beforehand)

Cool Headband:
  • Hope Harbor food shop, first floor, bottom left corner behind some boxes
  • Hope Harbor Equip shop, behind counter (can be accessed from another entrance in back)
  • Greenwood Village equip shop, secret in Drawer
  • Redpine Town Equip Shop, behind right counter
  • Given by Aniki in Rapture (must have completed his quest beforehand)

Milk:
  • Hope Harbor Kitchen (left of equip shop), secret in fridge
  • Greenwood Village, Grumpy guy’s house, secret in fridge
  • Greenwood Village, Randy’s house, secret in fridge (only after completing his quest)
  • Greenwood Village, in the barn (must complete Pablo’s quest)
  • Redpine Town barn, behind Topaz block

Glasses:
  • Chest behind chunk of dirt at farmers market
  • Given by Aniki in Rapture (must have completed his quest beforehand)

Star Balls:
  • Woehiv’s quest (native family room)
  • Maya’s quest (room south of pink slime bunny)
  • Gina’s quest (west of westernmost Poseidon Skull resting area)
  • Maka’s quest (room right of Zombie Slime Cat
  • Canela’s quest (Zombie Slime Cat room, accessible after visiting Rapture)
  • Sam’s Quest (Rapture, room right of Slime Cat)
  • Wakizashi’s quest (first room of Rapture)

Stick:
  • Ice cave east side entrance, across small bridge
  • Where Jorma’s quest is (bridge building NPC), near Jorma
  • Room where Lance ambushes you, near red creep
  • Left of fortress entrance, near protesters
  • Where Aniki is, near Aniki
  • Room below protesters, near Coral Boulder

Golden Ticket:
  • No Man’s Land, Across Jorma’s bridge
  • Chest in Jerry’s house
  • Mystic Woods, Teleporting Door in protesters’ camp room, hidden under some foliage
  • Iron Fortress, room north of spooky side room, chest reachable with stepladder
  • Treasure Horde after Poseidon
  • Forgotten Ruins, Flower code room, block puzzle (Cloud Boots required)
  • Redpine town, Roku’s house/treasure pile, chest hidden by some trees in the lower right area
  • The Rapture, room to south, then left of Slime Cat, chest accessible only with Cloud Boots
  • The Rapture, reward for opening shortcut in room right of Slime Cat
  • The Rapture, room above Slime Cat, behind Skull gate, guarded by Matt Doll
  • Grand Gallery, right hedge maze exit, can be reached after defeating Idols (and Sprites)
  • Rainbow River, rightmost Poseidon Skull resting area’s rainbow treasure (only accessible with Mega Hammer)

Music CD:
  • Iron Fortress, North of creepy side room, right jail cell
  • Iron Fortress, Spooky Side Room
  • Iron Fortress, Monolith Room
  • Greenwood Village, Grumpy guy’s house
  • Greenwood Village, In Randy’s house (only after completing his quest)
  • Greenwood Village, Library

Cookie:
  • Iron Fortress, spooky side room, secret from cardboard box
  • Mystic Woods, Bella’s shop, behind counter
  • Rainbow River, Leftmost Poseidon Skull resting place, chest behind tree in upper left corner
  • Frozen Valley, King’s tent
  • Redpine Town Material Shop, behind counter
  • Given by Shione in Rapture (must have completed her quest beforehand)
  • Behind bar (food shop) counter in Redpine Town
  • Rapture, where the Mega Hammer is, in chest guarded by Omega Dragon

Sunglasses:
  • Jerry’s basement, bottom left corner

Fishing Rod:
  • Jerry’s Basement, bottom right corner
Key Items (part 2):
Wooden Planks:
  • Dropped by Green Bushes around Randy’s house (one of them’s hidden behind the cat statue)

Sapphire of Dreams:
  • Hope Harbor Equip Shop, secret back entrance, push fridge aside to reveal secret entrance

Panties:
  • Greenwood Village, Randy’s house, secret in cabinet (only after completing his quest)
  • Greenwood Village, equip shop, secret in drawer
  • Greenwood Village, Anna’s house, secret in drawer
  • Mystic Woods, Bella’s shop, secret in left bed

Holy Water:
  • Greenwood Village, item/material shop, next to Ronja
  • Forgotten Ruins, First Room, Guarded by Angel Mirror
  • Hope Harbor, cavern with torches, reward for lighting torches (The Candle from Rapture required)
  • Redpine Town, Mausoleum, chest in lower left corner (only accessible with The Candle, push back the eyes and find a secret passage in the sides)

Axe:
  • Greenwood Village, Anna’s house, second floor

Fairy Bottle:
  • Mystic Woods, Room left of Greenwood guards
  • Mystic Woods, Room left of Anna’s house
  • Mystic Woods, by Chibi Knight encounter
  • Mystic Woods, by Lily Boots

Bottled Darkness:
  • Mystic Woods, room right of Monolith room
  • Mystic Woods, Monolith Room
  • Mystic Woods, room north of Monolith room
  • Mystic Woods, beyond 5-switch puzzle

Stepladder:
  • Mystic Woods, leftmost balcony area

Leafy Boots:
  • Mystic Woods, rightmost balcony area

Magazine:
  • Mystic Woods, protesters’ camp, secret in tent
  • Frozen Valley, King’s tent

Ocarina:
  • Mystic Woods, secret area in leftmost balcony area (enter the right tree from behind)

Empty Bottles:
  • You get one for every bottled item you give for a quest (Fairy Bottle, Bottled Darkness, Milk, Holy Water)

Ruby of Death:
  • Grumpy Guy’s House in Greenwood, push aside the bookcase to reveal secret exit (stepladder required)

Big Batteries:
  • Dropped by Metal Idols in room with pink slime bunny (after defeating Laurelin)

Flute:
  • Hippy Island, chest hidden behind tree closest to Monolith

Poseidon Skull:
  • Room left of the Rainbow Gate
  • Room right of the Rainbow Gate
  • Room left of Hippie Island
  • Room left of Blue Teleporter room
  • Blue Teleporter room
  • Room north of Temple of Trials entrance

Popcorn:
  • Found throughout the Frozen Valley. There are nine total, one per room (except for the Super Chibi Knight encounter, I think).

Spiked Boots:
  • Frozen Valley, room left of Poseidon, guarded by Bubbler MX-01

Cloud Boots:
  • Forgotten Ruins, Flower code 1-2-3-4-6-7-9 (found in Forgotten Ruins Temple)

Water Orb:
  • Room right of Poseidon

Mega Hammer:
  • First, upon reaching the Rapture Slime Cat, head south, then continue left until you encounter a boulder enemy blocking the way to a room to the north. Kill it, take the teleporter beyond it, and the chest with the hammer should be right there.

Wind Orb:
  • Rapture, complex teleporter room (north, then right of Slime Cat room)

Magma Sample:
  • Rapture, room right of Slime Cat, near bottom right corner
  • Rapture, room right, then south of Slime Cat near bottom right corner
  • Rapture, room in lower left corner of world, near the bottom left corner (only accessible with the Lava Boots)
  • Rapture, room south of Fire Orb resting place, near bottom center (only accessible with Lava Boots)
  • Rapture, Fire Orb resting place, near bottom right

Lava Boots:
  • Rapture, near the entrance to the Temple of Trials (Ominous Premium-Only area)

Snail Mail:
  • Sam’s Quest (Rapture, room right of Slime Cat)

Fire Orb:
  • Guarded by second Magma Hydra encounter at entrance of Temple of Trials

Acid Boots:
  • Akira’s quest (Iron Fortress, Monolith Room, only available after completing Sam’s quest)

The Candle:
  • Rapture, north, then right of Slime Cat room, guarded by War Mammoth

Emerald of Life:
  • Mausoleum (opened by pushing nearby star-marked grave), push eye-marked walls back, and then one of them to the side to reveal a secret exit (candle required)

Earth Orb:
  • Rapture, Guarded by Zombie Hydra in Skull Cave (entrance of Skull Cave is in room north of Slime Cat)

Turd (Premium Only):
  • Deathly Hollows, one in each puzzle room adjacent to main room (puzzles don’t have to be solved to obtain items)
Skills:
  • Protect (buff): Matt starts with this skill
  • Barrier (buff): NoLegs starts with this skill (room right of Matt’s house)
  • Snow Bunnies (special): Mungus (next to kitchen in Hope Harbor)
  • Heal/Healmore (special): Natalie starts with this skill (room left of Hope Harbor equip shop, after taking the Shovel)
  • Encore (special): Molly (in room north of Jerry’s house)
  • Purify (special: Bessie (in room north of Jerry’s house)
  • Bind (debuff): Indy (Wild Tropics Monolith Room)
  • Ivy/Vines (physical skill): Woehiv (in native family room)
  • Sawblade/Shredder (physical skill): Jorma (Room south of Eastern Ice cave exit)
  • Gaia Seed/Gaia Bloom/Gaia Blossom (magic skill): Erika (Slime Cat room)
  • Dispel (special): Anna starts with this skill (room right of No Man's Land Slime Bunny)
  • Shock/Surge (physical skill): Rebel (first room of Iron Fortress)
  • Debilitate (debuff): Lance starts with this skill (obtained after defeating him and the Neon Valkyrie as the Iron Fortress Boss)
  • Ion Cannon (limit break): Lance starts with this skill (obtained after defeating him and the Neon Valkyrie as the Iron Fortress Boss)
  • Lock On (buff): Jerry (Right outside Jerry’s house, accessible after defeating Lance and Neon Valkyrie)
  • Annihilate (limit break): Randy (next to Greenwood equip shop)
  • Power Metal (magic skill)(special): Xavi (first room of Iron Fortress)
  • Reflex (buff): Pablo (next to Grumpy Guy’s house)
  • Air/Airwave/Shockwave (magic skill): Lenk (outside Anna’s house)
  • Gale/Tempest (physical skill): Izumi (japanese training area)
  • Screamer (debuff): Goth (Below where the stepladder is in Mystic Woods)
  • Revive (special): Angela (In first hollowed out tree in Mystic Woods)
  • Purging Flame (magic skill)(debuff): Also Angela (In first hollowed out tree in Mystic Woods)
  • Bullet Bob/Big Bullet (physical skill): Weeb’s quest (pink slime cat room, after beating Laurelin)
  • Giga Drill (physical skill)(special): Aniki’s quest (room south of Iron Fortress Entrance)
  • Tsunami (limit break): Maya (room south of pink slime cat)
  • Bubble/Bubble Blast (magic skill): Fizz (room south of Greenwood Grumpy Guy’s house)
  • Supernova (limit break): Gina (puzzle in room west of westernmost Poseidon Skull resting area)
  • Absolute Zero (limit Break): King’s quest (room north of Poseidon)
  • Enfeeble (debuff): Maka’s quest (room right of Zombie Slime Cat)
  • Energy, Energy Barrage (magic skill): Albrecht's quest (room south of zombie slime cat)
  • Fire Spin (debuff): Shione’s Quest (Redpine Steroid shop)
  • Death Metal (limit break): Jessica’s quest (Redpine Steroid shop)
  • Heavenly Shield (buff): Canela’s quest (Zombie Slime Cat room, after visiting Rapture)
  • Flare (debuff): Wakizashi’s quest (first room of Rapture)
  • Black Hole (limit break): Akira’s quest (Iron Fortress Monolith room, must have completed Sam’s quest in The Rapture)
  • Hidden Power (limit break): Kiran’s Quest (room north of Redpine Food/Steroid shops)
  • Fireworks (special): Jin's Quest (Warp Zone, only appears during the Chinese New Year event)
Equips (part 1):
Hope Harbor (Note: Desert area where Jotun is fought counts as Hope Harbor):
  • Ultra Pro 9000 X (#11, sword, #13): Matt’s default “sword”
  • Captain’s Hat (#1, male hat, #1): Matt’s default hat
  • Hobo Clothes (#12, male armor, #16): Matt’s default armor
  • Bandage (#7, flair, #7): Storage room in Matt’s house
  • Lucky Clover (#12, flair, #12): Block puzzle outside Jerry’s House
  • Steel Buckler (#1, toys, #1): NoLegs’ default toys
  • Knight’s Helmet (#2, male hat, #2): NoLegs’ default hat
  • Heroic Armor (#12, male armor, #12): NoLegs’ default armor
  • Green Dress (#6, female armor, #6): Right of equip shop, guarded by sand slime
  • Sapphire Saint (#6, sword, #6): Native Family, guarded by wooden idol
  • Emerald Earrings (#26, flair, #26): Native family, guarded by sandstone boulder
  • Fur Hat (#4, female hat, #4): Behind Ice Cave entrance, guarded by sandstone boulder
  • Inferno (#3, sword, #3): Treasure horde after Jotun
  • Fur Dress (#4, female armor, #4): Treasure horde after Jotun
  • Eagle Eye (#10, bow, #12): Jerry’s quest
  • Desert Scorpion (#16, gun, #19): Guarded by Camel Mammoth in alcove accessible from Ice Cave after getting Spiked Boots

Wild Tropics (Note: includes Farmer’s market):
  • Green Cross (#15, flair, #15): Material Shop, behind the counter
  • Battle Paint (#11, flair, #11): Area reachable via behind food shop
  • Cardboard Box (#13, male hat, #16): Guarded by rock idol encounter south of farmer’s market
  • Bandit Blade (#2, toys, #2): Puzzle south of farmer’s market
  • Camo Jacket (#7, male armor, #8): alcove left of monolith room
  • Druid Staff (#4, staff, #4): chest in farmer’s market guarded by putrid worm
  • Dark Tooth (#12, staff, #14): Natalie’s default staff
  • Red Ribbon (#1, female hat, #1): Natalie’s default hat
  • Red Dress (#1, female armor, #1): Natalie’s default armor
  • Spelunking Hat (#10, male hat, #12): Puzzle in Indy’s cave
  • Dragon Helm (#6, male hat, #7): Cave with torches, guarded by Marble Boulder
  • Dragon Armor (#6, male armor, #7): Cave with torches, guarded by Gem Idol
  • Pixel Popper (#14, toys, #16): Glitch area in room south of Top Hat Slime Cat, chest guarded by “Bone Bat” (Dead Pixel)

Grand Gallery:
  • Crimson Razorback (#13, sword, #15): left wing, in the hallway
  • Chrome Earrings (#24, flair, #24): left wing, lower Gold Block
  • The Chopper (#8, sword, #8): left wing, middle Gold Block
  • Flower Bobble (#8, female hat, #9): left wing, upper Gold Block
  • Lightning Badge (#2, flair, #2): left hedge maze, chest on far right (45 medals required)
  • Small Cloud (#30, flair, #30): Technically in Wild Tropics, but can only be accessed after defeating Slime Bunny in the left hedge maze
  • Mini Drone (#32, flair, #32): left hedge maze, guarded by Chompers
  • Leaf Shield (#6, toys, #6): right wing, lower gold block
  • Arctic Trident (#2, staff, #2): right wing, middle gold block
  • Casual Skirt (#15, female armor, #19): right wing, upper gold block
  • Fake Mustache (#28, flair, #28): right hedge maze, guarded by Creeps
  • Hoop Earrings (#13, flair, #13): right hedge maze, also guarded by Creeps
  • Big Eyebrows (#29, flair, #29): right hedge maze, guarded by Squids
  • Hipster shirt (#13, male armor, #17): 20 medal room, guarded by Dolls
  • Drill Bits (#11, female hat, #14): 20 medal room, guarded by Dogs
  • Priest’s Tunic (#14, male armor, #19): 30 medal room, guarded by Mirrors
  • Berzerker (#2, sword, #2): 30 medal room, guarded by Fallen
  • Genji Helm (#4, male hat, #5): 40 medal room, guarded by Poseidon’s ores (Quartz, Peridot, Zircon and Sapphire) and Boulders
  • Obsidian Armor (#12, female armor, #14): 40 medal room, guarded by not-Poseidon’s Ores (Topaz, Ruby, Amethyst) and Golems
  • Biohazard Blaster (#9, gun, #9): 50 medal room, guarded by Bats
  • Black Widow (#13, bow, #17): 50 medal room, guarded by Dragons (except Omega)
  • Royal Crown (#13, female hat, #17): 55 medal room, tile puzzle
  • Soul Pistol (#12, gun, #12): 55 medal room, guarded by Blue and Yellow Flybots and Defenders
  • Pope Hat (#5, female hat, #5): 60 medal room, inaccessible until Mammoths have been defeated
  • Crystal Wing (#10, gun, #10): 60 medal room, inaccessible until Mammoths have been defeated

Ice Cave:
  • Snowflake Badge (#3, flair, #3): chest guarded by Zircon Ore, room right of family
  • Ice needle (#4, sword, #4): chest guarded by Viking Monolith, North of No Man’s Land entrance

No Man’s Land:
  • Riot Shield (#5, toys, #5): Where Jorma’s quest is (bridge building NPC), chest guarded by Cat Sniper
  • Pearl Necklace (#4, flair, #4): Across Jorma’s bridge
  • Lightning Shard (#5, sword, #5): Where Lance ambushes you, chest guarded by Blue Creep
  • Amber Bauble (#2, female hat, #2): Anna’s default hat
  • Ranger Skirt (#2, female armor, #2): Anna’s default armor
  • Fairly Bow (#1, bow, #1): Anna’s default bow
  • Camo Skirt (#14, female armor, #17): left of main entrance, guarded by blue flybot, behind dirt
  • Aquamarine (#4, bow, #4): South of protesters, chest gotten from pushing block by rainbow river
  • Nitro Bomber XL (#1, gun, #1): Treasure corde in cemetary
  • Basket Hat (#5, male hat, #6): Treasure horde in cemetary
  • Ninja Gear (#5, male armor, #6): Treasurer horde in cemetary
  • Heavy Claw (#11, gun, #11): Glitch Area in room right of TNT Slime Cat, chest guarded by cat

Iron Fortress:
  • Wrath of Zeus (#3, staff, #3): Abdul’s jail cell
  • Sol Spear (#1, Staff, #1): First chest in second booster puzzle (only reachable with Magnet Boots)
  • Crossbone Pin (#23, flair, #23): hidden Storage Area by first booster puzzle (only reachable with magnet boots)
  • Space Helmet (#9, male hat, #10): Large Light Switch Puzzle reward
  • Space Ace (#9, male armor, #10): Large Light Switch room, guarded by Metal Idol (or Gold Fish. One of those two, for sure)
  • Surgical Mask (#5, flair, #5): Room with two jail cells, bottom left corner chest
  • Juggernaut (#9, bow, #10): Secret exit, chest gotten via magnet boots
  • Iron Cross (#8, flair, #8): Small light switch puzzle by spooky side room
  • Neon Lightbulb (#3, toys, #3): Spooky side room, guarded by Wise Mirror
  • Gas Mask (#14, male hat, #17): Monolith room, guarded by Metal Idol
  • Officer’s Hat (#8, male hat, #9): Lance’s default hat
  • Officer’s coat (#8, male armor, #9): Lance’s default armor
  • Shadow Blaster (#8, gun, #8): Lance’s default gun
  • Dark Bobble (#9, female hat, #10): Monolith Room, secret in monolith (interact with both xboxes, then use Stepladder to cross

Rainbow River:
  • Fairy (#16, flair, #16): Alcove accessible from cemetery
  • Captain’s Coat (#1, male armor, #1): chest by Rainbow Gate (guarded by Hermit Creep)
  • Magical Skirt (#10, female armor, #11): Fizz’ room, chest behind Coral Block on leftmost island
  • Amethyst Earrings (#25, flair, #25): Fizz’ room, blocked by coral block right by Fizz
  • Cat Tail (#31, flair, #31): Fizz’ room, chest in upper right corner, guarded by slime bunny, at least one Coral Key required to obtain
  • Rubber Duck (#14, female hat, #18): Rightmost Poseidon Skull resting area, chest in upper right corner, blocked by Coral Block (only accessible with Mega Hammer)
  • Thunder Core (#3, gun, #3): Hippy Island, chest guarded by red bush, both hidden behind some trees.
  • Thor’s Hammer (#3, bow, #3): Rainbow Gate, Chest from arranging the skulls into the points of a triangle (top, bottom left, and bottom right positions)
  • Turtle Shell (#13, toys, #14): Rainbow Treasure in room left of Rainbow Gate (accessible after reaching Redpine Town)
Equips (part 2):
Greenwood Village:
  • Hellfire Shotgun (#2, gun, #2): Behind Randy’s house, accessible after completing his quest
  • Target Badge (#19, flair, #19): By Anna’s house, secret in blue target
  • Paper Fan (#14, staff, #16): Anna’s house, bottom left copper block
  • Leafy Hairclip (#6, female hat, #6): Anna’s house, top left copper block
  • The Deceased (#8, bow, #9): Anna’s house, bottom right copper block
  • Silver Cross (#9, flair, #9): South of training area, block puzzle
  • Golden Pendant (#10, flair, #10): Behind Item/Material shop
  • Heaven’s Gate (#1, sword, #1): Block puzzle next to Item/Material Shop
  • Celtic Cross (#11, staff, #13): Guarded by cat in bottom left corner of japanese training area
  • Cow Costume (#7, female armor, #7): In the Barn (must complete Pablo’s quest)
  • Curly Horns (#7, female hat, #7): Outdoor Barn Area (accessible from outside library)
  • Ninja Skirt (#11, female armor, #12): Izumi’s quest (right, then north of Anna’s house)
  • Dark Stalker (#14, sword, #18): Ruby of Death basement, chest on left side (accessible via stepladder)
  • The Tr*force (#14, flair, #14): Place all four orbs from The Rapture into the pedestals by Izumi

Mystic Woods:
  • Coconut Shooter (#14, gun, #14): Room left of Greenwood guards, guarded by Green Bush in top right corner
  • Ninja Chopsticks (#10, female hat, #12): Room left of Anna’s house, Hidden chest directly north of red X marker
  • Fat Fly (#27, flair, #27): Alcove accessible from behind left tree in Madness Kombat “puzzle” room
  • Angry Faic (#18, flair, #18): Shortcut from Madness Kombat “puzzle” room to room on right
  • Summer Kimono (#8, female armor, #9): right of monolith room, guarded by Purple Squid
  • Angel wing (#14, bow, #18): alcove accessible from top left corner of monolith room
  • Kaladana (staff): chest from inputting the markings from Indy’s puzzle into the 5-switch puzzle.
  • Chieftain's Horns (#11, bow, #14): chest from completing 5-switch puzzle
  • Blood Bank (#11, toys, #12): chest from completing Madness Kombat “puzzle”
  • Dog Sausage (#7, toys, #8): Protesters’ camp, chest guarded by Slime Bunny
  • Human Skull (#10, toys, #11): Stepladder Area, chest in upper right corner hidden under foliage
  • Beholding Eye (#7, staff, #9): In tree north of Goth, must be reached by going around with Stepladder (hint: Witch’s shop)
  • Cold Steel (#2, bow, #2): chest just above raft maker
  • Wizard Robe (#11, male armor, #13): treasure horde after Laurelin
  • Wizard Hat (#11, male hat, #13): treasure horde after Laurelin
  • Honjo Masamune (#4, toys, #4): Glitch area in Slime Cat room, chest guarded by Muddy Bush

Forgotten Ruins:
  • Tentacle (#21, flair, #21): Flower code 2-4-5-6-7-9 (found in Sapphire of Dreams basement)
  • Sub-Zero (#7, gun, #7): Flower code 3-5-7-9
  • Gaia’s Gift (#5, bow, #5): Temple Entrance, guarded by Crucified Fallen in top left corner of room
  • Soul Eater (#15, sword, #20): Temple, lower left chest
  • Spine Snapper (#15, gun, #18): Temple, upper left chest
  • Necromancer’s Helmet (#12, male hat, #15): Temple, upper right chest
  • Obsidian Staff (#10, staff, #12): Temple, lower right chest
  • Pope Dress (#5, female armor, #5): Through the temple portal, guarded by Snowflake (three gems required)
  • Power Paw (#15, toys, #18): Through the temple portal, guarded by Snowflake (three gems required)

Frozen Valley:
  • Ice Shards (#12, female Hat, #16): Chest reachable via side entrance to Frozen Valley (or if you have the spiked boots)
  • Sharanga (#15, bow, #19): King’s room, chest behind temple mural
  • Wrecking Rod (#8, staff, #10): Snow Slime Cat room, chest in northernmost area
  • Horned Helmet (#3, male hat, #3): Snow Slime Cat room, block puzzle reward
  • Angel Pin (#6, flair, #6): puzzle in room north of Snow Slime Cat room
  • Crimson Dragon (#6, bow, #6): puzzle in room west of westernmost Poseidon Skull resting area
  • Chainsaw Gun (#5, gun, #5): room south of Super Chibi Knight encounter, chest guarded by Quartz Ore
  • Elder’s Wisdom (#9, staff, #11): room with Napstablook + Boo sculpture, chest guarded by Woolly Mammoth
  • Explorer’s Jacket (#10, male armor, #12): Treasure horde after Poseidon
  • Blue Elephant (#15, female hat, #19): Treasure horde after Poseidon
  • Godly Book (#9, toys, #10): Glitch area south of Snow Slime Cat, chest guarded by Brown Dragon

Redpine Town:
  • Peace Sticker (#22, flair, #22): Complete floor switch puzzle in Weed Farm
  • Super Snipe ZX (#13, gun, #13): behind left counter in Equip Shop
  • Alchemy Set (#6, staff, #8): Mausoleum, chest in lower right corner (push back the eyes and find a secret passage in the sides)
  • The Knife (#13, staff, #15): Glitch area (accessible after finding all other glitched areas), guarded by the [REDACTED] boss.
  • Club of Withering (#12, sword, #14): Glitch area (accessible after finding all other glitched areas), guarded by the [REDACTED] boss.

The Rapture:
  • Hyper Drill (#10, sword, #10): Room left of Slime Cat, guarded by Ruby Ore
  • Deep Blue (#4, gun, #4): Room south of Slime Cat, guarded by Blue Creep
  • Dark Gown (#9, female armor, #10): Wind Orb Resting Place, center of room (be sure to trigger north switch, first)
  • Heat Badge (#1, flair, #1): Room right, then south of Slime Cat, reward for solving tile puzzle
  • Balance Badge (#20, flair, #20): Room south of Fire Orb resting place, guarded by Magma Hand, thermal boots required

Available in equip shops (prices are listed):
  • Army Helmet (#7, male hat, #8): 300
  • Nurse Hat (#3, female hat, #3): 300
  • Genji Armor (#4, male armor, #5): 600
  • Nurse Uniform (#3, female armor, #3): 600
  • Pocket Watch (#17, flair, #17): 1000
  • Black Fang (#7, sword, #7): 1000
  • Icecream Sandwich (#8, toys, #9): 1000
  • Vortex Cannon (#6, gun, #6): 8000
  • Fenrir’s Jaw (#7, bow, #8): 8000
  • Nimbus Rod (#5, staff, #5): 8000
  • Viking Fur (#3, male armor, #3): 20,000
  • Bubble Dress (#13, female armor, #16): 20,000
  • Giant Slayer (#9, sword, #9): 60,000
  • Alchemist’s bow (#12, bow, #16): 60,000
  • Viking Buckler (#12, toys, #13): 60,000

Holiday Events (all quests are in the Warp Zone)
  • Coin Charm (#35, flair, #39): Jin's quest, available in January
  • Lucky Fish (#34, flair, #38): available in equip shops in January (888)
  • Coat of Teeth (#16, male armor, #20): Jack’s quest, available in October
  • Spider Gown (#16, female armor, #20): Jack’s quest, available in October
  • Pumpkin Head (#16, male hat, #20): available in equip shops in October (300)
  • Spider Bobble (#16, female hat, #20): available in equip shops in october (300)
  • Santa Suit (#17, male armor, #17): Noel’s quest, available in December
  • Santa Skirt (#17, female armor, #21): Noel’s quest, available in December
  • Santa Hat (#17, male hat, #21): available in equip shops in December (300)
  • Holly Hairpin (#17, female hat, #21): available in equip shops in December (300)
  • Love Blade (#16, sword, #21): Amy’s Quest, available in February
  • Heart Pendant (#33, flair, #37): available in equip shops in February (3000)
  • Heaven’s Voice (#16, bow, #21): Bunni’s quest, available in April
  • Slime Staff (#16, staff, #21): available in equip shops in April (60,000)
Premuim Exclusive Equips
Freezeflame Dungeon
  • Slime Bunny (female hat): first room, guarded by Frozen Creep
  • School Uniform (female armor): first room, guarded by Obsidian Boulder
  • Gigavolt (staff): room left of entrance, Ice block puzzle reward
  • Flame Titan (gun): room right of entrance, block puzzle reward
  • Book of Spells (toys): room north of Ice block puzzle room, lower chest
  • Devil’s Fork (sword, #12): room north of block puzzle, guarded by Lava Slime
  • Cat Ears (female hat, #8): Guarded by Skadi (and Sol)
  • Scottish Kilt (male armor, #11): Guarded by Sol (and Skadi)
  • Iron Tusk (bow, #11): Guarded by Sol (and Skadi)
  • Scottish Cap (male hat, #11): Guarded by Sol (and Skadi)

Abandoned Mineshaft
  • Earth’s Whisper (bow, #20): From entrance: left twice, up, left, down twice, right twice, down.
  • Shooting Star (staff, #20): From entrance: right four times, then up.
  • Gungir (gun, #17): Blue Tile & Booster puzzle reward (to get to puzzle room from entrance: down, right thrice, down, right)
  • Fusion Blade (sword, #19): Blue Tile & Booster puzzle reward
  • Robot Ears (female hat, #13): Green Tile & Booster puzzle reward (to get to puzzle room: right, up, right, up)
  • Mecha Suit (female armor, #13): Green Tile & Booster puzzle reward
  • Headband (male armor, #14): Guarded by Neon Valhalla (to get to boss room from entrance: left twice, up, left, down twice, right, down twice, right, down)
  • Flame Suit (male armor, #15): Guarded by Neon Valhalla
  • Green Goliath (gun, #21): Guarded by Neon Valhalla

Deathly Hollows
  • The Stinger (bow, #13): secret alcove in first room - (you’ll see as rock in there), reachable from behind central rock structure
  • Puppy Hat (male armor, #19): Reward for Tile Puzzle north of main room
  • Golden Axe (sword, #17): Reward for block puzzle west of main room
  • Dragon’s Feather (sword, #16): Reward for block & tile puzzle south of main room
  • Elven Shield (toys, #15): Switch Puzzle (both diamond switches, left skull door)
  • King’s Guard (toys, #20): Switch Puzzle (follow the “line” symbols - use the mouse to find the hidden switch in the top right, right skull door)
  • Maid Outfit (female armor, #8): Chest obscured by wall in Telperion’s room
  • Shell Armor (male armor, #18): Guarded by Telperion
  • Soul Crusher (staff, #19): Guarded by Telperion
  • Death Mask (male hat, #18): Guarded by Telperion

Crystal Caverns
  • Bunny Ears (female hat, #15): First Chest
  • The Accelerator (gun, #20): First Ice puzzle
  • Emerald Cyclone (bow, #11): Middle chest in second ice puzzle
  • Turtle Gi (male armor, #14): Guarded by Crystal Hydra
  • Sami Dress (female armor, #18): Guarded by Crystal Hydra
  • Devil’s Sunrise (toys, #19): Behind Crystal Hydra, hidden behind the Northernmost Wall
  • Oak Staff (staff, #17): Sliding Green Block puzzle
  • Emerald Smasher (sword, #11): Reward for green block and big block puzzle
  • Regal Turtle (bow, #15): Hidden area in bottom left corner of green block and big block puzzle
  • Dragon Wings (staff, #6): West of big block and green block puzzle, Secret Second exit in alcove.
  • Spartan Helmet (male hat, #4): Guarded by Vulcan
  • Spartan Cuirass (male armor, #4): Guarded by Vulcan
  • Heartstopper (gun, #16):Guarded by Vulcan

Temple of Trials
  • Sword Badge (flair, #33): Reward for beating Matteus
  • Gold Star (flair, #34): Reward for beating Natalia
  • Shield Badge (flair, #35): Reward for beating Lancelot
  • Platinum Star (flair, #36): Reward for beating Annabelle
  • Buster Sword (toys, #7): Reward for beating God
  • Star Hammer (toys, #21): Reward for beating God
30 Comments
DaGamerDude584  [author] 12 Sep, 2020 @ 1:56pm 
You're probably looking for my V2.0 guide. This one is outdated unless you're playing the flash version.

Here's the new guide: https://sp.zhabite.com/sharedfiles/filedetails/?id=1936569983
Crescendotiger 10 Sep, 2020 @ 5:53am 
I mean, the Scottish Cap is not even where Sol and Skadi are.
Crescendotiger 10 Sep, 2020 @ 5:52am 
I found every treasure in Sol and Skadi's boss area, but not the Scottish Cap. If anybody knows the exact location of that particular treasure other than the person who provided this walkthrough, please inform me.
kmyc89 23 Jul, 2019 @ 12:44pm 
About the batteries:
it is a pink slime CAT not bunny...
kmyc89 20 Jun, 2019 @ 9:49am 
You missing to explain how to get the green keycards (Canela’s quest) - I have figure out from Randy’s quest (thank you :2016villain:)
Exzenosis 20 Feb, 2019 @ 1:23pm 
For the gold key, the 'leftmost posiedon resting skull' area confuses me the most, elaborate on it.
Sereomontis 13 Feb, 2019 @ 5:00am 
First I wanna say thank you for making this list. Clearly a lot of time and effort went into it.
However, I think the descriptions for where the things are, especially the skills, might need to be updated, as some of the 'rooms' have changed names.
astralfrankie 6 Feb, 2019 @ 5:03pm 
A coral key is required to obtain the Cat Tail.
DaGamerDude584  [author] 30 Jan, 2019 @ 3:34pm 
Just posting this here to clear up some confusion: Yes, I know this list was up on Google docs before it was on Steam. I was the one who made the Doc in the first place. I copied it here to make it more accessible.