AI War: Fleet Command

AI War: Fleet Command

229 ratings
Beginner's Guide
By Barcode Killer
This guide is intended for first time players. I will try to cover everything, and will try to go into depth as much as possilbe.
3
   
Award
Favorite
Favorited
Unfavorite
Getting Started
So you've just bought Ai War Fleet Command. You've opened it for the first time and it probably looks pretty intimidating. Hopefully this guide can change all of that. Ai War is not just an RTS. It contains elements of 4X, Tower Defense, RTS, TBS, and other genres. It utilizes a very unique AI that provides for interesting and unique gameplay each time. No matter whether you have never touched a video game in your life before, or whether you are a hardened RTS veteran, I can almost guarantee you that AI War will be one of the most fun games you ever play. But enough talk. Let's get down to business.
Tutorials
If this is your first time playing AI war, I recommend going through the tutorials. They will help you get used to the feel and interface of AI war.
Starting a Game
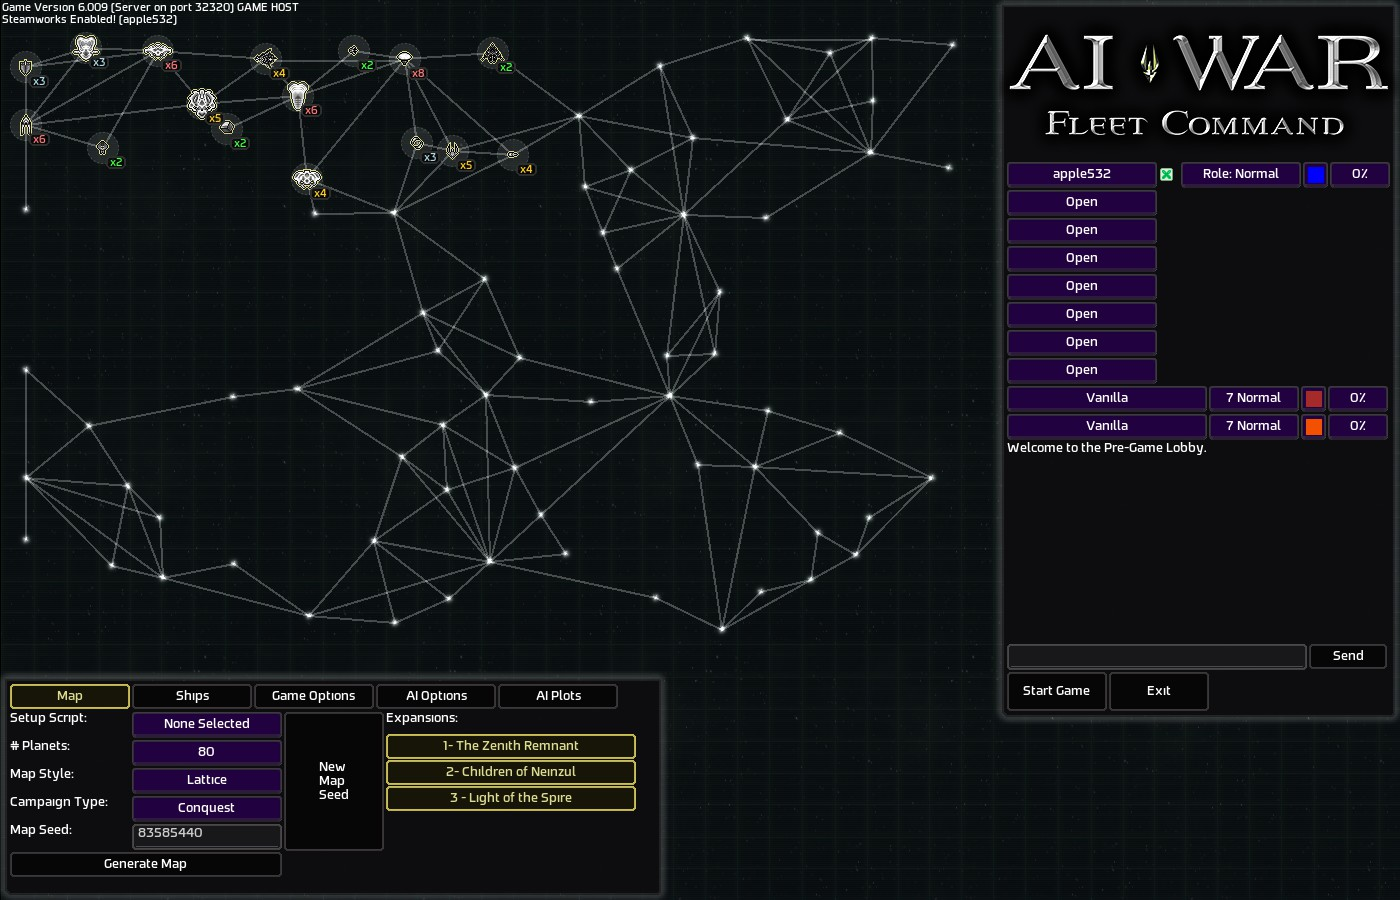
~~~~~Basically, when you start a game, your going to click "host new campaign" (or something of the like). You can host a multiplayer one, but for now, we're going to keep it simple and do a single player game. Basically, when you click that, you'll see a map, and down below, you'll see a panel with various options.


~~~~~Now you want to choose the type of game . Conquest is the most popular, and it involves traveling to the other side of the map to knock out the AI's command stations. Defender mode is more fast paced, and it involves defending yourself for a given time. This tutorial assumes you pick conquest. (Defender mode will be covered later) Now, you need to pick the difficulty. Despite what you may think, do not pick Normal. The AI is very hard, and if you pick too hard of a difficulty the first time, they will obliterate you. For experienced RTS players, I would suggest a difficulty of 5 or 6. For first time players, I would suggest a difficulty of 3 or 4. Now that you have selected the difficulty, you need to select other options. By clicking on the AI slot under the player slots (in my screenshot it says vanillla), you can select the AI Type. The difficulty is just to the right. (Remember my warning) I would recommend selecting Vanilla, because your brain is going to be overloaded enough trying to figure out the game, and it wouldn't help to have to deal with the harder effects of some of the AI. NOTE: You can only select Vanilla if you have the right expansion. Otherwise, just select one of the easier AI types.
~~~~~ The percentage sign is a handicap. Basically, if you are really bad at the game, you can adjust it to give you a better increase in meal and crystal income (explained later), but I would leave it at zero percent for now. It is usually only used if you are playing with someone a lot better or worse than you.
~~~~~Now you are going to pick a map . I have mine set on lattice, but I would recommend a "simple" map type for your first game. Under ship options, you can select different types of ships that you want in the game.
~~~~~Under game options , there is ship cap, combat style, performance, visiblity, and cheats. I would leave "show unexplored planets" on so you can see the layout of the map. Depending on how good of a computer you have, you may want to change your performance profile, as even the best gaming rigs can lag during really large battles. The ship cap feature will obviously let you have extra ships, but it will not give you the upper hand because the AI will have extra ships to compensate as well.
~~~~~ Cheats , which I will go into later, will allow you to gain the upper hand at the cost of crashing your game score. Enabling cheats, will not reduce your score, but actually using them will, so only use them if you need to.
~~~~~Under AI Options , you can find different minor factions that make the game really interesting (the number of minor factions you have depends on how many expansions you have bought), modifiers that make the AI weaker or stronger, and auto AI Progress (explained later as usual). Under AI Plots, you can find things that will make your game REALLY interesting (I would not use these the first time unless you really want to die. These will be explained later). Finally, now that you have selected all the options, you can select your home planet. Depending on which one you select, you could get a bonus ship class, which can be seen by hovering your mouse over it. You can select multiple home planets, but the number of waves the AI sends will be much bigger. NOTE: The game ends once all the AI's or your home planets have been destroyed.
Getting Started
~~~~~If you have gone through the tutorial, feel free to skip this.
~~~~~Alright, so you decided to skip the tutorial, but I will still give you a condensed version.
So you've finally started your game and are ready to go. So hopefully, after you recovered from a sensory overload of information on the screen, I can walk you through the process of getting started.


~~~~~Somewhere on the screen, you should see your ships. NOTE: You can zoom in and out by pressing (Q,W,E,R) or by using the mouse wheel. You can tell what each ship and building is by holding your mouse over it.
~~~~~At the top of the screen, you should see three numbers that are hopefully getting bigger. These are your resources . The orange one is your metal, the green one is your crystal, and the blue one is your knowledge. The yellow one, energy will stay static, until you build more energy collectors/matter converters (Explained Later). Metal and crystal are very important for building new things, and thankfully they will never run out, (they can run out, if you spend more than you take in, or if the AI destroys your metal and crystal harvesters, which are needed to make metal and crystal, but the harvesters will keep producing infinitely until the end of the game) while knowledge is important for researching helpful technology. Unfortunately, knowledge is finite and only 3000 of it can be harvested per planet.
~~~~~Now, before reading any more, pause the game by pressing "p". The pause feature is crucial, as it allows you to examine the battlefield without wasting time, which can be important in the middle of a battle. The reason you want to pause the game, is that in the time it takes you to read this, the AI could be reinforcing.
~~~~~Reinforcing happens whenever an AI planet borders one of yours, or other events. (I will go in depth later). If the AI gets the chance to reinforce, it would make the planet a lot harder to take. Now with the game paused, you want to do several things. By pressing tab, you can open the map view (as I call it). Since, you have not scouted anything (explained later), the map will be almost empty, but that will soon change. Now you can see the basic layout. Now you need to decide your plan of action. Will you be defensive, holing up at a chokepoint, or offensive, taking only crucial planets for the sake of low AI Progress (explained later). Play styles will be discussed later.
~~~~~Now, that you have seen the map, it's time to do some scouting , build a fleet , and research technologies. The DevGods have been very gracious to grant you an extra 10k knowledge at the beginning of the game for your use along with the 3000 you should be getting from the science lab at your home planet. If you switch to planet view, and make sure that you are still looking at your home planet, then you will see that there is a blue number on the screen going up and up, until it has reached 3000. This is how much knowledge the science lab has harvested. Eventually, it will say "exhausted." (I hope the game is still paused) NOTE: You can easily switch to another planet by switching to map view and then clicking on another planet. (Continued in getting started Part 2)
Getting Started Part 2
(Continued from Part 1)

~~~~~So now (assuming game is still paused), you need to research new technology . This research could determine your play style, and more importantly, the outcome of the game. Think carefully. (What to first research will be covered later in depth). If I were you, I would research better Metal and Crystal Harvesters, some sort of defensive turret, and a mark upgrade to one of my fleet ships. To research something, go to a planet with a science lab on it, and then click on it. A page should show up at the bottom right corner with the fleet ships. Click through the different pages to find something you want to research, and then click it. (You can do this with the game paused).
~~~~~Now that you've researched stuff, it's time to start scouting and building up some territory . (Unpause) The game should have automatically spawned two scouts, but if it didn't, you will have to build some. Click on your space dock, (you should have one) and now click the scout drone mark I (unless you researched a higher mark type). If you want to build more than one, you can set a build queque by clicking it multiple times or by clicking it once and then pressing arrow next to the pause button on the build menu. You can also set a rally point to where your newly created ships will rally to once built by clicking on the constructor and then right clicking on the place where you want them to rally. If done right, a flag will appear there.
~~~~~You may want to build more engineers , as they will assist in construction, but will also drain your resources at a proportionally faster rate. Click on your home command station, click on the "econ" tab, and then click Engineer drone. Again, since the engineer drone is not considered a combat ship, the sillouette of an engineer drone will appear on your cursor. Click anywhere to place it. (Hold alt while clicking to place 10, hold control while clicking to place 5). Your engineers will only assist construction within their range, but you can click an engineer and have it assist in any project you want by clicking on that constructor. NOTE: You can only build within a certain radius from the map's center, but the area is still very big. Also note that after traveling a certain distance away from the center, ships will lose speed and slow to a crawl. Since it might be a hassle to have to assign engineers to projects all the time, you can set them to free roaming defender mode. That will allow them to assist in any construction/repair on the planet. Combat ships can also be set to free roaming defender (FRD) mode, where they will attack any enemy ship that enters the planet. To set FRD, select ship or ships, (you can select multiple ships by dragging), and then right click while holding "v". The ships will move to that area, but in the process, will be set to FRD. (A normal right click will move a ship anywhere on the map) While selecting ships, it is important to note that if you try to select combat and non combat ships at the same time, only the combat ships will be selected. This can be overridden by holding control and selecting, but be careful to select only what you want to.
~~~~~Now that you have built some scouts, it is time to start scouting. Scout drones are automatically cloaked, so they cannot be attacked, but most AI Planets will have tachyon guardians waiting outside wormholes (used to travel through the map), which will decloak ships. The planets immediately surrounding your planet will usually not have those. Even if your drone gets destroyed, you will still have a general feel of what the planet looks like. But for live information, you must have a drone sitting on that planet.
~~~~~Now that you've scouted the planets around you, it's time to take your first planet. The first order of business is building up your fleet. Select your space dock and loop build the ship cap of all attacking ships possible. Engineers will speed this up. Now, depending on the planet you scouted, you are ready to attack. Select all your units and while pressing "control", right click the wormhole you want to send them through. You can also use the key combo "Control+Right Click+G" to have them move as a group, instead of having your Fighters essentially commit suicide. Once they are through, they will start attacking ships within range. They will not attack anything else, until they have further orders. Depending on the planet, there may be buildings protecting the command station, but probably not planets so close to your home planet. Now if the battle looks to be in your favor, select your units and FRD them so they clear out the planet. The command station, however, must be manually targeted. If the AI has a sizeable force to match yours, select your units and have them attack the highest priority target while attack moving. Attack moving lets them move to their target while also attacking anything that may come into their range. (Hold x and right click) Alternately, you could split your forces up to attack multiple targets, but it is up to you. (Strategy will be discussed later) Hopefully, you see a notification like "ai command station destroyed: +15 ai progress" This means you have sucessfully destroyed the planet. All AI forces on the planet however, will still be active and must be dealt with. Once the planet has been cleared, you can take it for yourself. Go back to the planet you own, and then find the colony ship in the construction tab of your home command station. Once it is built, send it to the other planet and then click on it. You will have the option of building three types of command stations. (4 if you have researched orbital) The military command station should be used at chokepoints as it provides an extra attack boost to your ships, logistical command stations should be used at heavy transportation points as it provides a speed boost, and economic command stations everywhere else as they provide an extra income of metal and crystal. (Continued in part 3)
Getting Started Part 3
~~~~~Now that you have built a command station. Once that planet is complete, you will need to build some other stuff there. You will probably want some engineers and a remains rebuilder (build one on your other planet too). In order to not have to remember to do this every time, you can go down to the very bottom left, click on controls, and change the options. Most of them are self explanatory, and a lot of them are very helpful. I would recommend "non warhead FRD" (or something like that, explained later), autobuild one mk1 engineer at each planet, one remains rebuilder, one energy collector. Some of the other options are very helpful too. Take time to look through them. NOTE: You can switch between galaxy wide controls and planetary controls, if a planet is higher priority. Now, at your new planet, build a science lab, preferrably mk2, an energy collector, metal and crystal harvesters, (these can only be built on the harvest points) engineers, and anything else you may need including defensive turrets (I will go in depth on turrets later). Congratulations, you have captured your first planet. Now, you may be wondering what AI progress is. In fact, it is so important that I have devoted an entire other section just for it.
AI Progress
~~~~~Now you may be wondering why I devoted an entire section to this, but it [AI progress] is very important . This number can determine the fate of the game. It is shown right next to the energy level. The AI Progress exists for this simple reason. If the AI attacked you in the beginning of the game with just 10% of its entire force, it would obliterate you every single time. The AI Progress is a measure of how "concerned" the AI is with you, and how much force it will throw at you.
~~~~~Breath a sigh of relief now, because the AI ALMOST never attack unannounced. The AI will periodically attack in waves, which will be a fleet of ships sent from an enemy wormhole to one of your planets. The AI will ALMOST always tell you what planet they are attacking and ALMOST always tell you what they are attacking with (noticing a trend here?) The size of the wave will depend on the AI Progress and the current difficulty. A low AI Progress at the end of the game is 400, while a high level of AI Progress is 700-800. Furthermore, after the AI Progress crosses a certain threshold, they will "tech up", which means that all ships they send will be of a higher mark level (more damage), and they will unlock one new ship type.
~~~~~That is why it is important to keep the AI Progress low. Every time you destroy a command station, certain guard posts, detonate a warhead, etc. you will raise the AI Progress. (A full list of those actions can be found at the AI War WIki) http://www.arcengames.com/mediawiki/index.php?title=AI_War:Fleet_Command On low difficulties, a higher progress will not matter as much, but on higher difficulties, (7 and above) every command station you destroy will come back to haunt you. Fortunately, there are ways to reduce the Ai Progress, such as destroying a data center. They are usually plentiful, (15 on an 80 planet map), and they each reduce the AI Progress by 20. Another way to reduce the Ai progress is through an ai coprocessor. There are four AI coprocessors in a galaxy. Each time you destroy one, it raises the AI progress by 20, but if all four are destroyed, the progress will drop by 120. Therefore, it is ideal to destroy each one in as quick succession as possible. Spire civilian leaders are a minor faction which spawn on AI planets. Each hour, they raise the AI progress by 1, but if you capture the planet they currently reside on, they will lower the AI progress by 3 per hour. If the AI progress goes below a certain point, it will hit the floor, which is the effective point beyond which the AI Progress can not be reduced. However, the destruction of a data center should not be delayed, as it will balance out the next increase in AI Progress.
Good Offense
~~~~~One of the hardest things to get around in AI War is the ship cap . I think that the ship cap is sort of annoying because it prevents you from being able to fully defend all of your planets at one time. There are a few ways to get around this. The easiest way is to use the cheat "More More More" which removes the ship cap, but also kills your score. Other ways include scaling up the ship cap when creating the map, but as a result, the number of ships the AI has scales up too, which just makes the game lag.
~~~~~The most effective way to get more ships and establish a good offense is to capture lots of adv research stations, jumpstart your economy, churn out mercenary ships, and repeat. What I tend to do is save up a lot of knowledge, only research MK 2 ship types, and once I capture an adv Factory try to start researching all of the mk 3 types. Mercenarys are really effective too as they are mk 4 equivalant and have a 3 times larger ship cap. They are also really helpful midgame as you may have not unlocked a whole bunch of ship types yet but by using the mercenary space docks, you are able to get other ship types including parasites, beam frigates, and even a mk2 neinzul enclave starship, which is really helpful both offensively and defensively. You will need a very strong economy to do this, so I recommend unlocking mk3 metal and crystal harvesters early on in the game.
Good Defense
~~~~~The primary factor about establishing a good defense is utilizing both turrets and ships to their full potential. A lot of the helpful defensive stuff will come from research. Some things I would definitly consider researching are mini fortresses, area minefields, emp minefields, mark upgrades, and grav turrets. Other turrets can be unlocked at your own discretion. Mini fortresses are not strong by themselves, but 2 of them can be placed on EVERY single planet, effectively with no ship cap. This is good for some defense, say if a stray threat ship decides to attack. They have decent range, and can deal up to 460k per shot, or 16k to 30 ships. Because of the lack of a ship cap, I consider the mini fortress one of the best defensive weapons.
~~~~~Minefields are also a very good investment. There is virtually no cost to build minefields, and a full cap of mk3 engineers or mk2 and mk1 engineers can erect a full cap of one of the minefields in minutes. Minefields are very good for defense because they are virtually free, and can be erected right on top of a wormhole so that an attacking wave will suffer damage. (I will stack up to 500 of them at a single wormhole that I know a wave will come through, and it is a big help in battle) The area minefields can also damage groups of ships (In some cases even the entire fleet if they have just come out of a wormhole) and even damage ships that are immune to area damage! EMP minefields can paralyze ships making them vulnerable to more damage from other area minefields or other turrets. Place area minefields closest to the wormhole, then emp minefields, then normal ones. That placement is most effective.
~~~~~Fortresses are one of the strongest defensive units in the game. Mk3s are capable of dishing out 400k damage to a whopping 50 units, with only a mere 6 second reload time. I recommend unlocking the mk1 fortress at least, and Highly, Highly, Highly recommend unlocking the mini-fortress. (Did i say highly?) Good fortress placement is very simple and logical. Fortresses should mostly be placed at chokepoints and high traffic areas so that they are able to be utilized frequently. However, I would recommend not relying on fortresses soly for defense, ESPECIALLY when the next wave is a fleet of bombers or anything with a polycrystal hull (fortresses suffer a massive attack penalty of 0.25% damage when attacking anything with a polycrystal hull, most notably bombers), although with additional defenses, such as mines or grav turrets, a mk1 fortress could reasonably stave off a wave of 100 ships. My rule of thumb is that for each mk1 on the planet and grav turrets and minefields at the wormholes, you can hold off another 100 ships. Mk2 can take 125 and mk3 can take 150, but I'd say that's to be conservative. It's better to be safe than sorry in ai war. Finally, placement of fortresses is really obvious. Fortresses have huge range, so I would place them in a central location so that they could attack any ship from any wormhole. Alternatively, you could place them in a corner so they could be far away from any ships while being able to attack ships coming from a high traffic wormhole. If you really concerned about a wave, I would place grav turrets around the fortress so that the fortress would have an extra buffer. Mini fortress placement is about the same. Although their range is smaller, you get two of them per planet, so I would try to spread them out to cover all of the hostile wormholes. Although mini-fortresses are not good for waves, they are good for the occasional free-roaming ship that may have traveled onto your ship without your notice. The one major downfall of fortresses is their exorbitant build time and resource cost. I definitely recommend a full m/c cap before you start building one of these. I would try to use as many engineers as possible, while never letting your m/c go below a certain threshold (depending on difficulty of game). I would definitely recommend getting engineers to build your mini-fortresses, as while they aren't particularly expensive, they still take 15:00 to build unassisted. Also, make sure that while a fortress is undergoing construction, to keep it far away from hostile wormholes and possibly under ff protection. This will help ensure that you did not waste you m/c and time in building it just to have it destroyed before it was even operational.
~~~~~I know. I know. You're probably thinking "What is this section doing here?" Well let me explain. Engineers and Remains Rebuilders can play a crucial part in your defense. Engineers are good for repairing things and assisting in construction, and I recommend unlocking mk3 if you're soloing. Remains rebuilders rebuild turrets at half the build time and half the cost, allowing them to get back in the battle faster and cheaper. There are many ways engineer drones can be used offensively, from helping build neinzuls, to, as I like to call it, offensive mine placement. Offensive mine placement is basically spamming huge numbers of minefields in the path of an attacking wave. I first place mines at the wormholes before the attacking wave arrives, then as soon as I can tell what wormhole the wave will come from, procede to scrap the mines at all other wormholes and build wormholes in the path of the wave. As most of the ships are paralyzed from the emp mines already placed around that wormhole, there is a window of opportunity for new mine placement. NOTE: Starships have emp resistance and will not be paralyzed by those mines. It is even possible with a full cap of mk3 engineers to place mines while the ships are in motion, but expect to lose some in the process. I strongly recommend a full cap of mk3 engineers or experimental engineers for offensive mine placement, as they can both teleport. With mk3 engineers, I would set the planet controls to automatically spawn the full cap of engineers, and automatically frd them, so there is no need to micromanage the engineers. For the exp: engineers, I would set a rally point for the planet on which you need them, as they can teleport and a fabricator warp gate has a cool down period. That way, all you need to do is place the mines, watch the engineers teleport over and build them, and watch as the other fleet is destroyed. Remains rebuilders have a far less offensive job. They simply rebuild destroyed turrets. THEY CAN EVEN REPAIR DESTROYED FORTRESSES< SAVING YOU HALF THE BUILD TIME AND HALF OF THE M/C COST. I would keep five off them minimum on a planet with a wave on it, and put them in different strategic locations around the map as they can't teleport (fortunately they have cloaking). Also make sure you set the return point for the frd engineers as a place with a ff if you have one. That could save some trouble.


49 Comments
siliconvalets 19 Jan, 2024 @ 3:54am 
Cannot get this game to function the controls do not work properly zoom just does not None of the above seems at all relevant is it because of WIN 10?
Romeo Deluxe 18 May, 2018 @ 1:24pm 
It would help save time if one of the authors returned and amended the title to show that it is outdated and is no longer being updated. Yes, I did see the date, this is why I'm making this comment. ;)
[ ] 23 Oct, 2017 @ 7:05am 
I never understand why people can't take a moment to look at the date a guide was published and last updated on before commenting the typical "this guide is outdated, blah blah blah".
Sander 14 Mar, 2017 @ 8:54am 
Well given that this guide was written in 2014, its no suprise that its outdated now
Tydo 21 Jan, 2017 @ 11:59am 
Hopelessly outdated.
No such thing as crystal anymore and no stacking of minefields not to forget that the minefield cap is far below the 500 mentioned here.
Also use of engineers is very different now - for construction you need a CMD station or a mobile constructor in system.
That of course makes me question everything else in it, but even most of the official wiki is from version 6.x (=year 2013) and even has lots of empty entries ("coming soon" messages) or only copies of the ingame text, no additional info.
So it is business as usual, no manual or reference anywhere, at best some ad-hoc trial and error observations from other players that often refer to what things where like when they played many many patches/expansions ago.
Guide needs to be downvoted or taken down to avoid misleading new players.
aZavar.Kul 26 Nov, 2015 @ 11:13am 
переводи переводи не спрашивай
maxqwerty 4 Oct, 2015 @ 9:16am 
I would like to get permission from author to translate this tutorial into russian.
jabberwok 11 Sep, 2015 @ 1:42am 
At least conceptually, I really like the per type ship cap, since it means old ships are still useful for filling out the fleet. Also, hitting the cap gives me a clear indicator of when I'm ready to attack. In other RTSs I tend to turtle and build up too much.
Killroi 9 Jul, 2015 @ 8:31pm 
I had 2 AIs on Vanilla 4, and still lost by the time I took my second planet. The AIs warped in like 200k ships by the time i had maybe 1k... lol. I need to pause more
InTo_The_Sun 19 Apr, 2015 @ 7:48am 
Thank you! Really useful guide.