Killing Floor

Killing Floor

123 ratings
Creating a map with the Killing Floor SDK - Basics
By Jsh and 1 collaborators
This guide shall give all Killing Floor players the opportunity to get into the usage of the Killing Floor SDK. It describes how the editor works and how to handle it right. With the following guide I try to explain basics that are required to get ready for map building. Please mind that this one was created for users who never worked with SDK before.
   
Award
Favorite
Favorited
Unfavorite
Step 1 - How to get Killing Floor SDK?
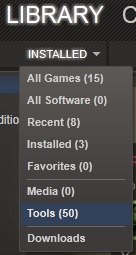
First of all, you need to install the Killing Floor SDK. It is something like additional software for free that allows you to create several new contents. To get this programm you'll need switch into your Steam "Library" and select the section "Tools".


Right after this step a list with all available tools appears. A double click on the entry "Killing Floor SDK" will open a window with some information like needed HDD space and download time. Hit next to install the current selected file. It will work like updating your Killing Floor game. You may know it from several times. When the download has finished, the Killing Floor SDK will appear as "Ready to play" in your tools directory.

Note: Before you start the SDK please bear in mind that you won't get into the editor after 10 minutes. You probably need a lot of practise to be able creating your own maps built from scratch.

The screenshots were made with my PC displaying with 1366x768. Other resolutions may show your layout way different than my screens do.
And please, don't hang me for wrong spelling or grammar. ;)
Step 2 - Getting started with the SDK
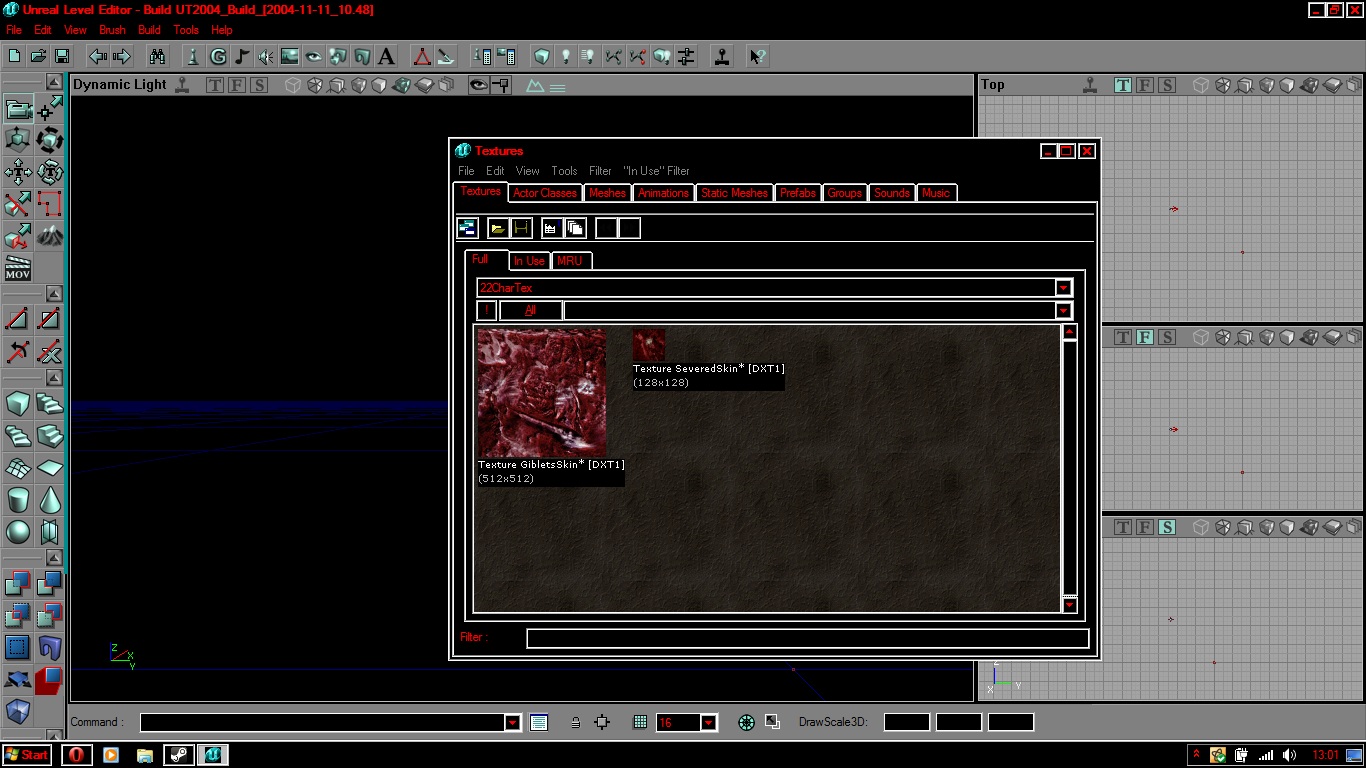
Well, you recieved your Killing Floor SDK. Now we want to start it for the first time. Therefore we hit the Killing Floor SDK in "Tools" section that says "Ready to play". Due to its complexity it may take a while until it runs for the first time. You should be able to see the following screen:


Note: For those who has already worked with the UED 3.0, known as Unreal Engine 2.0 Editor (UT2004), or higher before, this may look similar. Just some minor changes has been made to the 2.5 engine version.

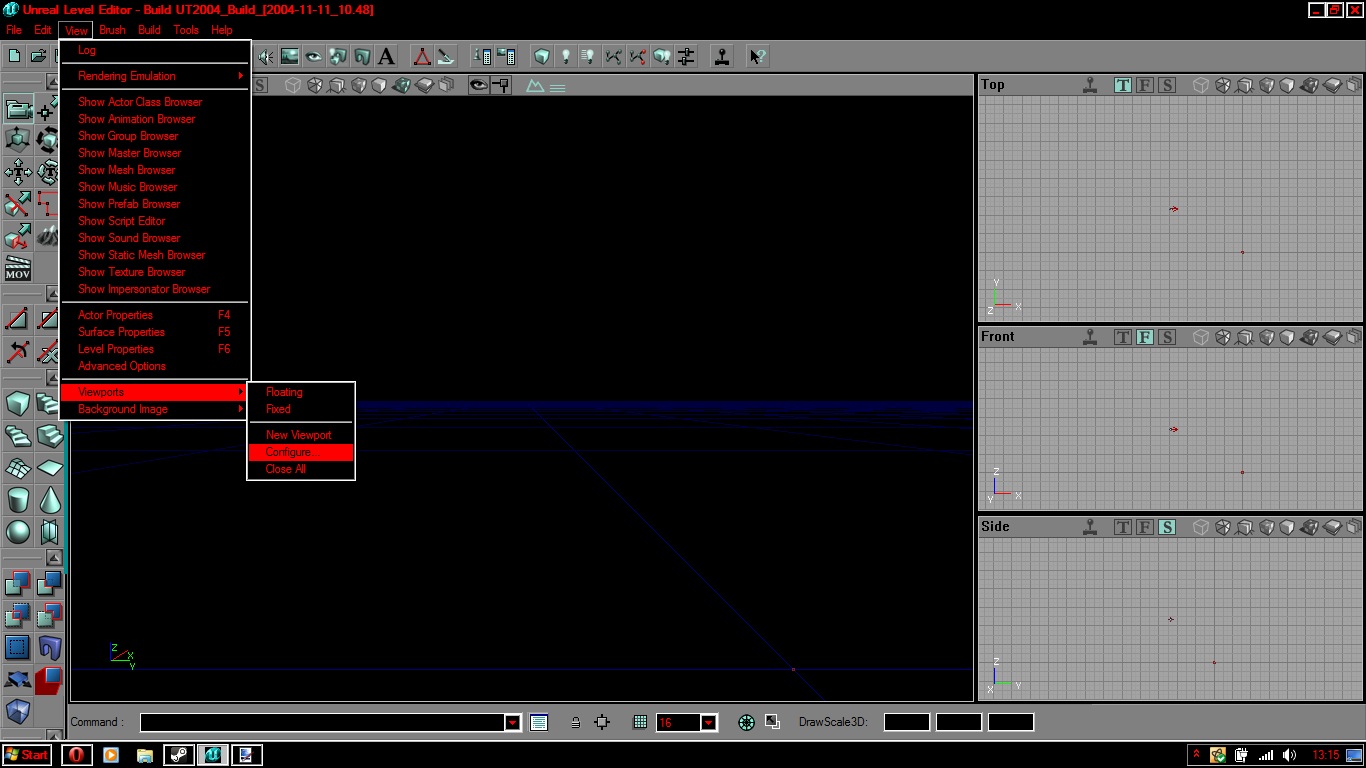
We close the window with "Textures" because we don't need it for now. Your layout may look different when SDK runs for the first time. For changing the window layout you go for "View" on top line; a dropdown menu will appear. Here you choose "Viewports" > "Configure...".


A new window with different layouts will show up. Personally, I prefer the 1:3 layout where the larger one is for realtime preview (stopped time) with different displaying rendering modes. By default it's the "rmode1" which means you see your map as wire framed view. But we will go back to this later. The three smaller windows on your right screen are by default for Top (T), Front (F) and Side (S). You also have the possibility to change each separately into render modes as well but I don't recommend you to do that because it's kind of useless and wastes performance.

Step 3 - Camera movement and navigation
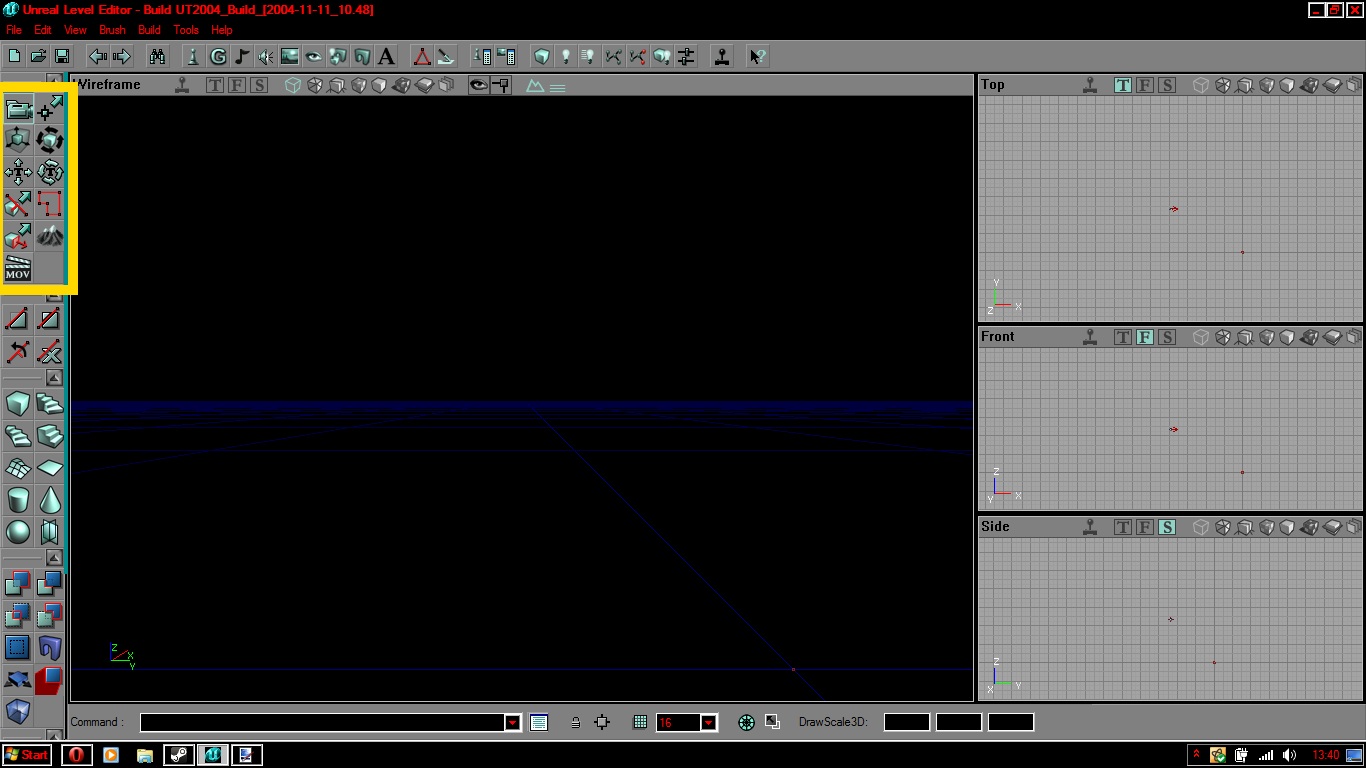
To stay on top of things we have to know how to navigate through the void. To move the camera choose the "Camera Movement" tool. You can find all the tools on the left side bar but this tool is normally selected by default.


You are now able to navigate yourself through the windows. To do this click on a viewport you want to change the camera angle at first. By selecting a viewport its outlines should turn into white.

There are three different ways to change your camera position in the main window (3D):

  • Holding left mouse click + moving mouse = flying planar through void on x,y; spinning around z
  • Holding both mouse click + moving mouse = flying planar through void on y,z; no spinning
  • Holding right mouse click + moving mouse = no movement; spinning around your point of view

The smaller windows are easier to navigate. All you have to do is to select one and hold mouse click + move your mouse to navigate where left click has got a slower movement than right click. Hold both mouse clicks pressed while moving your mouse or simply use your scrolling wheel to adjust the zoom level.

Note: You may notice the three-way-axes display at the left bottom of your main window. It rotates with your camera in real time what might be very helpfull sometimes.

Step 4 - First room with light source
Now, after the camera movement we will go on with adding a room into our void. But beforehand, you should know some quirks about this engine. First of all, it works subtractive. This means the void isn't a void actually. It's more like an enormous huge cube where we have to cut out "rooms". Furthermore, it does work neither in the metric nor in the imperial system. The engine uses its own measure, the so called Unreal Units (UU). Generally-speaking, we can suppose that 16 UUs stand for 1 foot and 52.5 UUs for about 1 meter.

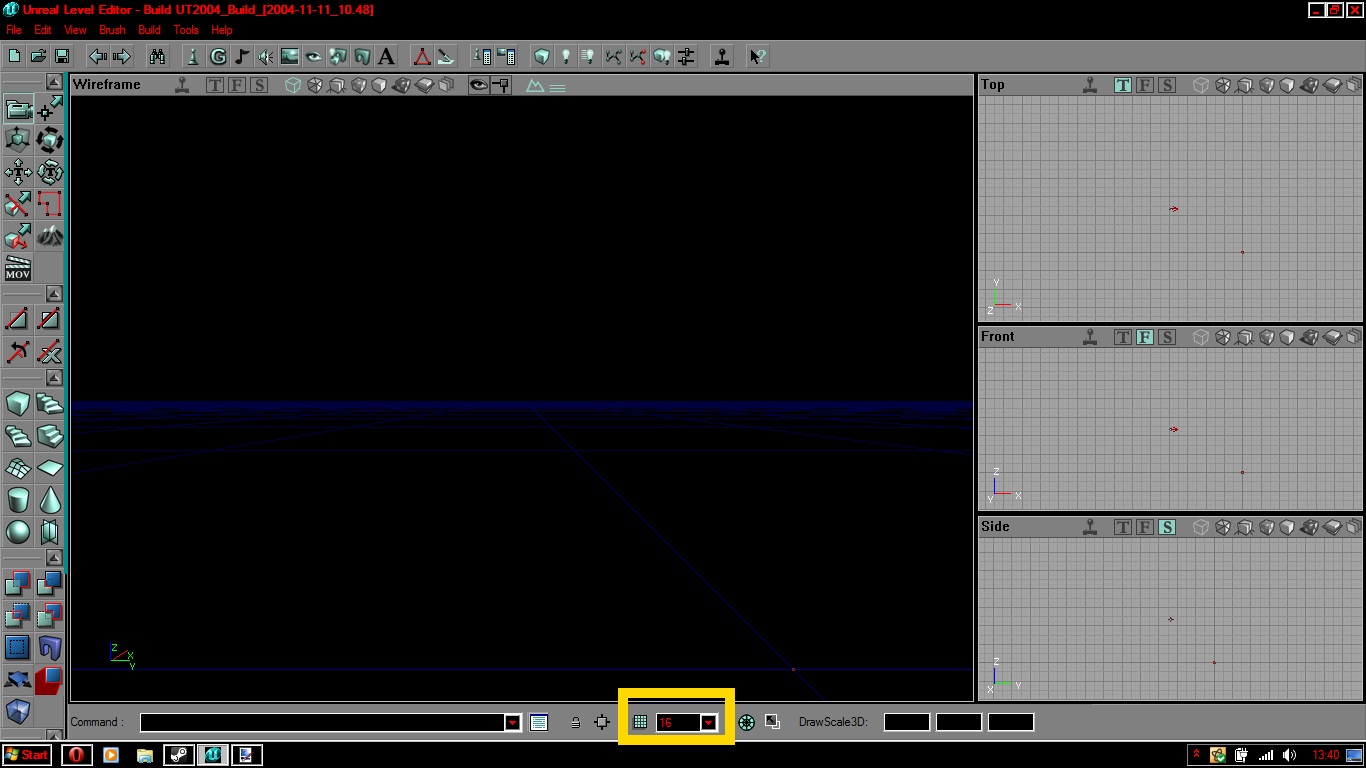
The wireframe or grid helps you out to work exactly. We can determine which size it shall display. For changing size there is a small field on the bottom below the main window. The changed grid size apply to all camera perspectives.


Hit the arrow and a dropdown menu will pop up. We can choose between 1,2,4,8,16,32,64,128,256,512,1024,2048,4096 (powers of two).

Note: You should always stay in 16 or at least in 8 grid. Otherwise it could end up in critical error while playing later or may cause ugly graphical bugs [like HOMs (Hall of mirrors) or BSP holes]. Usually it does for sure when the map layout is very complex. Trust me, I made this mistake at the very early begining of my first projects back in time for UT2004. With some bad luck you have to redo all your work or even abandon your project.

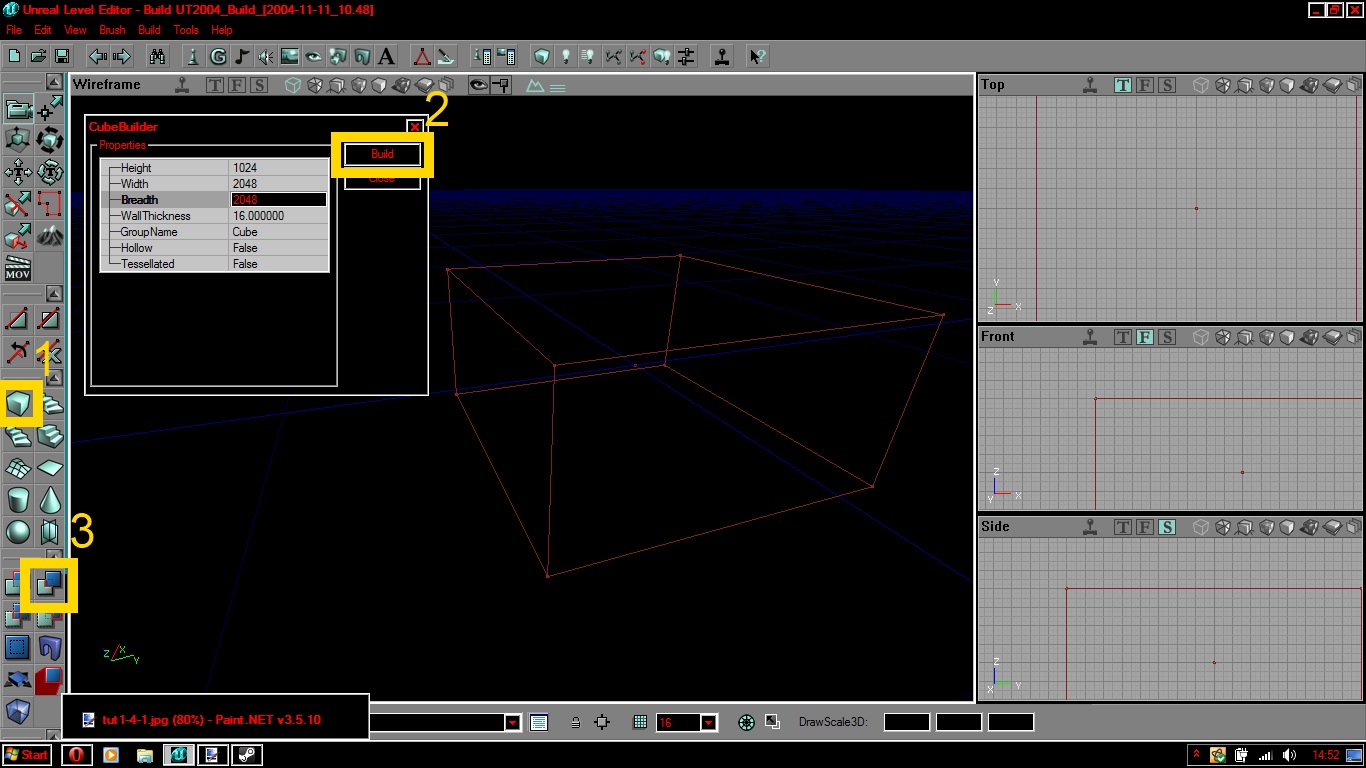
Let's create a room where we can create additive geometrical structures. Remember, the editor works subtractive so we need to cut out a cube first. To do so, navigate to the center of the left sidebar and search for the term "Cube". Right clicking it will open another window called "CubeBuilder". Following modifiable settings will be shown:

Height (in UU) : the lenght output on z
Width (in UU) : the lenght output on y
Breadth (in UU): the lenght output on x

Note: Only integral numbers are valid here. Negative or floating-point numbers won't work.

For our example you need to enter 1024 for "Height" and 2048 for "Width" and "Breadth". I choose these numbers because they are powers of two. This ensures that we will always stay in 16 grid.

Note: The lenghts are halved, starting from the center of where the cube is located.

Don't change and mind the other settings because we won't need them.

Now press the "Build" button to create a Builder-Brush. It's just some kind of template for the editor. It just illustrates the dimensions of a brush (in our case it will be a room) you can build with it. Hit the "Subtract" button on your left side bar to create a new room.


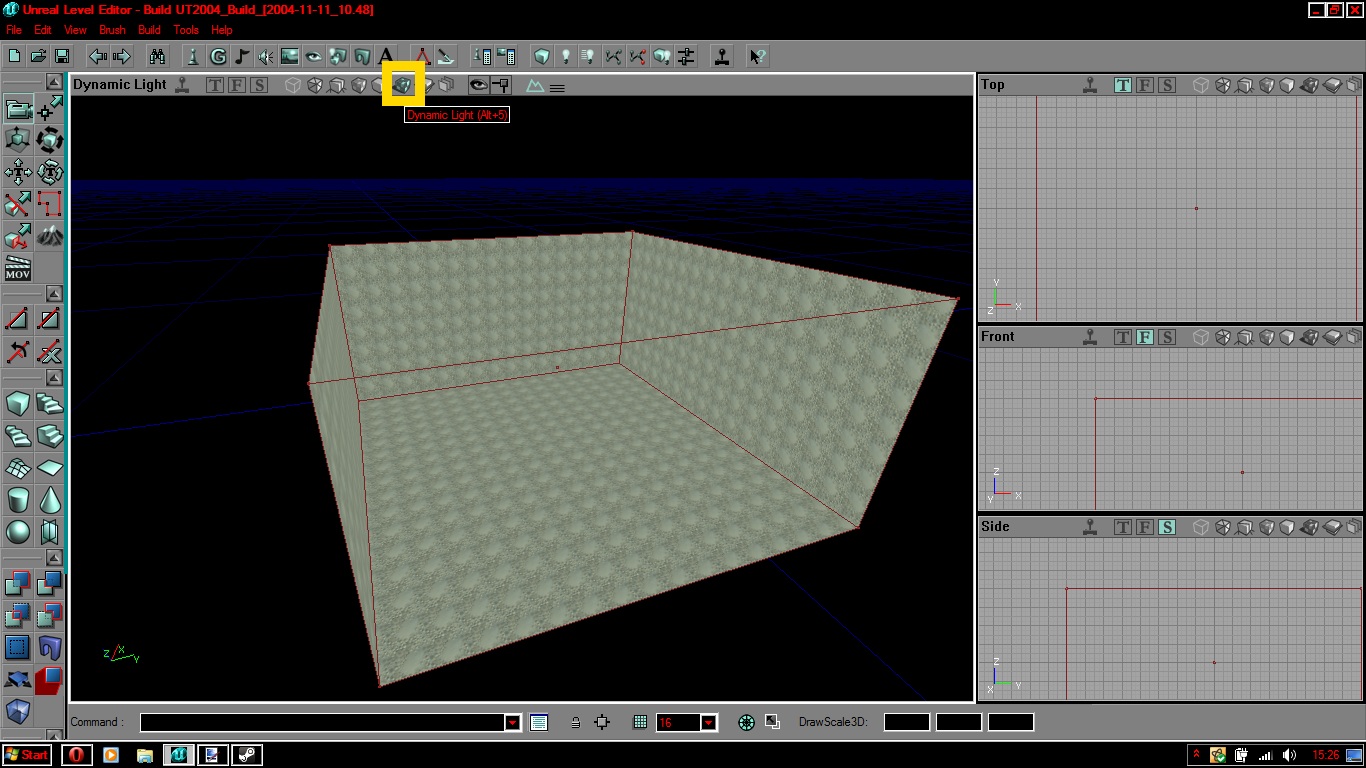
No changes, huh? False you can't see them for now, sure. We must change the rendering mode to see textures and other stuff. The current mode is "Wireframe" (rmode 1), I suggest to use "Dynamic Light" (rmode 5). To change rmodes we have to click on the symbols in the central headline of our main window.


Note: As you realized you can touch symbols with your cursor before pressing them to get information about their function.

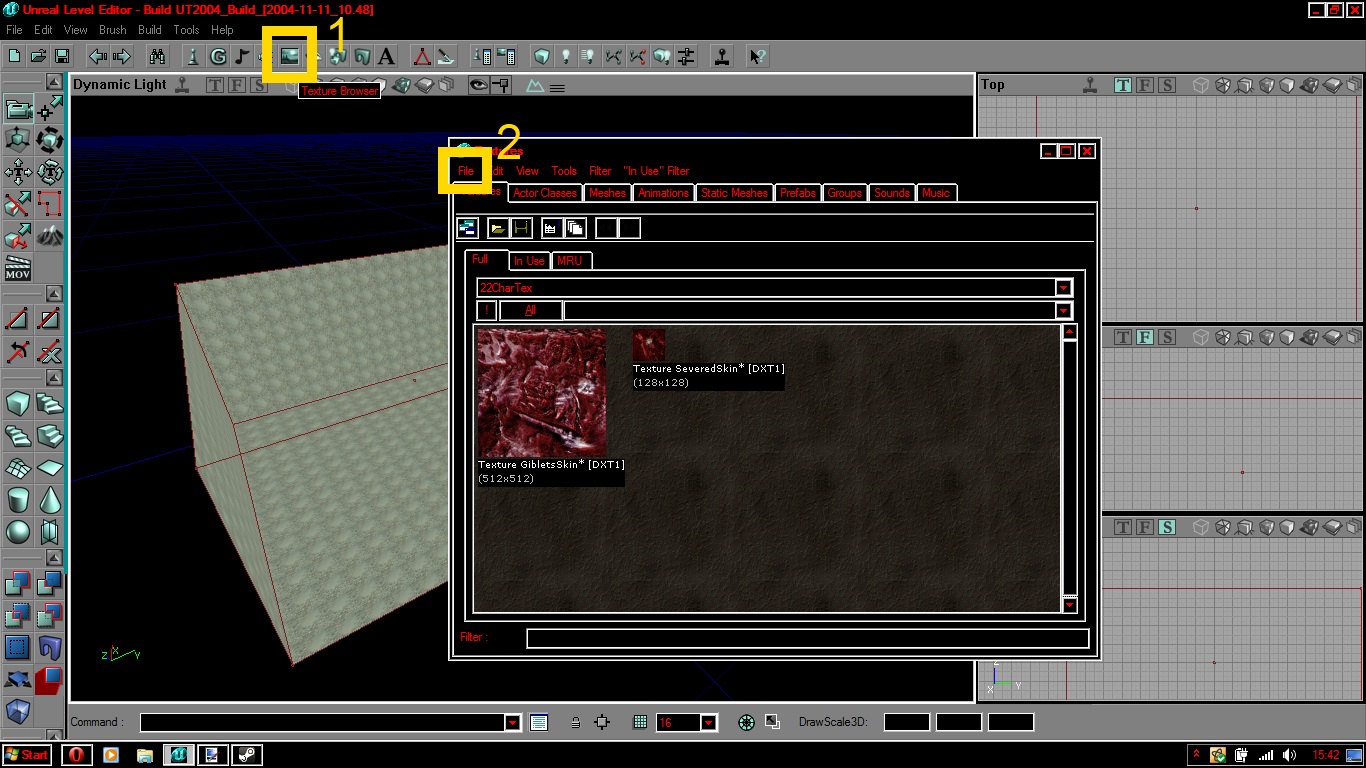
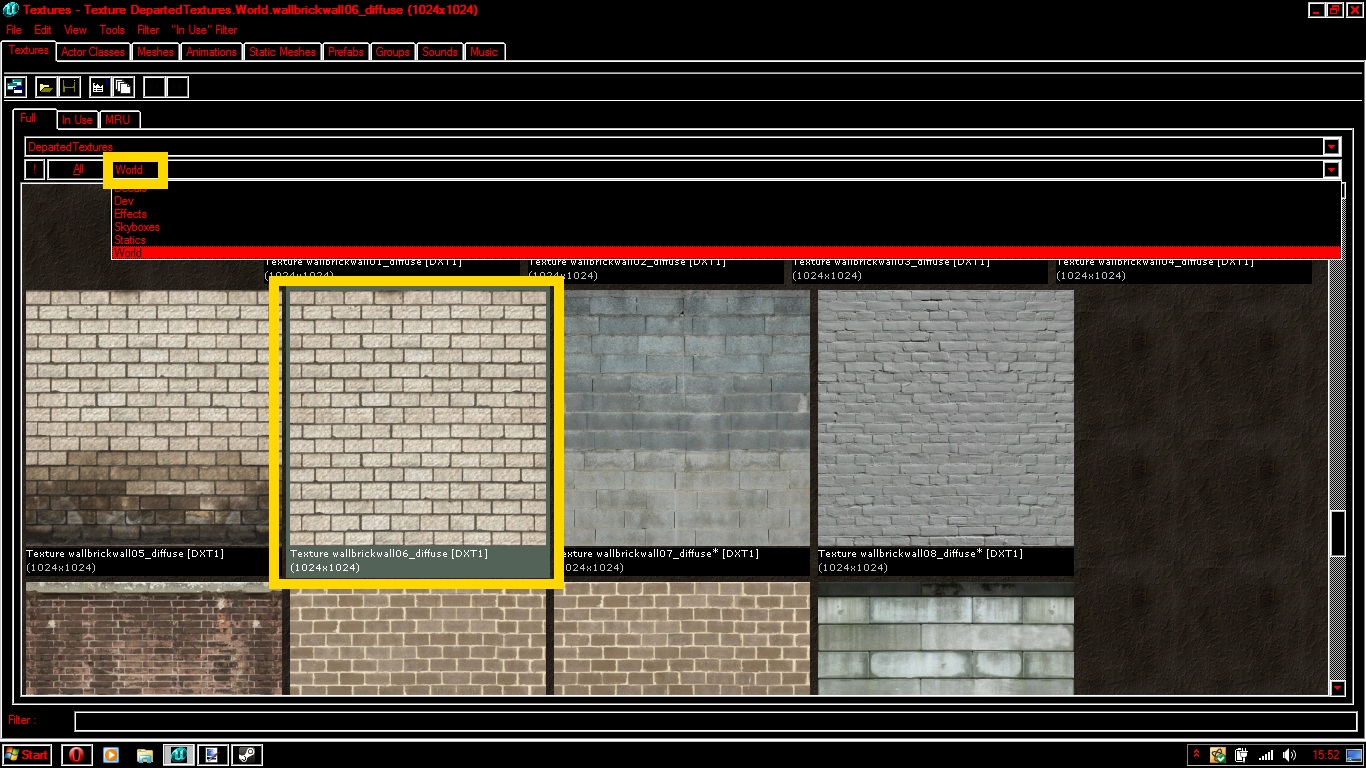
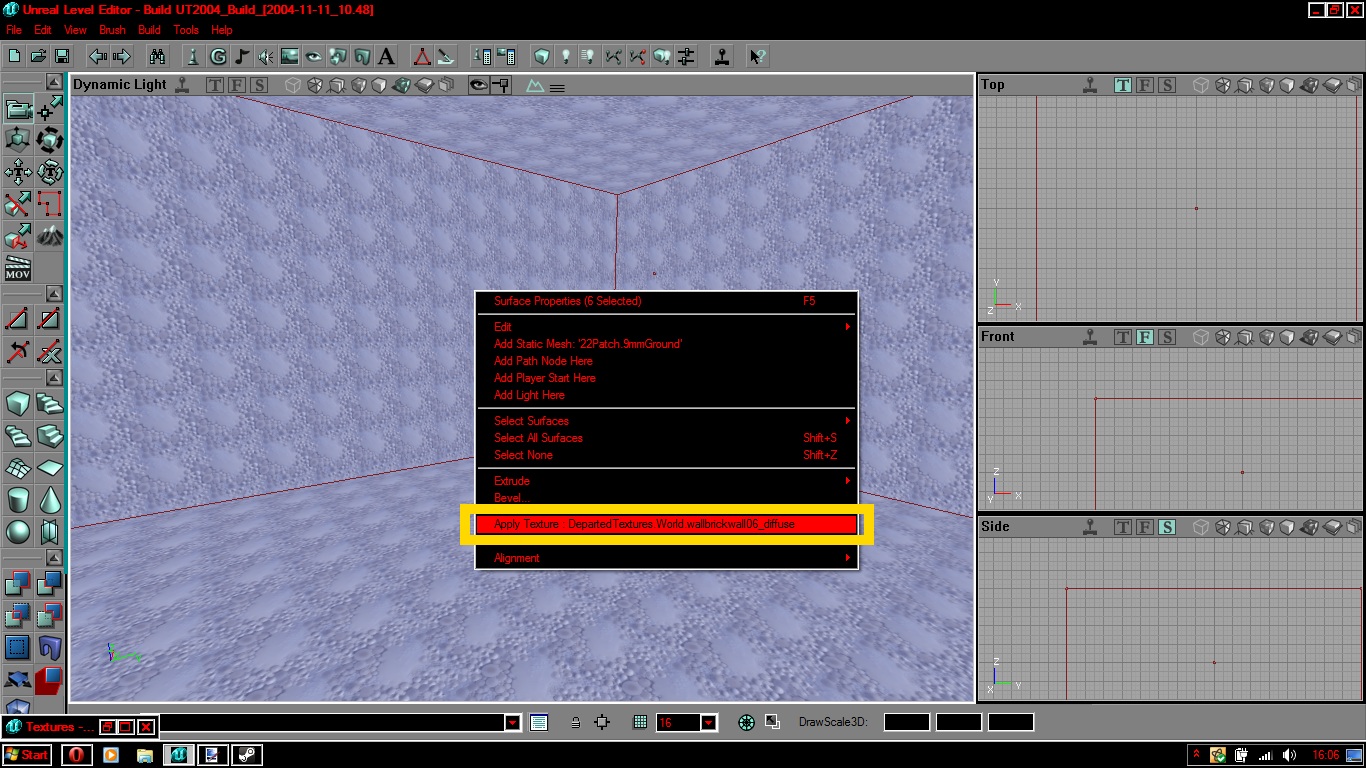
Due to the fact we subtracted a room before selecting a texture, the editor uses the default texture of the engine which looks like bubbles. To change this we open the "Texture Browser" on the top-bar of the SDK above the selectable rendering modes. Now we have to select a texture package, click on "File" -> "Open..." or just click on the "open folder symbol". Another window will show up which can load all textures packages found in your Killing Floor textures folder. Scroll down and search for the "DepartedTextures.utx" package. I really like that package because it features a lot of bright high detailed textures and I am going to use it on this tutorial.


You just loaded the full package into your editor. Some packages are loaded since the SDK ran, some of them aren't fully loaded. I am not able to tell you why this happens, just take it like it is.
We have to change the section where our needed texture is located. So we need the lower topline that says "Decals" and select it. Again a dropdown menu will appear and hit the "World" section.

Note: That's just an example. In this case it works like that. Usually every texture package got its own section names. Some of them don't even got any sections.

Scroll down until you find a brickwall texture called "wallbrickwall06_diffuse" and select it with a simple left mouse click. From now on it is shaded in grey which means it's your current selected texture.


Note: Did you mind the size of the texture shown below its name? Again powers of two. Only combinations of powers of two are valid for textures. I hope you see how important it is.

You can minimize the "Texture Browser" and return to the main window of the SDK. There you can select all surfaces with your left mouse click by pressing "Strg"(German keyboard)/"ctrl"(English keyboard). Release "Strg"(German)/"Ctrl"(English) and right click once on any side of your room to open a new window. Then you hit "Apply Texture [texture path]" and your surfaces are "repainted".

Note: You can also select all surfaces where you want to change textures first. Hitting the wanted texture in your "Texture Browser" afterwards will also work.


It's time for saving your file. Hit the "Save Map" symbol on the upper left of your SDK or go over "File" dropdown menu to "Save As..." and save it as tutorial01.

Note: I recommend you to save it as none KF-file until it's palyable because KF-tagged will show up in your game maplist. An unplayable map that is started ingame causes a crash and may in some cases reset your perk progress stats to 0 for certain time or for the next steam restart.

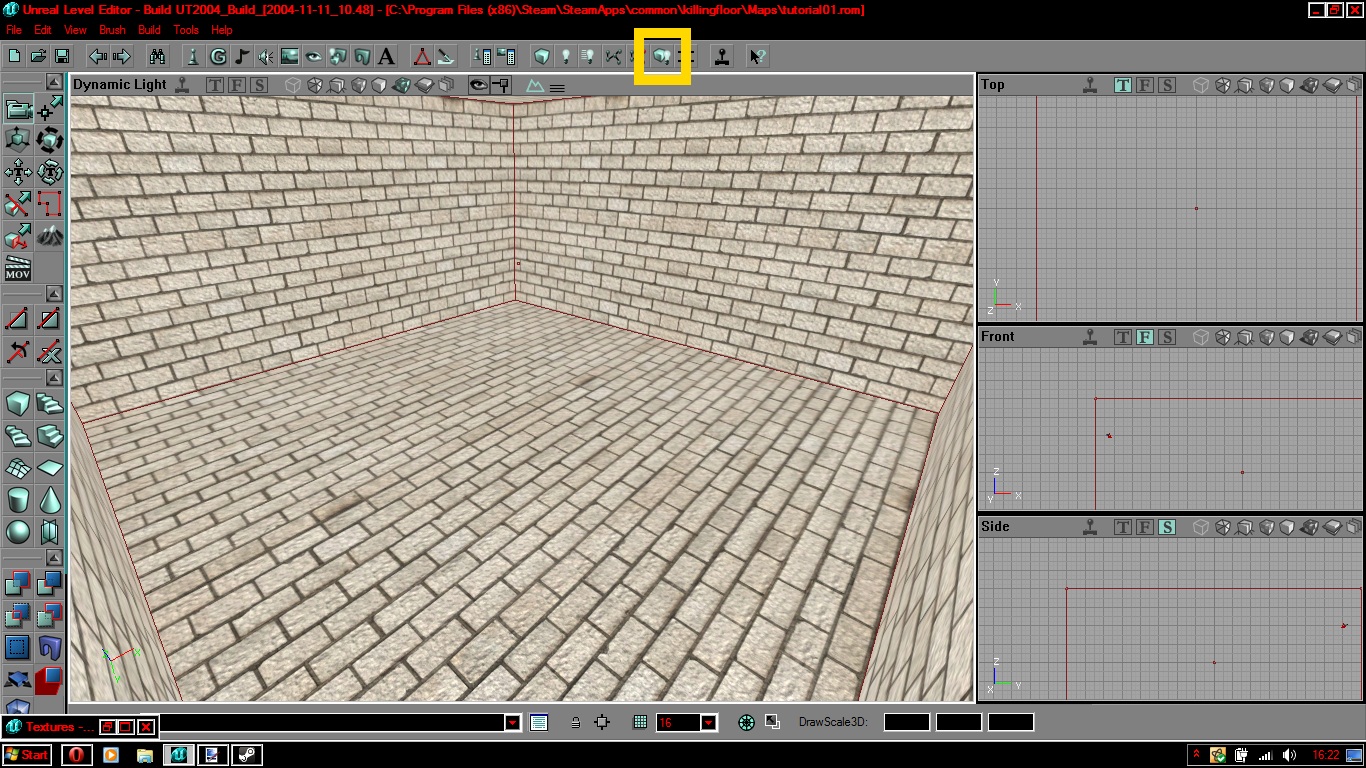
Well, we see something we've created and the editor shows it to us but the editor doesn't know that it is already there. So we need to rebuild it to make SDK notices that we want to have these things really build what we see. To build press the "Build All" button on the top-bar.


Loading screens are running fast and then darkness!?... Wait we pressed build all. That means lightning as well. What a shame we forgot to add lights. For adding light sources just right click anywhere in your cube and choose the term "Add LIght Here". A light bulb will appear and bring some light in your room. It is still not that what we want it to be, isn't it? We move our light to the center of your map. Just select it and shove it to the center.

Note: For shoving objects into the right direction use the Sideview windows for better navigation. Hold down "Strg"(German)/"Ctrl"(English) and push the selected object with your left mouse with fixed screen, hold down "Caps switch" to make the screen follow the object as central point while shoving it. Using the right mouse click instead of left causes objects spinning.

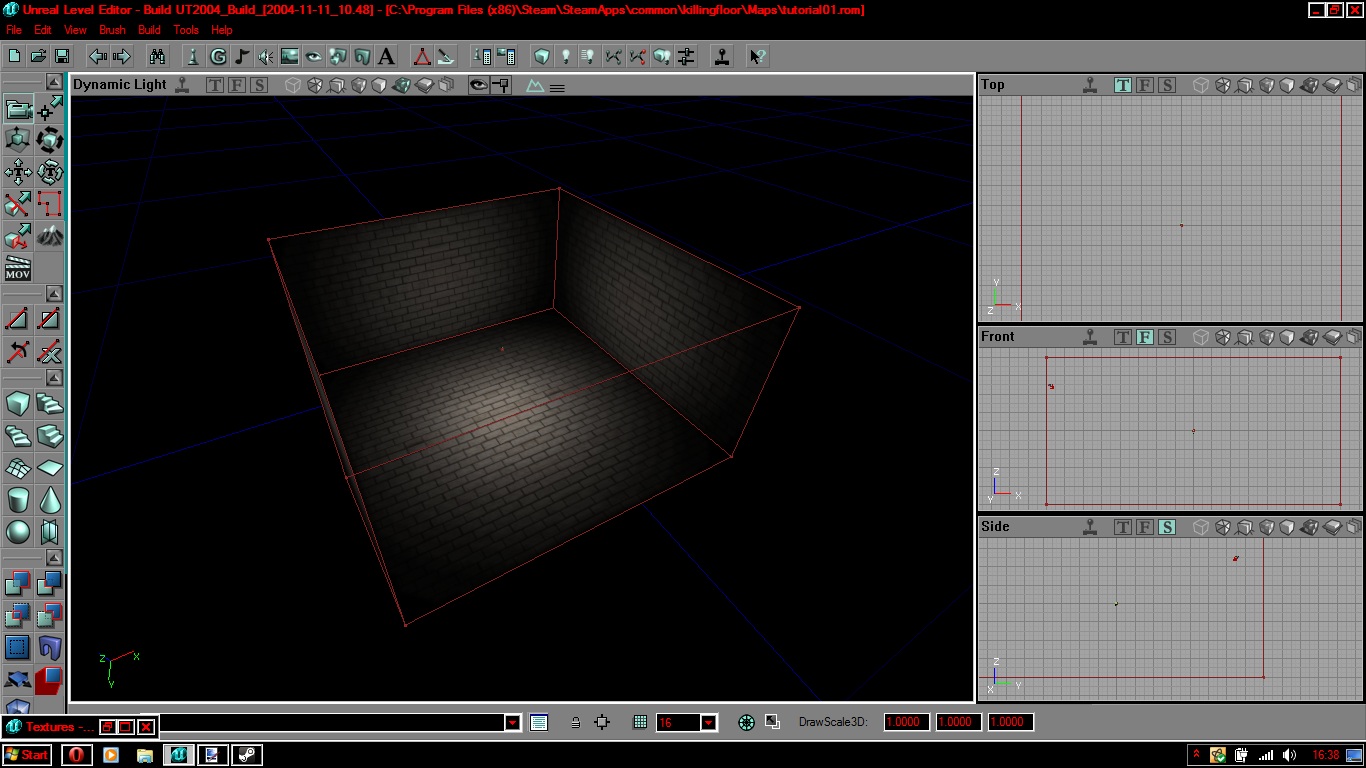
After releasing the light in the middle press the "Build All" button one more time and save it.
That should be your result as well.


Congratulation, you have just built your first cube map with lightning. In the next tutorial I will show you how to add additive geometrical solids to your room and additional lightning with different settings.
21 Comments
Kazz 7 Jun, 2021 @ 7:15pm 
Any hints why this SDK won't start for me or how to debug this?
Mutant  [author] 22 Jul, 2018 @ 1:19am 
Nope, it can't be converted 1:1.
You should go through tutorials that are meant for KF2. :UT2004flak:
󠀡󠀡 27 Jun, 2018 @ 2:44pm 
Will this work similary in kf2?
Mutant  [author] 22 May, 2018 @ 7:21am 
Jsh has not created any further tutorials.
Here are some advanced tutorials:
1) https://api.unrealengine.com/udk/Two/SiteMap.html
2) https://wiki.beyondunreal.com/
Blehh..... 16 Mar, 2018 @ 8:45pm 
Where's your next tutorial?? Got a link? Apparently this is the only Jsh guide under Jsh's guides...
Roviot_XX 4 Jan, 2018 @ 7:48am 
Can you help me with light? On floor under light I have static mesh-blood, but this st.mesh is not visible; is too black/shadow, like a black hole. If I change light properties: "bShadowcast" to false and "Collision" -"bBlockZeroExtentTraces" to false, result is again nowhere.
Mutant  [author] 11 Feb, 2017 @ 1:02pm 
Press Control + Left click on the Brush you want to move. Keep the buttons pressed and by moving your mouse you also move your selection.
Fonz 10 Feb, 2017 @ 3:09pm 
how do i move areas?
Mutant  [author] 2 Sep, 2015 @ 1:58am 
Hmm... weird. Well just open the texture browser, then select the surfaces you want to change and then click on the texture you want to be applied in the texture browser. That should also change those surfaces.
The_Reaper 29 Aug, 2015 @ 2:32am 
I was hoping I can make my first map..... I tried to press control + left click a few times and then right click, but the texturing thing doesn't pop up.... please help