Tales of Zestiria

Tales of Zestiria

127 ratings
Tales of Zestiria Stone Monolith Location Guide and Unlocking Last Battle Act
By Happy Fun Cat
This is a Guide for Tales of Zestiria that list the locations of each Monolith and also how to Unlock the Final Battle Act and what it does and how it is used.
   
Award
Favorite
Favorited
Unfavorite
Introduction
Hello and welcome to all who read. I am the happiest of the cats, Happy Fun Cat, here to give you my first, and hopefully not last, Tales of Zestiria Guide, focusing on the Stone Monoliths and where to find them, and unlocking the Last Battle Act that seems to not have a requirement!

With that said, lets get started on why I am doing this, and also how I did this guide to make it easy on you (I hope).

Also, please read the Final Thoughts section of the guide, it has information I would like you guys to know for future projects.

NOTE! I am not rereading through this right now, so a lot may be off (spelling, screenshots, ect) Cat wants food, so Cat's done working on this for now.


Update: I will start the making the guide oh so pretty here in the next few hours, stay tuned, or don't, I really don't care :D

Update: I hope it looks good, will fix it up more at a later date.

Update: Looked over everything, and noticed that I was not too clear on my Friendly Link section, not to mention I used the japanese word for the bonus skill and not the english word, however, they look the same. Once I farm for a bit on my 2nd playthrough and get the bonus skills needed, I will try to update that section accordingly incase I missed something. Enjoy!
Why am I doing this?!
As the question states above, why am I making this almost pointless guide? Well, because when people are finding list of these Monoliths, they are only given the Monolith and the Zone it is in, not the exact location of the Monolith. This guide here is to give you the pin point-ish location of the Monoliths in the game, as well as me trying to explain where they are in terms of landmarks in the game.

That is great, but WHY am I doing this? Doesn't the Monoliths just give game hints and AP when you first discover them? No, they do not. They also give an ACHIEVEMENT! Wait, don't care about achievements. I am just wasting my time. True, I am wasting my time, but for you guys!

Though, I did leave out one thing. The title of the guide mentions unlocking the Last Battle Act. And THAT is the true reason behind finding all the Monoliths, to unlock this Battle Act.

Should you care about this Battle Act. Short answer is YES! This is the best Battle Act in the game by far, and it allows for the Ultimate Combo Mystic Arte. I will explain more about this at the end of the guide, after all the locations.

The Monoliths do not appear in the library, so if you get to Hexen Isle and did not get all of them (you will know you did when you read about the Last Battle Act at the end), you will have to go through the whole world and reread all of them all over again to see which you missed.

(NOTE: We had a helpful commenter explain that you can indeed fine the monolith in a library, just in a weird way. I forgot about this after doing the guide and will update accordingly in the future, give or take a week or so. Look in the comments and thank them for helping out!)

NOTE! If you do not want simi-exact locations on these Monoliths, just don't load my screenshots. I did type out to the almost best of my abilities the locations of the Monoliths, and it is less accurate than my screenshots are. So if you just want a general location of the Monoliths but still want to explore, don't load my screenshots. If you want exact, load my screenshots. If you only want the zone and number of Monoliths, I listed a short and sweet list showing all of these. If you don't even want that, why are you reading my guide then?

Also, the Monoliths with the asterisk next to them are the ones I personally missed my first playthrough. Thought it might be a fun thing to add for those who might have wondered which ones I missed.
How this guide is put together?
I will be updating this on a later date to make it easier to read, but I am going to give you the heads up on how I did this guide.

For the screenshots, the location of my character cursor and the direction that my character is facing is the location of the Monolith. I literally took the screenshots right ontop of the Monoliths themselfs.

As for getting to these Locations, most of my written out details list the Save Point that each Monolith is close to in some regard, so you know which Save Point to fast travel to when hunting these things down. I will make it easier to see or update it to make it more eye pleasing.

NOTE! This guide is NOT in chronological order. This is meant to be a guide for those who have finish the main story. Not meaning you are not able to use this guide, but some areas you revisit later due to unlocking some out of battle seraphim powers (most noteable is Edna's Earth Strength and D/Z's Wind Jump thing).

I will try to make a checklist for people to copy and paste onto a notepad or word doc or whatever you use for typing, so you can print it or just check it off in the program.
Short and Sweet List
You can find this list in multiple different locations, but for ease of having it for the guide, I will list it here as well.

(Note: This section will be updated at a later date to help you more easily locate Monoliths you missed, look down in the comments to help you out)

This list will only contain the area the monoliths are in, and the number of monoliths in the area.

Mt. Mabinogio Ruins - 3

Elysia, Home of the Seraphim - 3

Lakehaven Heights - 3

Ladylake, the Aquapolis - 3

Vivia Subterranean Aqueduct - 5

Galahad Ruins - 4

Falkewin Hillside - 3

Rayfalke Spiritcrest - 3

Marlind, the City of the Great Tree - 4

Dumnonia Museum - 3

Bors Ruins - 3

Glaivend Basin - 3

Volgran Forest - 3

Tintagel Ruins - 3

Lastonbell, City of Artisans - 3

Meadow of Triumph - 3

Pearloats Pasture - 2

Pendrago, the Blessed Capital - 1

Cambria Caverns - 1

Biroclef Ridge - 1

Igraine, Shrine of the Fire Trial - 2

Pendrago Shrinechurch - 1

Gaferis Ruins - 1

Morgause, Shrine of the Earth Trial - 2

Lamorak Cave - 3

Westronbolt Gorge - 2

Zaphgott Moor - 2

Camlann, the Origin Village - 1

Plitzerback Wetland - 2

Malory, the Patinal Forest - 2

Aifread's Hunting Ground - 2

Hexen Isle - 1


Mt. Mabinogio Ruins
Martial Artes

From the Mt. Mabinogio Ruins - Inside Circular Hall Save Point, go through the door and make your way through the dungeon. After 3 right turns, you should be staring it in the face.


Guarding

Continue down the path of the dungeon and you will come across the next save point. Southeast of the save point is the next Monolith.


Spirit Chain

From the Guarding Monolith, continue to the hallway/room to the right and continue until you reach the end, past the chest which had the Shepherd's Gloves. You will see a ledge overlooking the bottom pit with the (once) invisible bridge. You should see the Monolith next to a regular chest.

Elysia, Home of the Seraphim
Difficulty Settings

After exiting the Mt. Mabinogio Ruins, to the Elysia exit, do a 180 from the door and look to the left, you will see the Monolith.


Quickstep

From the Difficulty Settings Monolith, head down the stairs to the left of the Monolith and go straight south to the other set of stairs. You will see the Monolith to the left of them.


Targeting

Head to the exit leading to Aroundight Forest, you will see it next to the save point, Elysia, Home of the Seraphim - Elysia Entrance.

Lakehaven Heights
Hidden Artes

From the Aroundight Forest exit, follow the path to Ladylake. Once you cross the stream of water, you should see it, plain as day to your left.


Elements and Status

Near the Lakehaven Heights - Near Great Morgan Falls save point, look across yet another stream of water, you will see it.


Changing the Control Mode

From the entrance to Ladylake, travel south across the bridge. You will see it off to the left side of the path.


Ladylake, the Aquapolis
Hit Points (HP)

From the entrance to Lady of the Lake Sanctuary, over looking the market, look left. I am sure you will see it. (This is located in the Central District)


Advanced Techniques

Again from the entrance to Lady of the Lake Sanctuary, go into the market and take a right inbetween 2 market vendors into an ally of some sorts. You will see it in the corner, before the path turns right. (This is located in the Central District)


Seraphic Arts

Located in the Outside the Aquaduct of Ladylake, where the entrance to Vivia Subterranean Aquaduct is at, go up the stairs to the area that overlooks the sea. You will see it in the corner of this area.


Vivia Subterranean Aqueduct
Difficulty Settings

From the entrance to the Aqueduct, start following the linear path past the locked door that required the dagger to open during the story. Once past the door, look left and you will not miss it.


Armatization

Continue the linear path of the dungeon, I am sure you will see it as you have to follow down a long hallway and it is sitting at the very end of it. If not, look at the screenshot provided.


Weaknesses and Resistances

From the Armatization Monolith, continue following the path of the dungeon, going up a set of stairs. It is sitting in the southeast corner of the room.


Spirit Chain (SC)

From the Vivia Subterranean Aqueduct - Near Palace Entrance save point, look north and turn left and continue that path into a right and a dead end, the Monolith is right there.


Hit Points (HP)

Again from the perviously mentioned save point, take the other path this time, going right. Once you reach the path with the stairs going down to your right, take them and conintue traveling down until you reach the first set of cells to your left. The Monolith is in the first cell.

Galahad Ruins
Weaknesses and Resistances

From the entrance to Galahad Ruins, walk straight, it sitting right in from of you, in the middle of the back wall of the first room, doubt you could miss it.


Targeting

From the Weaknesses and Resistances Monolith, go east (right) and follow the left wall all the way around the turns, you will see it sitting in the corner of the room you come across.


Quickstep

Back again to the Weaknesses and Resistances Monolith, this time go west (left) and follow the linear path past the room that held the bow into the room following it. It is sitting in the northeast corner of this room.


Dropped Items

If you are following the path of the dungeon from the beginning, from the Quickstep Monolith, go down and take the east path and follow it to the next area (B2). Follow the Linear path until you reach the Galahad Ruins - B2 save point and go north through the long hallway. Take a right and follow the left wall around the corner until you see the Monolith sitting in the middle of an hallway that is blocked by rubble.

If you are not following the path of the dungeon from the beginning, and instead are Save Point hopping, go to the above save point and follow accordingly.


Falkewin Hillside
Martial Artes

From the Falkwin Hillside - Northwest of Griflet Bridge save point, travel north, following the path back to Lakehaven Heights. You will see the Monolith to your left as you travel this path, near the entrance to Lakehaven Heights.


Switching Seraphim

From the Falkwin Hillside - In Front of Southern Entrance to Marlind save point, travel north to the Northern Entrance to the city. While traveling north, if you look to the right, you will see it between 2 sets of rocks, infront of a tree.


Quickstep

Continuing from the Switching Seraphim Monolith, keep going north. You will see a fork that allows you to take a right into a dead end, take that path and you will see the Monolith at the end of this short path.

Rayfalke Spiritcrest
Blast Gauge (BG)

From the Rayfalke Spiritcrest - Mountain Trail Entrance save point, look west, you will see it off to the right side of the path.


Combo Effects

From the previous Monolith, follow the path of the dungeon. You will encounter this Monolith sitting on the left side of the path.


Switching Seraphim

Continue to follow the path from the previous Monolith, until you each the area with 2 paths, 1 to the right leading to a dead end and a silver chest, and one leading to the left leading up the dungeon in a spiral. Go up the left path, up the spiral. You will see the Monolith off to the side of the path to the right on a ledge.

Marlind, the City of the Great Tree
When the Going Gets Tough

From the Marlind, the City of the Great Tree - Near Southern Entrance save point, you will see this Monolith infront of the Weaponsmith.


3 Types of Arte

You will find this Monolith behind the Great Tree, near the Lord of the Land. No need for instructions on how to get there, just find the Giant Tree.


Strategy

In the same area as the 3 Types of Arte Monolith, go south to the few house you see, the Monolith is sitting infront of those houses.


Armatization

This Monolith is located infront of the Dumnonia Museum, near the Marlind, the City of the Great Tree - In Front of Dumnonia Museum save point.

Dumnonia Museum
Blast Gauge (BG)

From the entrance to Dumnonia Museum, look left, you will see it.


Combo Effects

From the entrance to Dumnonia Museum, go through the doors infront of you, it is behind the stairs. If you are not done with this portion of the story, you will be unable to open this door if I remember correctly. Just go through the dungeon normally, you will get to this part in a bit and be able to get the Monolith.


Effect Potential

From the entrance to Dumnonia Museum, go through the door to the right and follow the path through the dungeon. You will advance through this area, going to a set of stairs. You will see the Monolith infront of a door leading to the next area.


Bors Ruins
Elements and Status

From the entrance to Falkewin Hillside, it is in the first circular area you come acorss, literally right after you enter the Ruins from Falkewin Hillside, can't miss it. (This is the Northwest Location)


Grade

Continue through the dungeon to the Southeast area, then continue once more. Continue to the first large area you come across, the Monolith is sitting in the north corner of this area.

If I remember correctly, you are unable to get to this area until you unlock Edna's Earth Strength ability, so if you are unable to get it, don't worry, the story will force you back over this way.


Weaknesses and Resistances

Again, continue through the dungeon from the previous Monolith. When you come acorss the fork, head left. You will see the Monolith in the open area you come across in the middle of the west (left) wall.

Same as above, I believe area is blocked off until you get Edna's Earth Strength ability.

Glaivend Basin
Guarding

From the Glaivend Basin - Inside Hyland Outpost save point, take the northern path to the battlefield. Once you past the gate with 2 guards guarding it, look behind the guard on your right and you will find the Guarding Monolith. Wow, I just typed a form of guard a lot >.>


Seraphic Artes

From the Glaivend Basin - Inside Rolance Outpost, go north to the gate, but not past the gate. Look right and you will see the Monolith.


Hit Points (HP)

From the Glaivent Basin - Inside Rolance Outpost, take the east exit out of the camp and follow the right wall. You will come across the Monolith after about 3 turns. I honestly had no other idea how to relay in words where the Monolith is located ._.


Volgran Forest
Mystic Artes

From the Volgran Forest - Lamorak Cave Entrance save point, go north and go a little left. You will see the Monolith infront of a giant tree.


Difficulty Settings*

From the Volgran Forest - Lastonbell Entrance save point, go south. You will see it yet again in front of a giant tree.


Grade

From the Volgran Forest - Tintagel Ruins Entrance save point, head west, southwest down the path. Once you past 2 giant trees on each side of you, you will come across a field with a tree stump in the middle. Go left and you will see the Monolith.

Tintagel Ruins
Status Ailments

From the Tintagel Ruins - Small Room save point, go to the exit to Volgran Forest (the one with the ladder going up, not the one deeper in the dungeon). The Monolith is in the northeast part of the room with the ladder between rubble and boxes in the corner.


Changing the Control Mode

Either continue from the previous Monolith, deeper into the dungeon going straight, past the 3 wind jump gaps. The Monolith is in the last room with the painting that tells the locations of the trial temples, in the northeast corner of the room.

Or travel to the Tintagel Ruins - In Front of Mural in the Depths save point and walk across the room.


3 Types of Arte

From the first Monolith that I listed here, move deeper into the ruins until you come across the room with 3 paths. Take the left path, wind jump and head down the stairs. Continue straight after you head down the stairs and when you reach the end of the straight path, take the left path. You should see the Monolith.

Lastonbell, City of Artisans
Hidden Artes*

From the Lastonbell, City of Artisans - In Front of East Gate save point, look north, you will see it.


Seraphic Artes

From the previously mentioned Monolith, take the northern road through the town until you come across the graveyard on your left. The Monolith is in the graveyard.


Spirit Chain (SC)

From the Monolith in the graveyard, walk out and take a left into the courtyard of the Sanctuary. The Monolith is located in the southwest corner of the courtyard.

Meadow of Triumph
When the Going Gets Tough

From the Meadow of Triumph - Lastonbell Entrance save point, look west and then a bit left, you will see the Monolith.


Power Links

From the Meadow of Triumph - In Front of Malevolent Crucible: Sanjiva save point, look west. You will see the Monolith next to a tall bush and a tree.


Effect Potential

From the Meadow of Triumph - Exit Leading to South Ridge save point, go south past the natural bridge and take a right. You will see the Monolith past a rock.

Pearloats Pasture
Elements and Status

From the Pearloats Pasture - Exit Leading to Southwest Hunting Grounds save point, travel northeast along the path. If you follow the path, once you take the first turn, you go straight. You will see the Monolith on a hill surrounded on 3 sides by rocky hills.

You can only get to this Monolith AFTER you obtain Edna's Earth Strength Ability.


Combo Effects

From the Pearloats Pasture - In Front of Malevolent Crucible: Kalasutra, look to the Cruicible and there it is.

Pendrago, the Blessed Capital
Armatization*

I will admit, really easy to miss, seeing the location of it. From the entrance of Pendrago, go up past the inn to the right street. Continue to go down until you are able to turn and go up a set of stairs and follow that up and around until you hit a dead end and are only able to turn right. Turn right onto the circular area and follow the south path and it will take you to the Monolith.


Monolith is at the end of the path on the screen, this is here in case my explanation wasn't good enough >.>


Gaferis Ruins
Status Ailments

From the entrance to Gaferis Ruins, take either path and follow it to B2. Go all the way around to the big room with coffens everywhere. It is in the center of the room.

Cambria Caverns
Blast Gauge

From the Cambria Caverns - Near Subterranean Lake save point, go south and jump down to the lower level. Across the room, southwest, is the location of the Monolith, facing away from you, so it just looks like a smooth, long, stone rock thing.

Biroclef Ridge
Commands

From Biroclef Ridge - Gododdin Entrance save point, look on the opposite side, and there you go.

Igraine, Shrine of the Fire Trial
Status Aliments

From the entrance to Igraine, Shrine of the Fire Trial, just go through straight, through the door, you will see it.


Mystic Artes

From the Igraine, Shrine of the Fire Trial - In Front of the Shrine Great Hall save point, go through the west doors, it is on your left.

Pendrago Shrinechurch
3 Types of Artes

From the Pendrago Shrinechurch - Near the Sacred Inscriptions save point, go behind the the monument, into the doors leading further into the dungeon. Once you are inside, take a right, through the door with the fire seal. You will see the Monolith at the end of the hallway.

Aifread's Hunting Grounds
Dropped Items

From Aifread's Hunting Grounds - Morgause, Shrine of the Earth Trial - Entrance save point, head west. Before you get to the area with the Weylish Ruins, you should see the Monolith to the left, near a few rocks.


Switching Seraphim

From the previous Monolith, follow the path that leads past the Weylish Ruins (it is the path a very little ways north of the Monolith) and follow it all the way through. You will end up hitting an area tha holds 2 chest and also the Monolith.

Morgause, Shrine of the Earth Trial
Mystic Arts

From Morgause, Shrine of the Earth Trial - In Front of the Innermost Great Hall save point, go back through the dungeon and hang left and enter the first room on said left. Follow it, going down stairs and make your way to the large section of the room. The Monolith is in the southeast part of this room.


Targeting

From Morgause, Shrine of the Earth Trial - In Front of the Innermost Great Hall save point, go back through the dungeon and go up the center stairs. Follow it down back to the beginning and look left for the Monolith.


Lamorak Cave
Dropped Items

From Lamorak Cave - Central Area save point, head south. Once you reach the first room, look to your right at the north wall of the room, the Monolith should be next to you.


Advance Techniques

From the previous Monolith, you have two choices of path, but both go to the same place. If you have already been in this dungeon because, you most likely cleared the rocks away from path one, in the southwest part of the dungeon that will allow you to wind jump the gap on the other side. If not, or just don't want to, you can take the path southeast in the room. Either way, follow the path until you reach the next area, Lamorak Cave - Southwest. Once you are in the room, look southwest and you will see the Monolith.


Westronbolt Gorge
Armatization

From Westronbolt Gorge - Northeastern Gorge Entrance, follow the path past the vendor, keeping to the right (north) wall. You will come across the Monolith pretty soon.


3 Types of Artes

From the Westronbolt Gorge - Entrance to Ganglen Ruins, follow the path south. Really hard to miss this Monolith.

Zaphgott Moor
This part is going to mostly depend on the screenshots to show where they are located, since there are no real Save Points right next to these Monoliths, but I will still try to explain in words where they are.

Advanced Techniques

From Zaphgott Moor - Exit Leading to East Bridge save point, head across the field and once you each the other side, follow the wall south, you should end up coming across the Monolith.


Seraphic Artes

From Zaphgott Moor - Trizolde Cave Entrance save point, go through the field, following the left wall. You should end up at the Monolith.

Plitzerback Wetlands
Blast Gauge (BG)

From Plitzerback Wetlands - Northern Wetland Entrance save point, go north back through the tunnel/cave. Once you reach the fork in the path, go right and you will see the Monolith.


Elements and Status*

This is going to be fun to explain. From Plitzerback Wetlands - Northern Wetland Entrance save point, head west across the docks/lilly pads. Once you are at that area, head south/south east to the next area. In that area, you head to the area north/north east of you. In THAT area, you go east and climb some vines up a rock formation. Follow that until you get to the other side of the rock formation and jump down at the vines to the other area. Once in that area, keep going east, following the left edge of the area past the bridge. Once you get to the area past the bridge, the Monolith is on the north corner of the area.


Malory, the Patinal Forest
Grade

From Malory, the Patinal Forest - Eastern Area save point, head south and then go right. You will come across the Monolith in the middle of this stretch.


Weaknesses and Resistances

From the previous Monolith, continue down the same path and go into the next area (Malory, the Patinal Forest - West). Once in this area, you will wind jump across the water and then head right (north). Follow this path all the way nother until you are able to turn right. The Monolith is on the south wall to your right.

Camlann, the Origin Village
Difficulty Settings

From Camlann, the Origin Village - Near Village Entrance save point, make your way through the villages center, all the way up until there is a large path you can take on the right. The path is short, but holds a Monolith at the end of it.


Hexen Isle
Advance Techniques

From Hexen Isle - Hexen Isle save point, go west, you will see the Monolith.

Last Battle Act, Friendly Link!
As of writing this guide, I haven't tested this Battle Act yet. I will in a little while and update this tomorrow, but I wanted to list what I know about it from other people.


So, you did all the Monoliths but still you don't have the Battle Act unlocked? Thinking you missed one and have to do all of them again, all 78 of them?! No, most likely not. Go to a save point and at the bottom left of the screen, you may have a skit to play about said Monoliths. If you do, watch the Skit and bam, you get achievement and the Friendly Link Battle Act!


Once you have this Battle Act, if you have 9 BG's on Sorey or Rose (I think it has to be Sorey, but I don't even have 9 on him yet), you can use the Duel Mystic Arte. (The 9 can be reduced based on the number of Zexceed you have in bonus skills)

After you use Sorey's Mystic Arte (the 3 BG one, not the 5) and have 6 BG left, you can start to attempt the Duel Mystric Arte. Once you start your Mystic Arte on Sorey, hold down the key needed for Lailah (I don't play with the keyboard, but for me it is up on the D-Pad) and spam your martial artes attack button (X for me since I rebound it). If done correctly, Lailah will start to preform her Mystic Arte. You will continue until you used all the Seraphim in the correct order (I do believe it has to be the correct order) This order is Lailah (Up), Edna (Down), Zaveid (Right), then Mikleo (Left). When Mikleo is preforming his Arte, don't hold down anything and spam the Martial Artes attack button, and hopefully you will achieve performing the Ultimate Mystic Arte.

Another way to use this Battle Act (most likely because Sorey doesn't have 9 BG's or enough Zeceed Bonus Skills) is just to spam an armitization Mystic Arte until you run out of BG's, whatever flots your boat, for me, it is water.


Preforming Dual Mystic Arte: Ultima Elementia (or Ultimate Elements)
I will like to start by saying one this, this took forever, by forever, I mean an hour of testing and trying to figure out how to pull this off. Whoever thought this was a good idea on how to use this skill needs to be punished. Now, lets get to the action.

As stated above in the friendly link section of this guide, I was right on how to pull this off, however, there are additional steps that was left out when doing research when I first looked it up. You have to count (or feel the motions of the amount of number presses) when attempting the ability. So, here are the steps to do this.

Step 1: Have Sorey with 9 BGs during the fight, He must have atleast 6 left after preforming his Mystic Arte to preform the Ultimate Arte. (You may have 8 or 7 depending on the number of Axcell you have on Sorey) (Also, I had 3 left after I finish the Dual Mystic Arte, but that is because I have 2 Axcell and 9 BGs on Sorey, so I have no idea if it lowers the cost of the Dual Mystic Arte or not, but I am not testing that, so on the save side, make sure you have 6 after your Mystic Arte on Sorey)

Step 2: Have each Seraph atleast at 3 BGs do preform their Mystic Arte. (Same as Sorey, more Axcell, less BG's you require)

Step 3: Rose's BGs doesn't matter. Not a step, but a statement I guess.

Step 4: Get into a fight.

Step 5: Start to preform your Mystic Arte on Sorey. (Most likely will be Bolt Tempest, if you preform Divine Wrath, you must have 9 BGs with 2 Axcell bonus skills)

Step 6: Here is the start of the annoying part, during the animation of the skill (not the standstill picture showing what character is preforming the skill), hold up on the D-Pad (for the Seraph Lailah) and hit the Martial Artes button atleast 10 times. If done correctly, Lailah will start her Mystic Arte (Concerto Infernus or Primal Embrace depending on your BGs and/or Axcell)

Step 7: During Lailah's Mystic Arte animation (same as above), hold down on the D-Pad (Edna) and hit your Martial Artes button as many times as your pressed it for Lailah plus atleast 5. If done, Edna will do one of her Mystic Artes.

Step 8: Repeat for Right D-Pad (Zaveid), 5ish+ the number of times the Martial Artes button was pressed for Edna, then Left D-Pad (Mikleo) 5ish+ the number of times the Martial Artes button was pressed for Zaveid.

Step 9: Do not hold down any D-Pad directions and spam your Martial Artes button as fast as possible since this is the last one that needs to be done (again though, atleast 5ish+ times pressed for Mikleo).

Step 10: Enjoy the Arte, looks really cool.

Now, am I making this up? No, saddly I am not, they require you to count the number of button presses to do this Mystic Arte. I been testing for over an hour and finally was able to pull it off.

Is it worth it? Yes and no, the way I did it allowed me to get almost a 100 combo hit on the target (for me it was a Mimic Giant), so great if you still need the combo Battle Actions. But, it didn't even 1 shot the 63k health Giant, so the damage wasn't impressive, but then again, I have had times when only Lailah's and Edna's Mystic Artes was enough to kill it, so the damage is random, I guess I had a very low roll.

Is there an easier way to pull this off? Kind of. A great way to pull this off is to preform your 5 BG cost Mystic Artes instead of your 3 cost BG Mystic Artes. The reason for this is the animiation for the skills are longer and you are able to count a bit easier. So have 5 BGs on each Seraph, or one lower for each Axcell you have on them (up to 2) and that will increase the amount of time you have for button presses.

I will post screenshots of my gear on Sorey (only thing that matters is the Earrings) and some screenshots of the Mystic Arte itself, as requested by a commenter :D


Updates
10/28/15 - Created Guide

10/30/15 - Gave the guide a simi make over, hope it looks good. Also fixed Screenshot issue with Pendrago section

11/9/15 - Created Dual Mystic Artes section.
Mystic Arte - Final Thoughts!
Thank you for reading. This is not my first guide, though it is my first for Tales of Zestiria, I made 5 total for Dragon Ball Xenoverse.

I had a simi-less of a blast writting this guide, mostly just a lot of boring work, though I do this to help you guys if possible.

If you have read my Xenoverse guide, you will noticed I am not as funny (if I was even funny to begin with) like I was then, but that is because of the contents of this guide. Hard to try to force being funny when it is just doing collectables. I will try harder next time.

Speaking of next time, until Fallout 4 comes out (which I doubt I will do guides for), I am going to continue to play Zestiria. So! With that being said, what guide would you like to see next. If it is in my power and not super timer consuming (have to devote time for other things) I will write it!

Also, if you have any questions about the guide itself, or a question in general, I will answer it the best of my abilities. If I get enough questions, I will do a Q and A section for the guide.

Another thing, if you see mistakes in the guide, spelling, ect. Let me know. I reread some of my older guides I never proof read and had a fieldday with the amount I screwed up on. So, again, let me know that I screwed up!

I been working on this for about 9 hours straight, so I am going to stop working on it now. Once again, I am the happiest of the cats, Happy Fun Cat, hoping this guide has helped you, that you have a fantastic day, and may all your non-psychopathic dreams come true. Peace~

~Happy Fun Cat~
18 Comments
unboundlopez 30 Jan, 2024 @ 12:20pm 
Excellent guide and thank you ladynadia for the comment of:


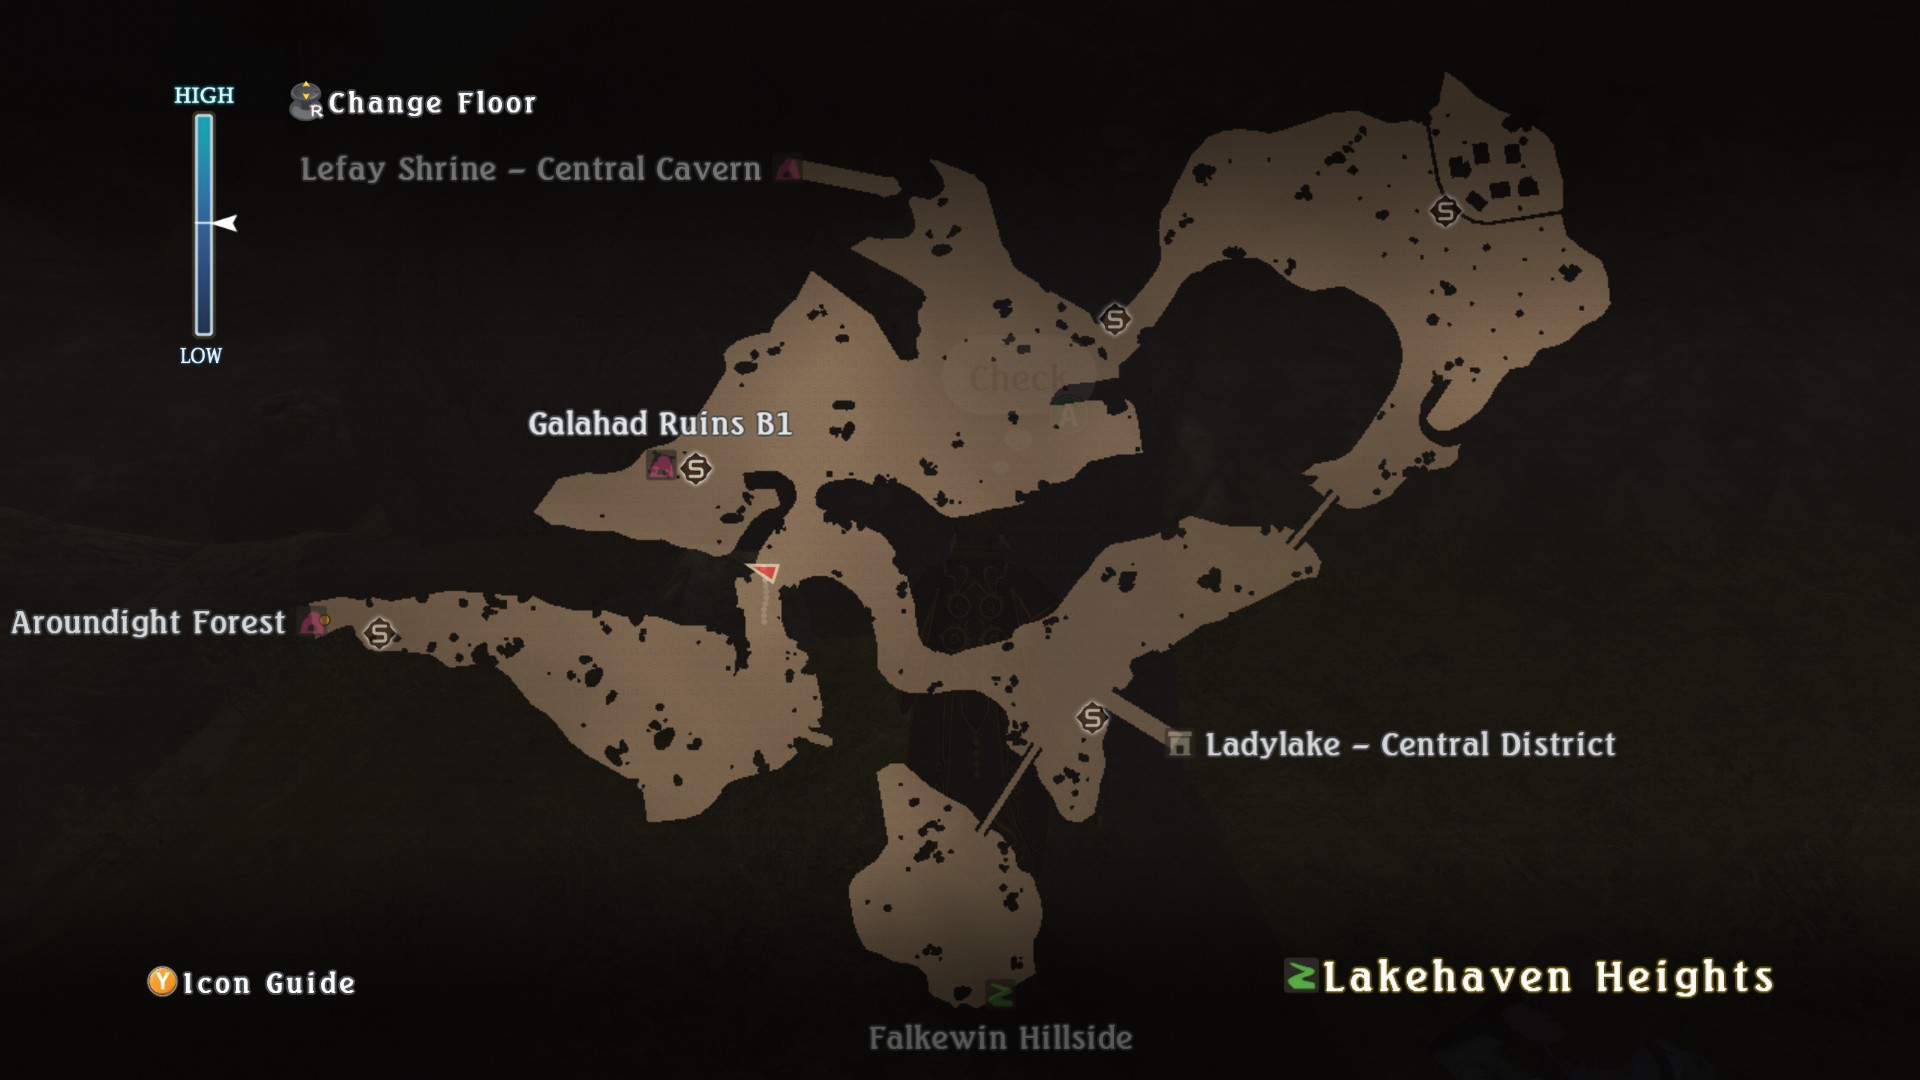
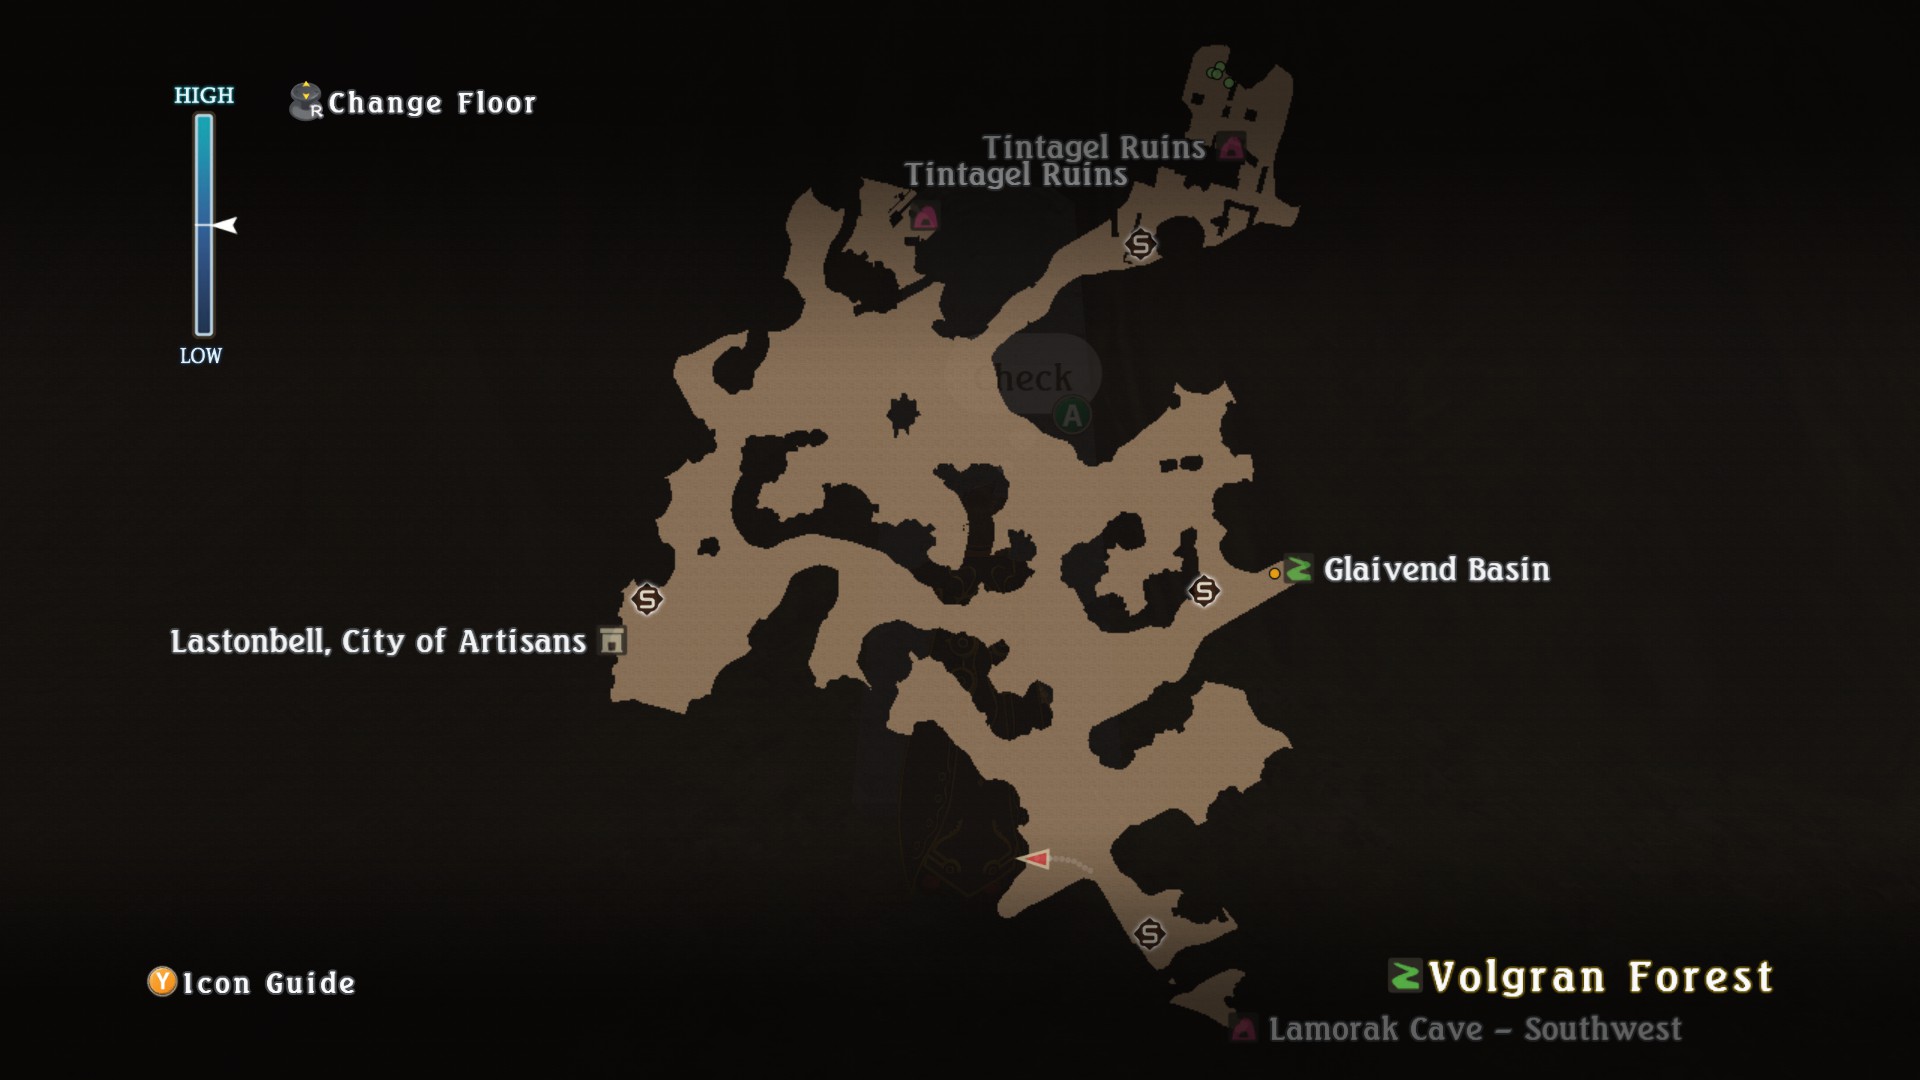
You missed a monolith in Lamorack Cave. From the screenshot you gave on the second one there, head towards the exit to Volgran Forest and it will be on the wall in the room that has two paths towards the exit.


This was the last one I was missing thanks.
Unseen 15 Aug, 2023 @ 7:15pm 
Well managed to find them all but the 2ndery guide on duel mystic arts should be useful. Also to anyone who got to the end but still doesn't have them all, try cambria caverns that's where I found my last one.
Unseen 15 Aug, 2023 @ 8:25am 
Very awesome and helpful looking guide, I'm amazed this doesn't have more awards. Sometimes we just need a straightforward mini guide without tons of details and this helps a lot. The monuments are actually hidden really well. Was able to find all the normin easily enough but still have yet to find all these monuments so this is imo one of the most helpful guides for zestiria especially since most of the game is rather simple besides finding these. Great work.
MakoSipper 14 Nov, 2018 @ 11:23pm 
If you've missed monoliths on the way, but don't know exactly where to find it (or "them"), don't think you need to go over the whole world looking for the one you've missed!

You can compare the list of Monoliths below (arranged by type of help) and narrow down your search:
https://pastebin.com/Dic8jKQm
Happy Fun Cat  [author] 30 Sep, 2016 @ 4:33pm 
Note: This is on Hiatus until I go through the game again because A) I haven't done that yet, and B) I honestly forgot about this :/

I only forgot 1, so that shouldnt be a big deal, I hope for anyone in the future reading this >.<
pengusaur 11 Jan, 2016 @ 9:16pm 
Awesome guide great job!!!!!!!!!!!!
Yuen 3 Jan, 2016 @ 11:15am 
9 BGs? That's already annoying! At most I can hit 6. D:
Happy Fun Cat  [author] 30 Dec, 2015 @ 10:14pm 
Update: I have not updated this yet, honestly, just haven't had A) Time, and B) the willpower, for now just remember I forgot one and it makes it that much more exciting :D
Happy Fun Cat  [author] 8 Dec, 2015 @ 6:20pm 
Okay, I am late with updating, school and other projects took a lot out of me. I will update this here in the next day or so. Thank you for waiting (if you did wait)
Happy Fun Cat  [author] 16 Nov, 2015 @ 8:12am 
You are right, I did miss one, I will update that as soon as possible, thanks for seeing it!