Dark Arcana: The Carnival

Dark Arcana: The Carnival

106 ratings
Text walkthrough
By yah
We walkthrough now
2
   
Award
Favorite
Favorited
Unfavorite
Introduction
This is a blunt walkthrough, as in I'll try not to list flavor content of the game here and there won't be story spoilers, so it's supposed to be used as a side-guide to be consulted when you get stuck somewhere, somehow. This is being written on my Expert playthrough with all cutscenes being skipped, so if this guide is being read while you're not playing, it'll probably make the game look like it has illogical puzzle solutions, which it doesn't.

And most important of all is that it'll mostly be delivered by man-cave speech, so keep that in mind.

I'll call every hidden-object scenario as "H-O scene" for short. Oh btw when the monkey doesn't shut up, it means he's itching to get something only he can reach (meaning you'll need to use him somewhere at the screen to progress).

Part 1: From the start of the game;
Part 2: After entering the mirror for the first time;
Part 3: Nearing the circus tent;
Part 4: Beach (with no sea) time;
Part 5: After setting up the TV.

lesgo
Part 1
- Speak to the girl
- Get the picture
- Go to Park Entrance
- Try to speak to the man
- Click the ticket booth for an H-O scene, receive button
- Inspect the Zorlax teller booth on the left, use button on the coin slot, pick up coin
- Go in Square
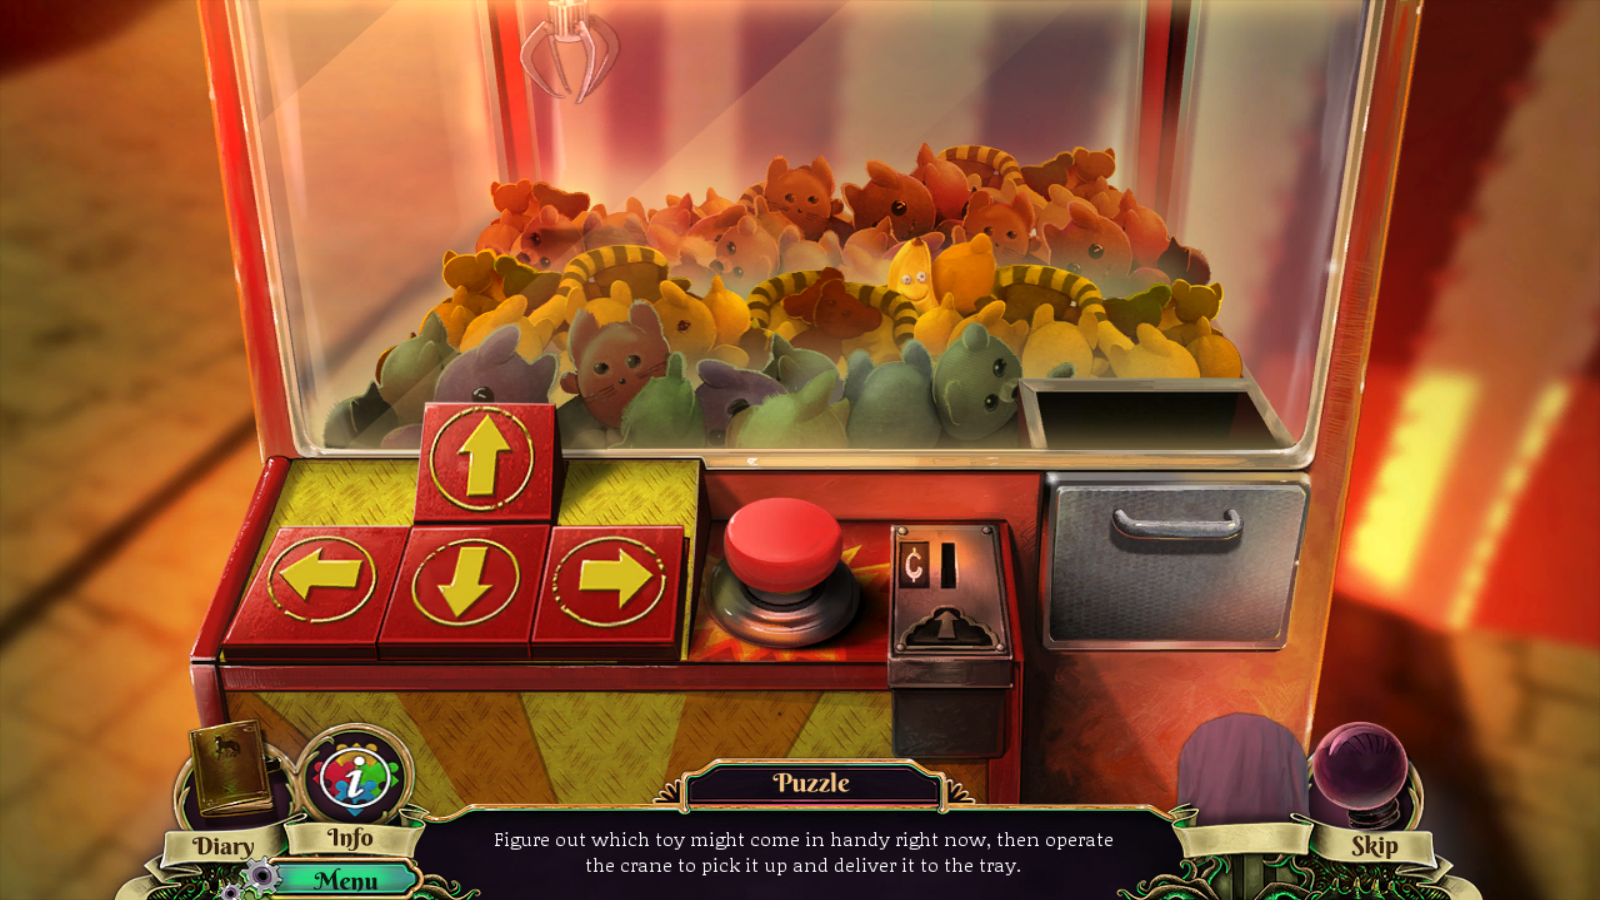
- Inspect the toy-claw machine, insert coin in the slot

• Puzzle: Figure out which toy might come in handy right now, then operate the crate to pick it up and deliver it to the tray.
• Press right, right, down
• Press the red button

- Open the tray, pick up banana
- Inspect monkey, give banana, inspect his foot and unchain the Best Sidekick 2014
- Inspect the gate, use Monkey on key, receive key
- Inspect the shooting range booth (at the center), grab Hammer
- Go back to Park Entrance
- Use Monkey on the handle that lies on the mini-roof
- Inspect Manager's door, use handle

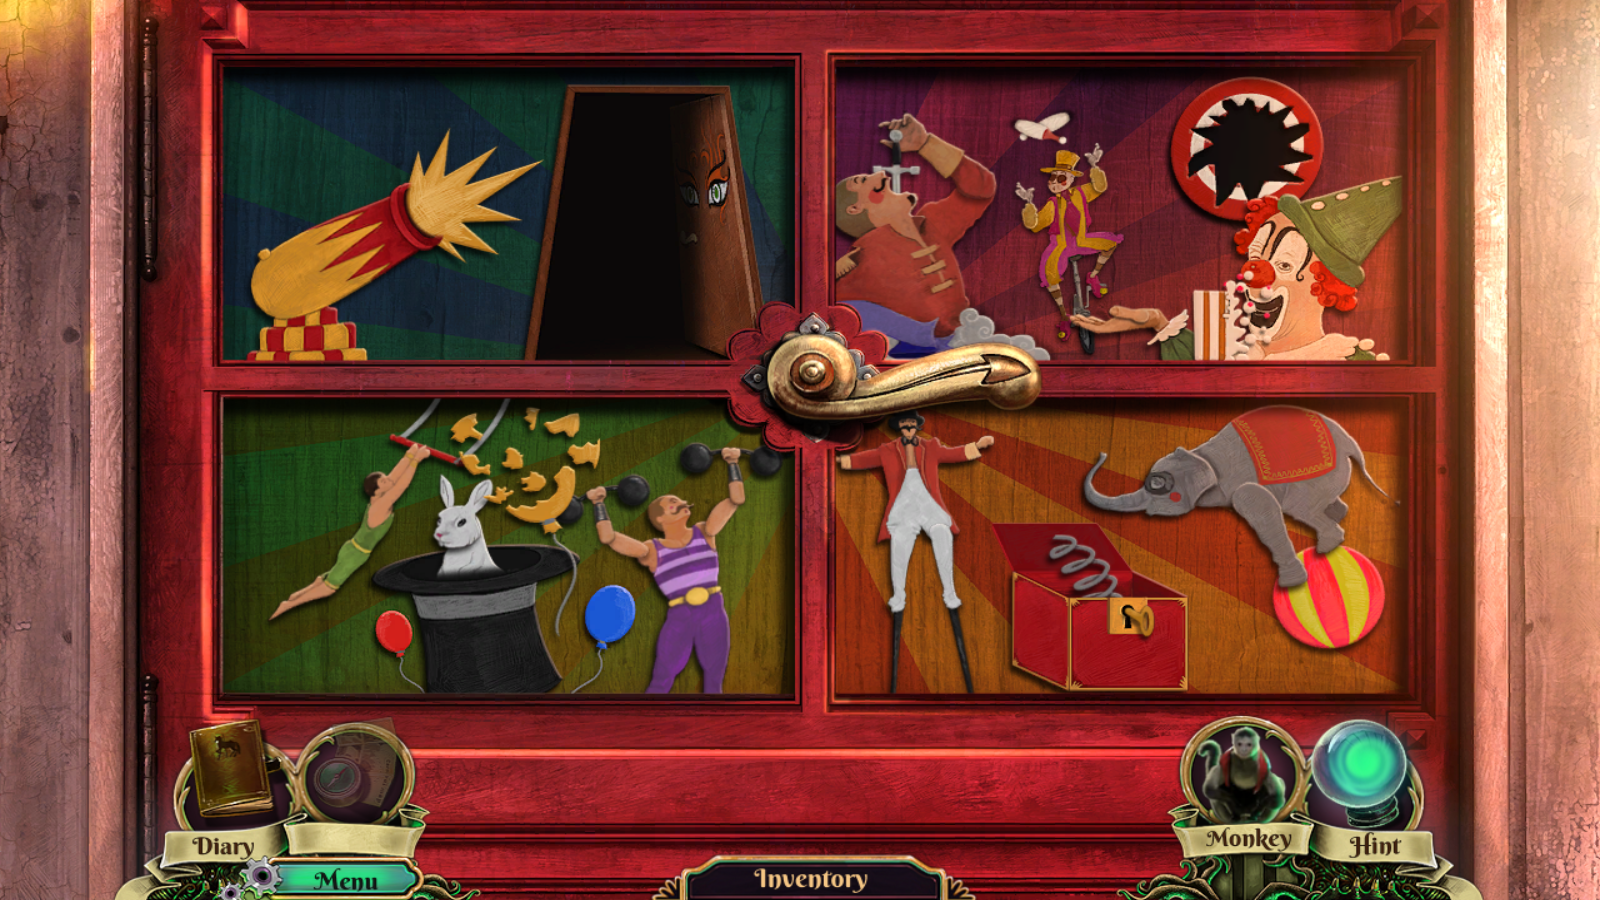
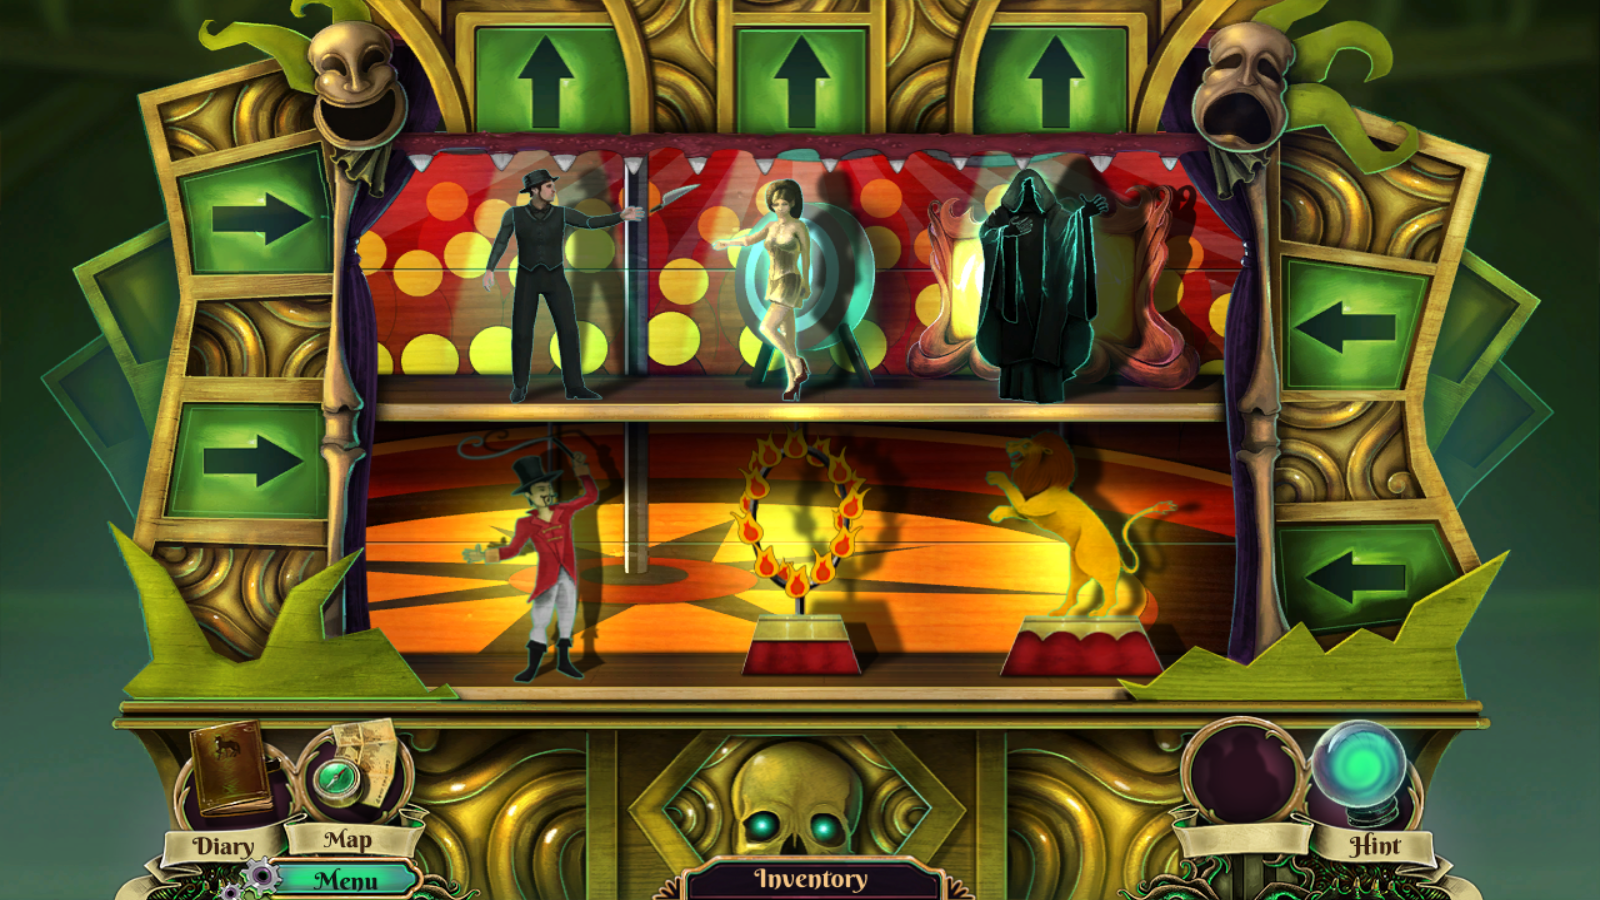
• Puzzle: Arrange the glowing items with matching acts and performers. Switch between opened panels by operating the handle.
• From left to right, starting at the top:
• Grab leg (2nd panel), use on red-coated man (4th panel)
• Switch panels with the handle
• Grab trapeze (4th), use on green performer (3rd)
• Grab needle (4th), use on balloon (3rd)
• Grab ball (3rd), use on elephant (4th)
• Switch panels with the handle
• Grab eye (3rd), use on the door's eye-slot (1st)
• Grab weights (1st), use on purple performer (3rd)
• Grab rabbit (1st), use on top-hat (3rd)
• Switch panels with the handle
• Grab cake (1st), use on clown (2nd)
• Grab sword (1st), use on open-mouth performer (2nd)
• Grab lit match (2nd), use on cannon (1st)
• Switch panels with the handle
• Grab key (2nd), use on chest (4th)
• Grab pin (4th), use on juggler (2nd)

- Go into the Manager's Office
- Click the window
- Click both posters on the wall to the right, then pick up the map (your best ally) which reveals a safe that was underneath
- Open and inspect cupboard, pick up First teeth panel
- Inspect desk, pick up tickets
- Go back out, into the Square, inspect Hall of Mirrors, use tickets on the slot, go inside
- Click the hanging ball to the right to turn the lights on
- After cutscene, inspect bag, open it, grab Clown nose key
- Open closet door for H-O scene, receive Second teeth panel
- Go back out, back to Park Entrance, in the Manager's Office
- Use clown key on the chest, open it
- Grab handle, grab piece of paper with combination
- Inspect safe on the wall, use handle on it

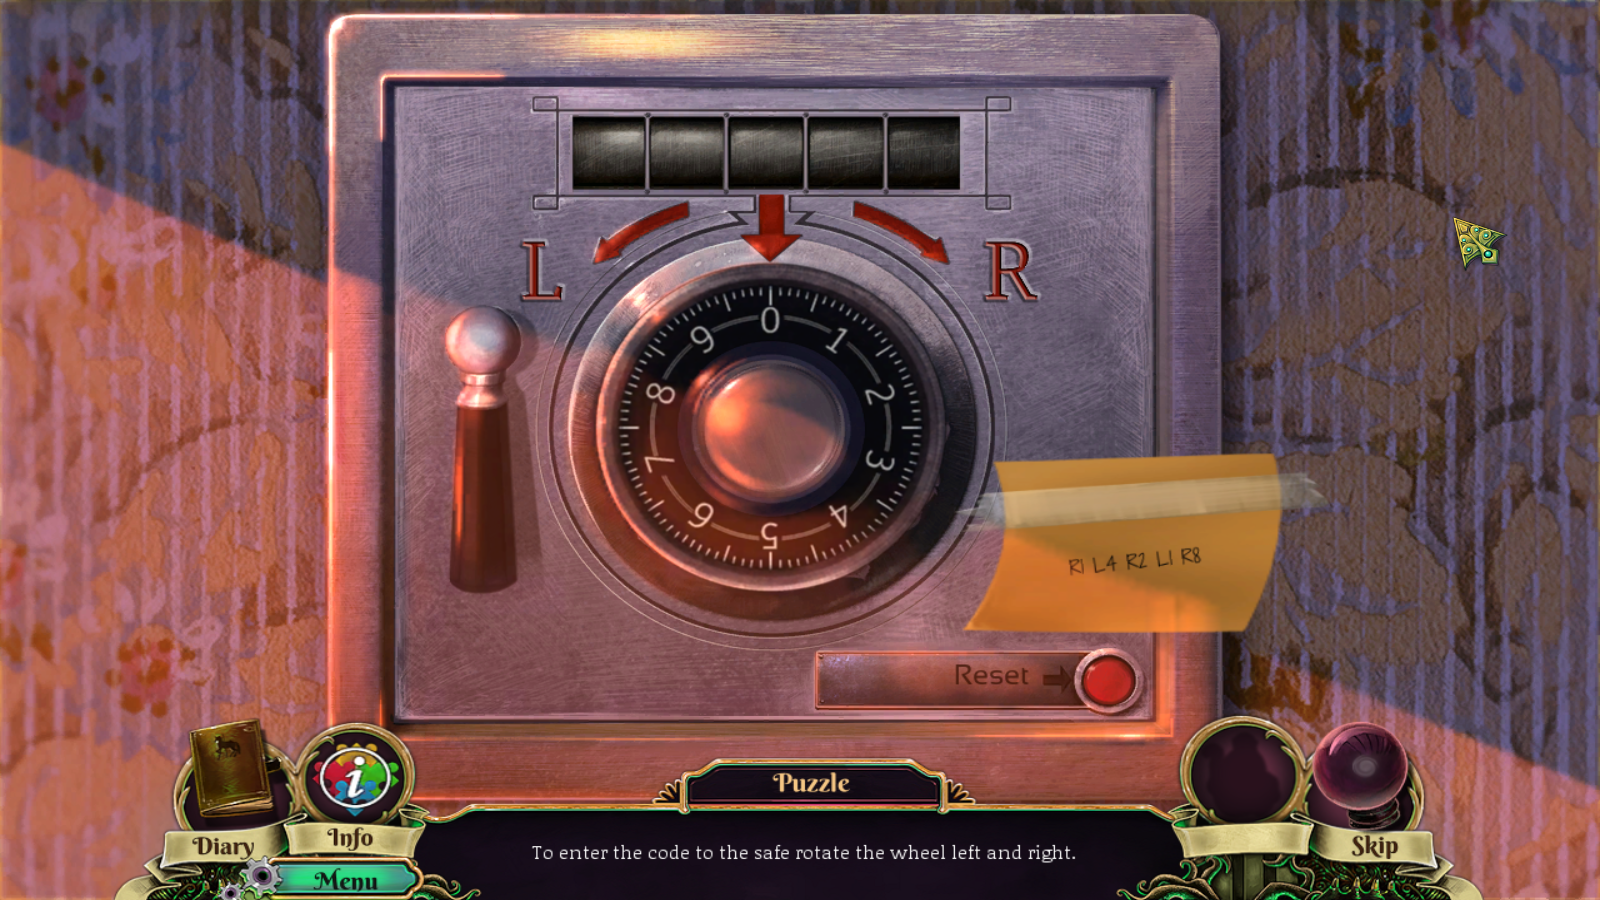
• Puzzle: To enter the code to the safe rotate the wheel left and right.
• R = right, L = left
• Start by rotating clock-wise from 0 up to 1
• When you release it at the 1, notice that the input is recorded on the black panel above
• Follow the code, always alternating between clock-wise and counterclock-wise for each of the inputs
• The code: R1 L4 R2 L1 R8
• At the end, use handle, grab gate plate

- Go back out to the Park Entrance, in the Square
- Inspect gate, use gate plate, use gate key, click the key then its handle
- Go in Alley, click anywhere for cutscene
- After cutscene, use Hammer on the strength tester machine on the left
- Go inside the tent on the left, lose monkey, weep
- Inspect the trapped man, remove a sword
- Go back, inspect the folding wall on the right
- Grab Wig panel
- Inspect CARNIVAL cabinet just because
- Click the glowing square next to the skull, grab the spring (both sit on the top of suitcases)
- Go back out the Alley, go to the right, in Carousel
- Inspect doll sitting near the carousel
- Remove all the doll parts, grab nose panel
- Inspect the open box at the feet of the mimic to the right
- Grab screwdriver and all his money then run away and live in exile inside the shadows
- Go back, inspect the strength machine's base on the left
- Use screwdriver, pull bad spring, insert spring from inventory
- Hammer the machine again, grab eye panel
- Inspect the House of Fears in front of you and clear your inventory on it (two teeth, wig, eye, nose) then click and enter it
- Draw curtains, inspect broken mirror

• Puzzle: The mirror is partly broken. Set the smashed pieces in the correct places in the pane.
• Six pieces total, from left to right:
• 1st piece: bottom-left near the center
• 2nd piece: top-left
• 3rd piece: top-right
• 4th piece: top-right
• 5th piece: bottom-right
• 6th piece: top-left

- Go back once, grab the eye from the hand coming out of the coffin on the left
- Give the eye to the creature from the mirror, grab second map from him
- Go inside the mirror
Part 2
- Heyo clean inventory
- Inspect and grab Alice cutout
- Go in Park entrance
- Inspect ticket booth for H-O scene, receive Jim cutout
- Inspect giant skull on center of screen, grab rat hilt
- Go in Square
- Inspect the booth to the right, pick up Evil cutout
- Inspect crates on the left, pick up mask (1/5)
- Inspect shooting range on center, pick up card (1/3), inspect the range
- Add all 3 cutouts that you picked up earlier

• Puzzle: Choose the right cutouts for the scene below and find a stage design that will fit both scenes
• Characters below: guy with whip, circle of fire, lion
• Background above: half-done from the start, match it to result in a representation of a crowd
• Background below: ring set

- After you're done, grab the (grass) scissors
- Try to go inside Hall of Mirrors or through the gate
- Inspect the gate, use scissors on giant roots and proceed
- Inspect glowing skull on the left, get card (2/3)
- Go to the Carousel
- Click the devil statue on the right to get a H-O scene, receive card (3/3)
- Take note of the mask above the carousel
- Go back, inspect the tent on the left
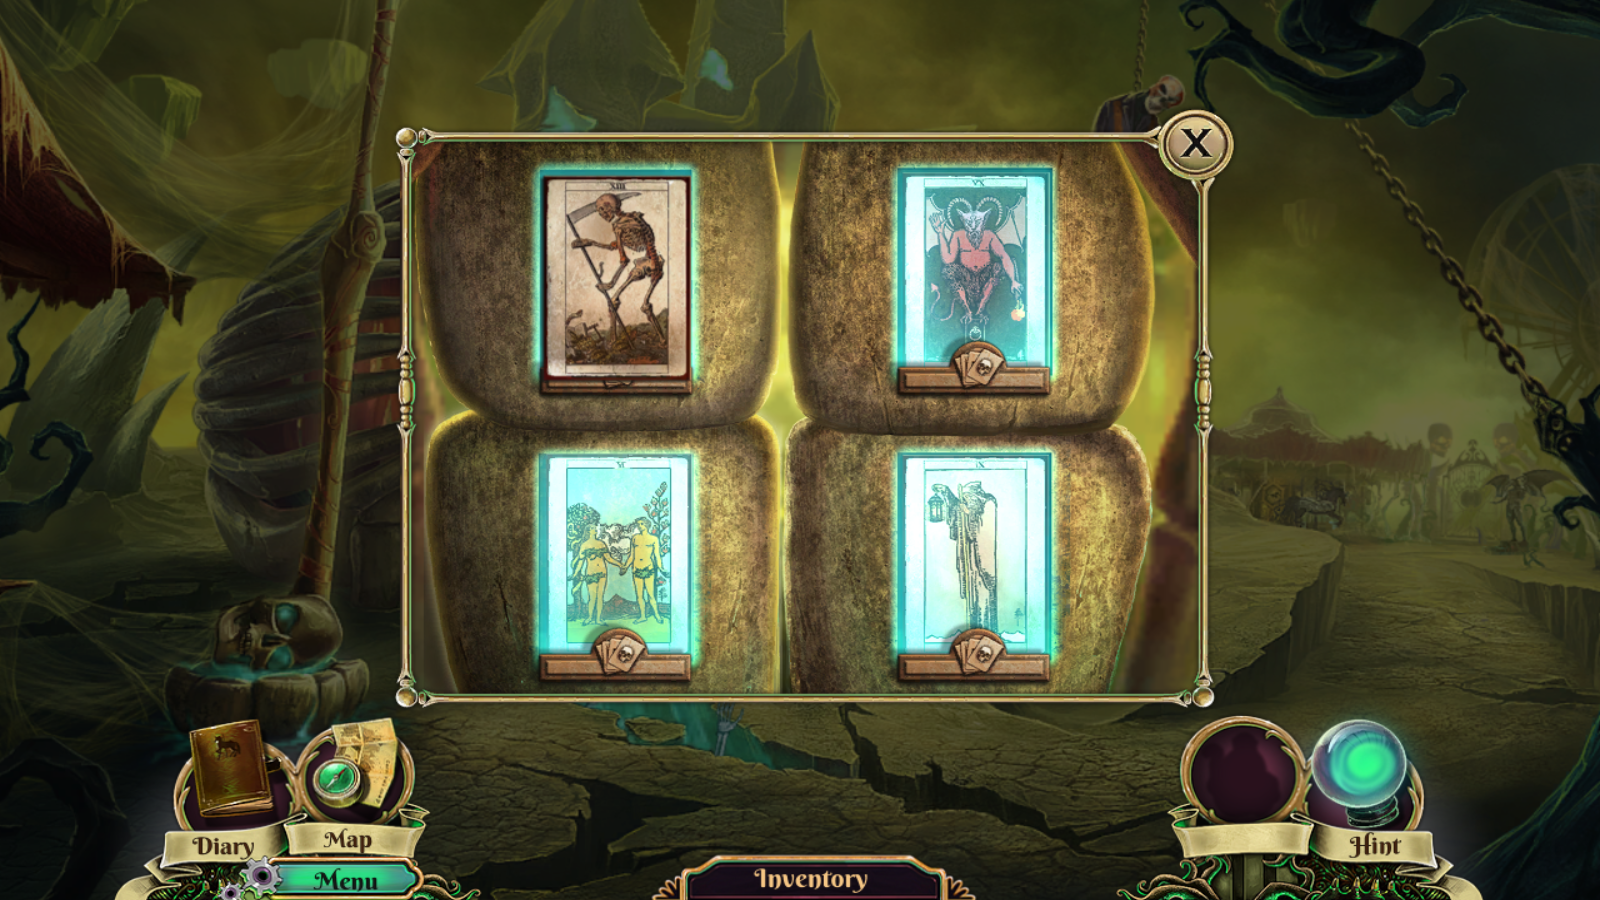
• Use your cards and arrange to: Death, Devil and Lovers, go inside

- Inspect skeleton, grab mask
- Inspect the little box next to the skeleton

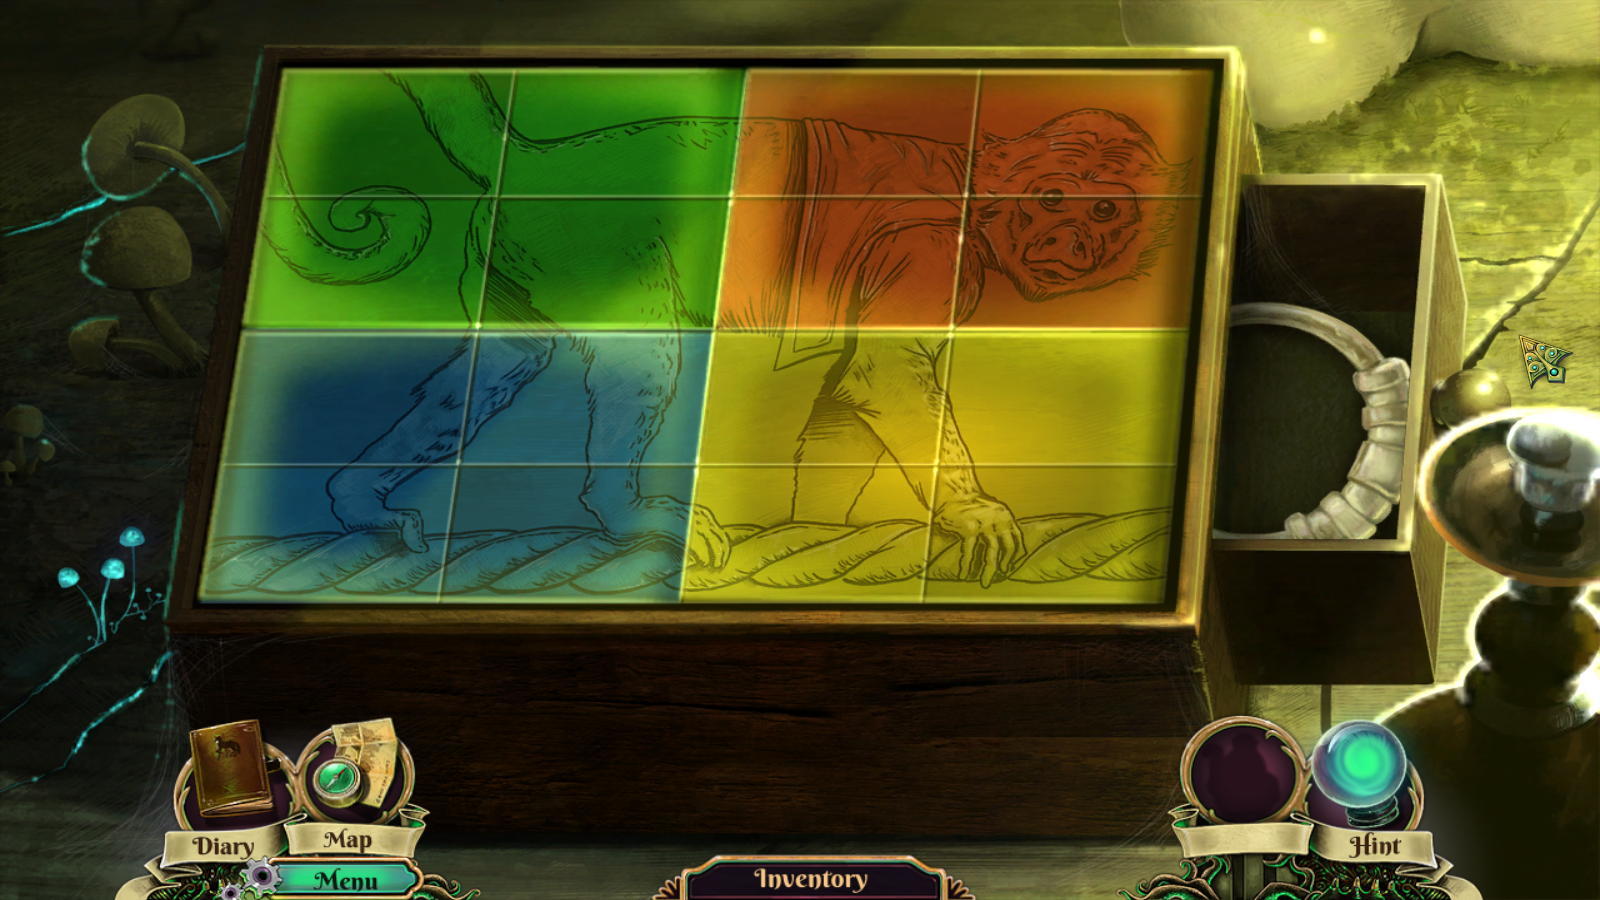
• Puzzle: The image of a familiar friend is jumbled. Cycle through the squares to set it right without being deceived by the colors.
• Arrange all tiles to make the image of a healthy, furry monkey
• When you get a 2x2 formation correct, they get locked in place
• Notice that there are four 2x2 squares, with each square being only one color

- Puzzle done, get the object on the right, which is a door knocker
- Fold the corrupted folding wall to the right, grab the bat hilt on the floor
- Go back, inspect the door and use the knocker, then proceed inside (don't forget to knock)
- Once inside, turn the lights on with the switch on the right
- Go inside the kitchen to the right
- Inspect the hanging note on the left
- Inspect the counter on the right, get pliers
- Go back, use pliers on the cupboard on the left
- Open it up for H-O scene, receive blowtorch
- Go into kitchen, use blowtorch on the ice on the center
- Grab snake hilt and the R letter
- Go back, then inside the tent
- Inspect the object on the right full of teeth, use the R letter on it

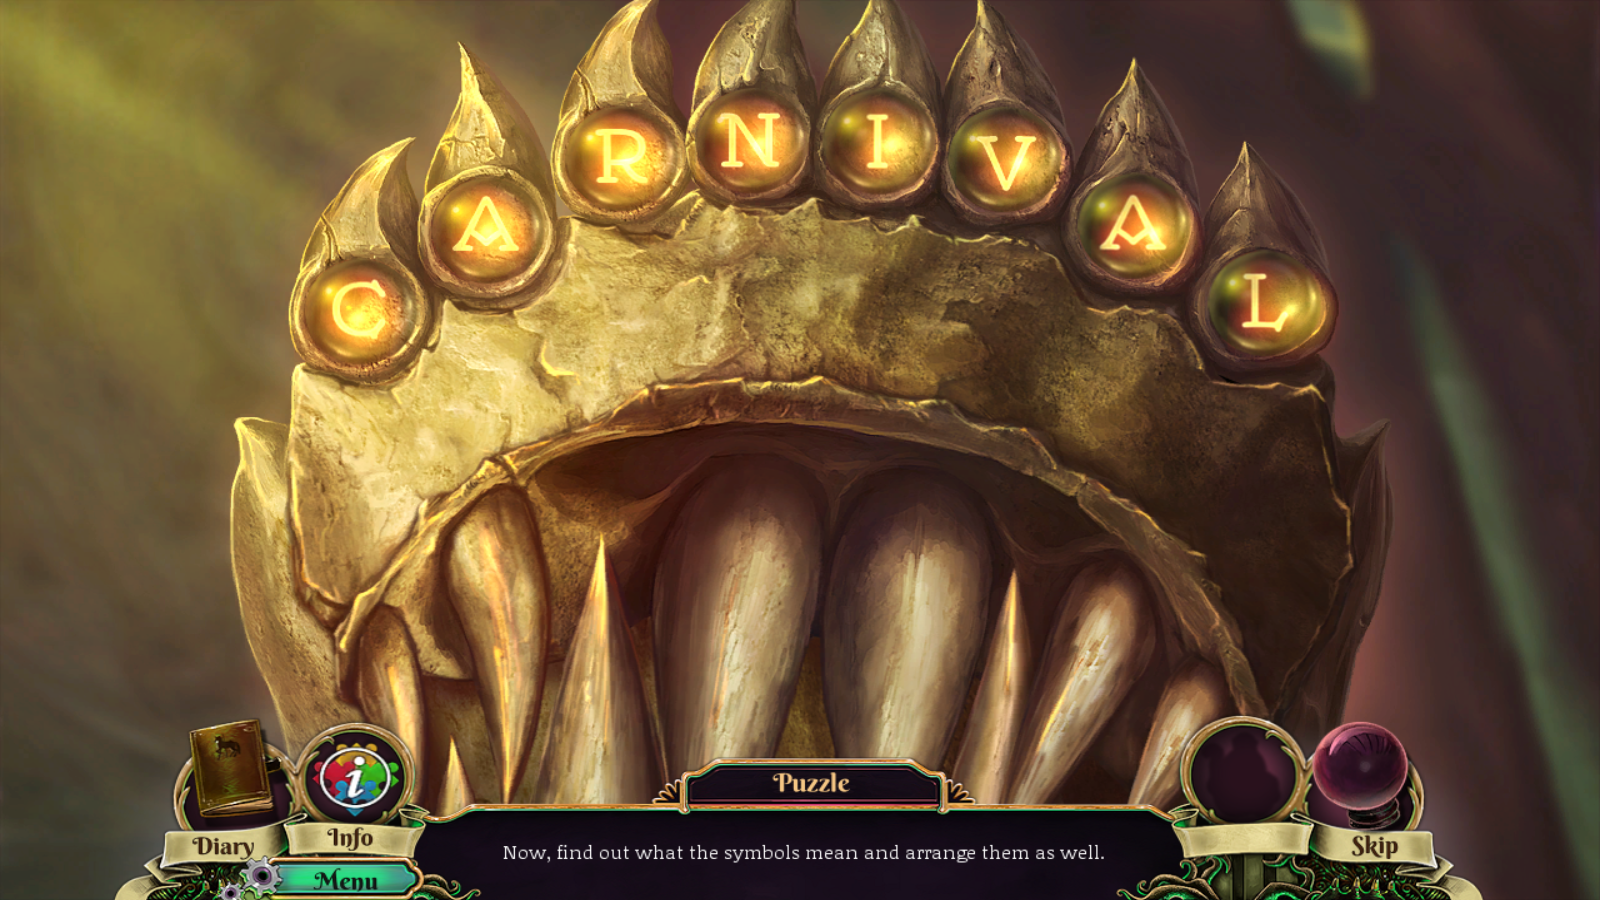
• Puzzle: Arrange the letters so they form a word that could be seen in the other version of this place
• Which is "Carnival"

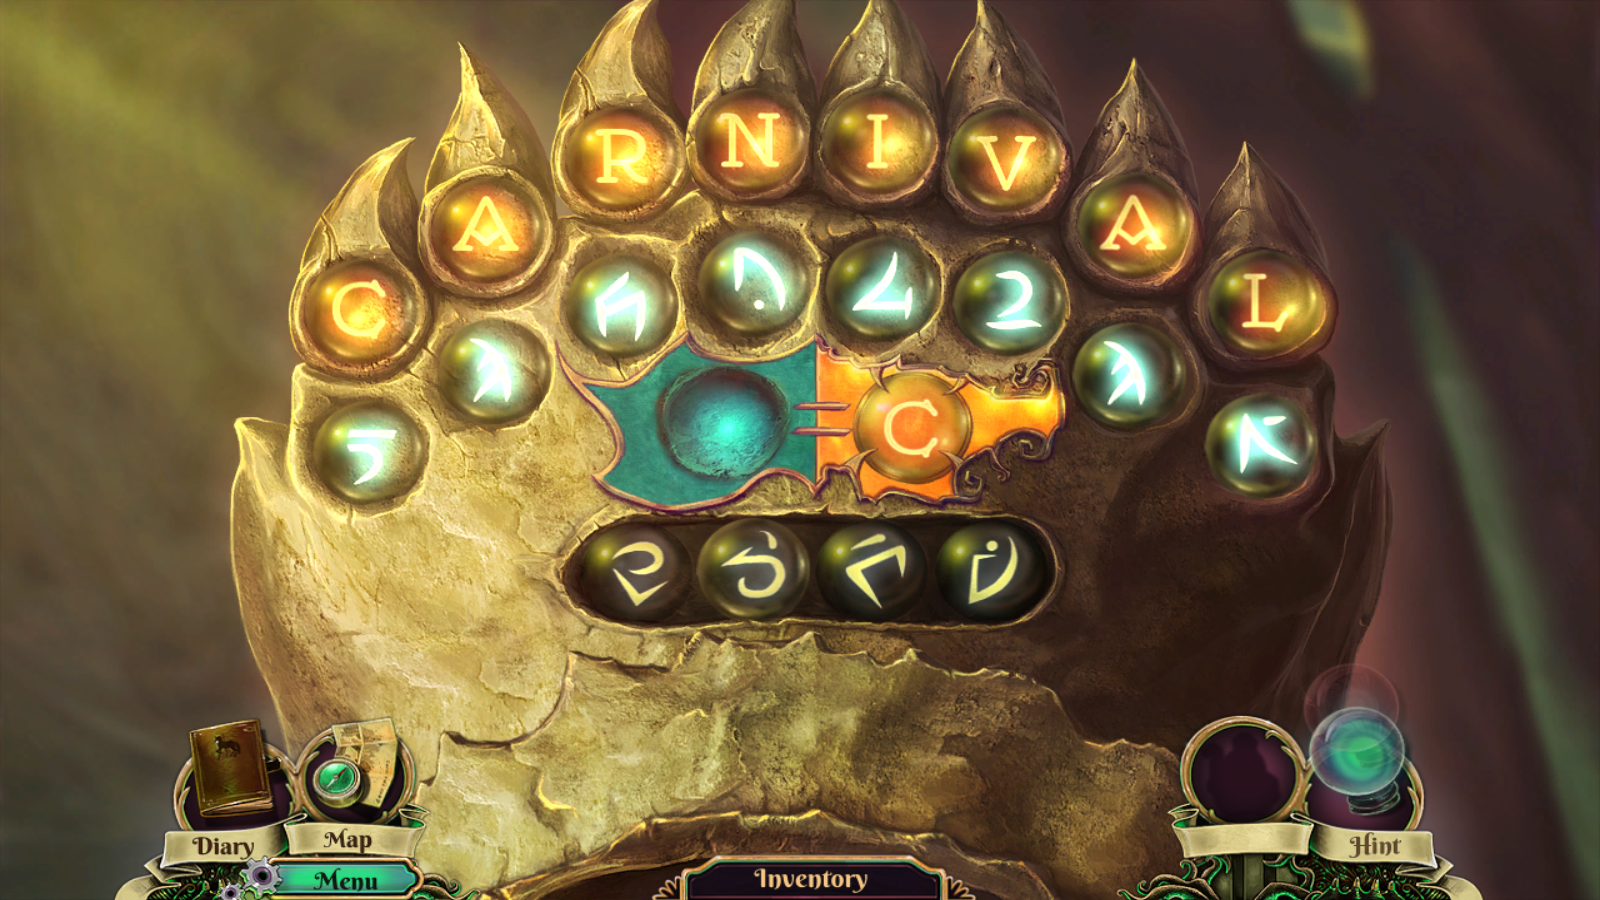
• Puzzle: Now, find out what the symbols mean and arrange them as well.
• Each symbol equals to a letter, with which you need to spell "Carnival" again
• Click on the arrows to open a compartment to store unused/useless symbols
• Insert each symbol on the slot in the center to get its translation
• When a symbol is in the correct place, it'll glow

- Grab the knob from the tongue
- Go back, then inside the house, then kitchen
- Inspect the oven

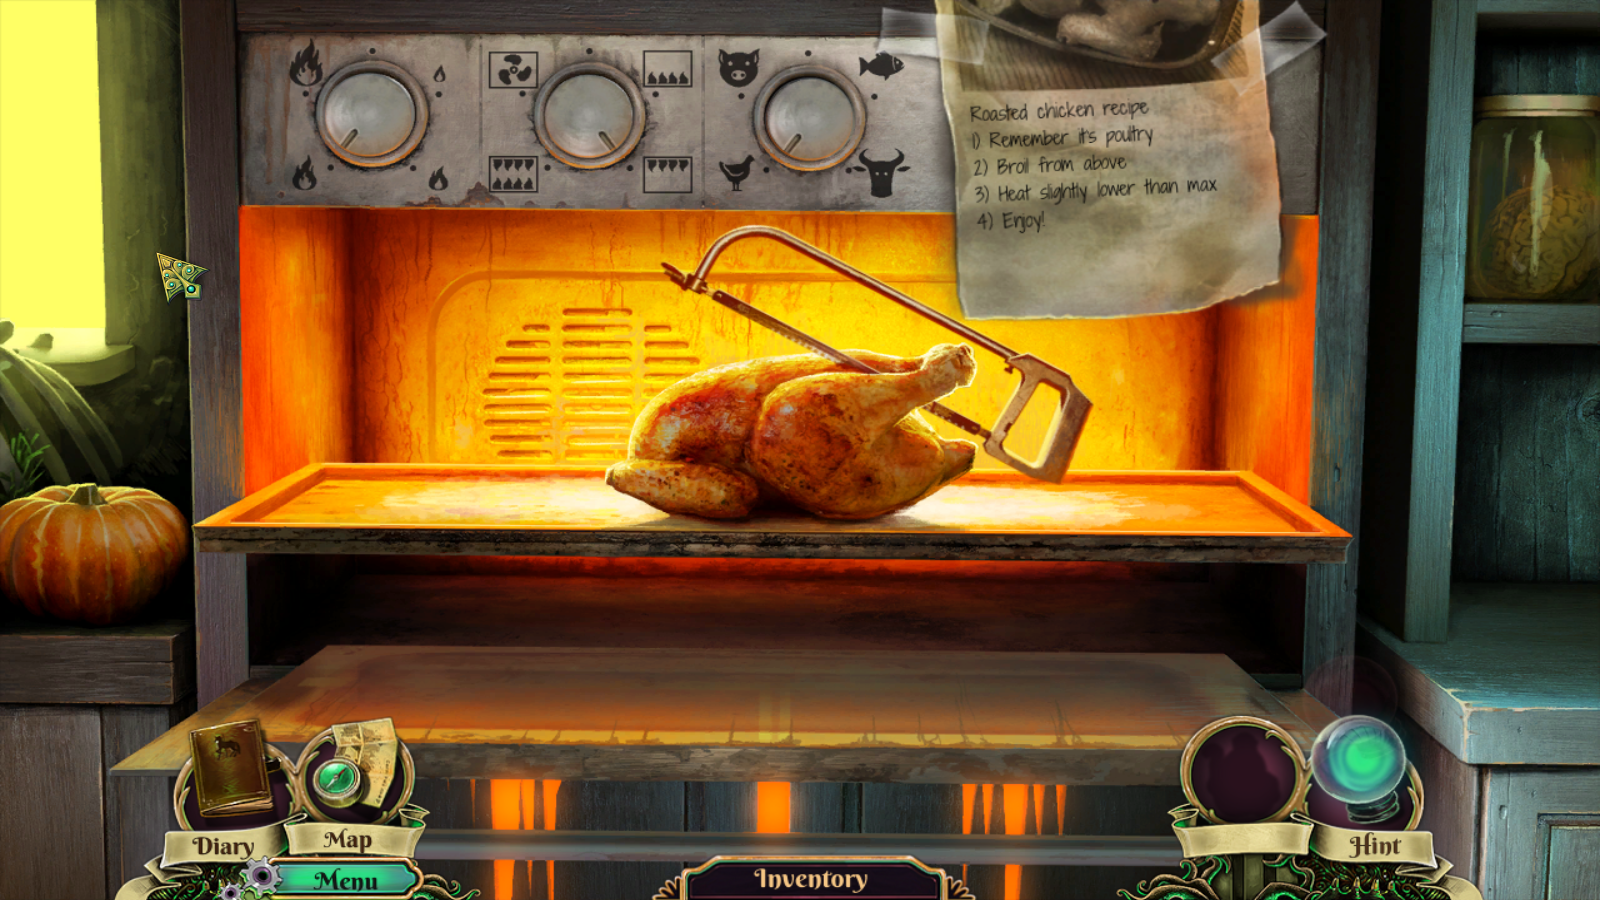
• Puzzle: Find the recipe for this meal, then turn the dials to set the right combination
• The recipe dictates that knobs need to placed, from right to left: bottom-left setting (almost hottest), bottom-right setting (fire from above), bottom-left setting (chicken)

- Grab saw, go back then outside the house
- Use saw on the chain that holds the hanging skeleton
- Inspect him, get mask from his face
- Inspect the purple cloth next to him, grab token
- Go inside the house again, inspect the mirror and give him the token
- Go through the mirror
- Go inside the tent, inspect sword coffin
- Use the correct hilts on the correct swords (from left to right): rat, bat, snake
- Get monkey back (hellyes)
- Talk to the teller, grab mask
- Go outside, then inside the house, go through the mirror again
- Keep going forward until you reach the carousel, then use the monkey on the mask stuck above it
- From there, inspect the gate and use the masks, then go inside
Part 3
- Hurray for clean inventory! (this is not at all related to the way I'm dividing this walkthrough parts)
- Inspect the poster in the center, grab ring (1/4)
- Inspect a spike coming out of the main circus tent, use monkey on it and grab ring (2/4)
- Go to Ferris Wheel to the right, inspect the toolbox on the background, get the head
- Go back then forward to the tent, then forward again to the Playground
- Inspect the snacks booth on the left to get H-O scene, receive coin
- Inspect the ride in front of you, grab glove and strainer, notice the lifebuoy
- Go back to Passage, inspect the guy on the left
- Give him his head, insert coin, grab flute
- Go forward, then down the stairs on the right to the Bird's Cage
- Inspect the giant mug on the right to get H-O scene, receive hairpin
- Inspect the barrel on the left, use strainer on the fish, grab ring (3/4)
- Inspect the light above the barrel, use glove on it, get bulb
- Go back, then back to the Passage, go in Ferris wheel
- Inspect the lock, use hairpin, open the door
- Inspect and change the bulb
- Get the bat on the left
- Go back, then forward, downstairs to the Bird's Cage
- Inspect and bash the piñata
- Inspect the snake, use the flute on it, grab cable (1/2)
- Inspect the giant mug on the right, again, get H-O scene, receive cable (2/2)
- Go back to Ferris wheel
- Inspect the panel inside the cabinet, use the cables on it

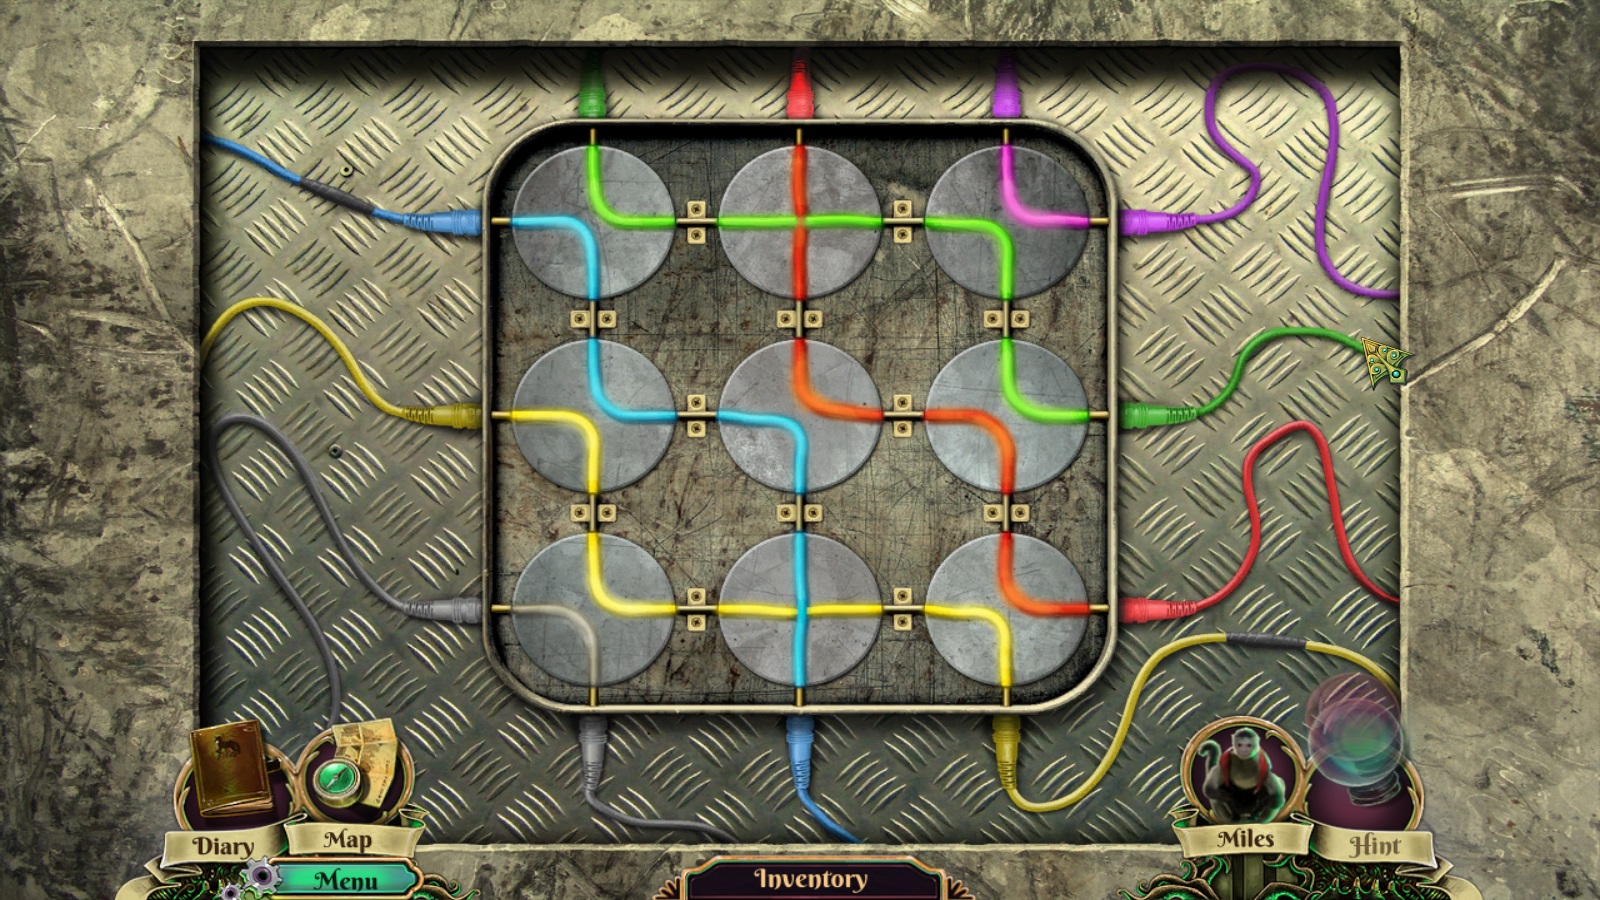
• Puzzle: Swap the tiles so that each colored cable goes from one jack of the same color to another.
• Start from the corners and work your way inwards, final result below.

- Press the lever to activate the ferris wheel
- Inspect it to get H-O scene, receive ring (4/4)
- Go back, then to circus tent
- Inspect the entrance, then if you like it you should put rings on it

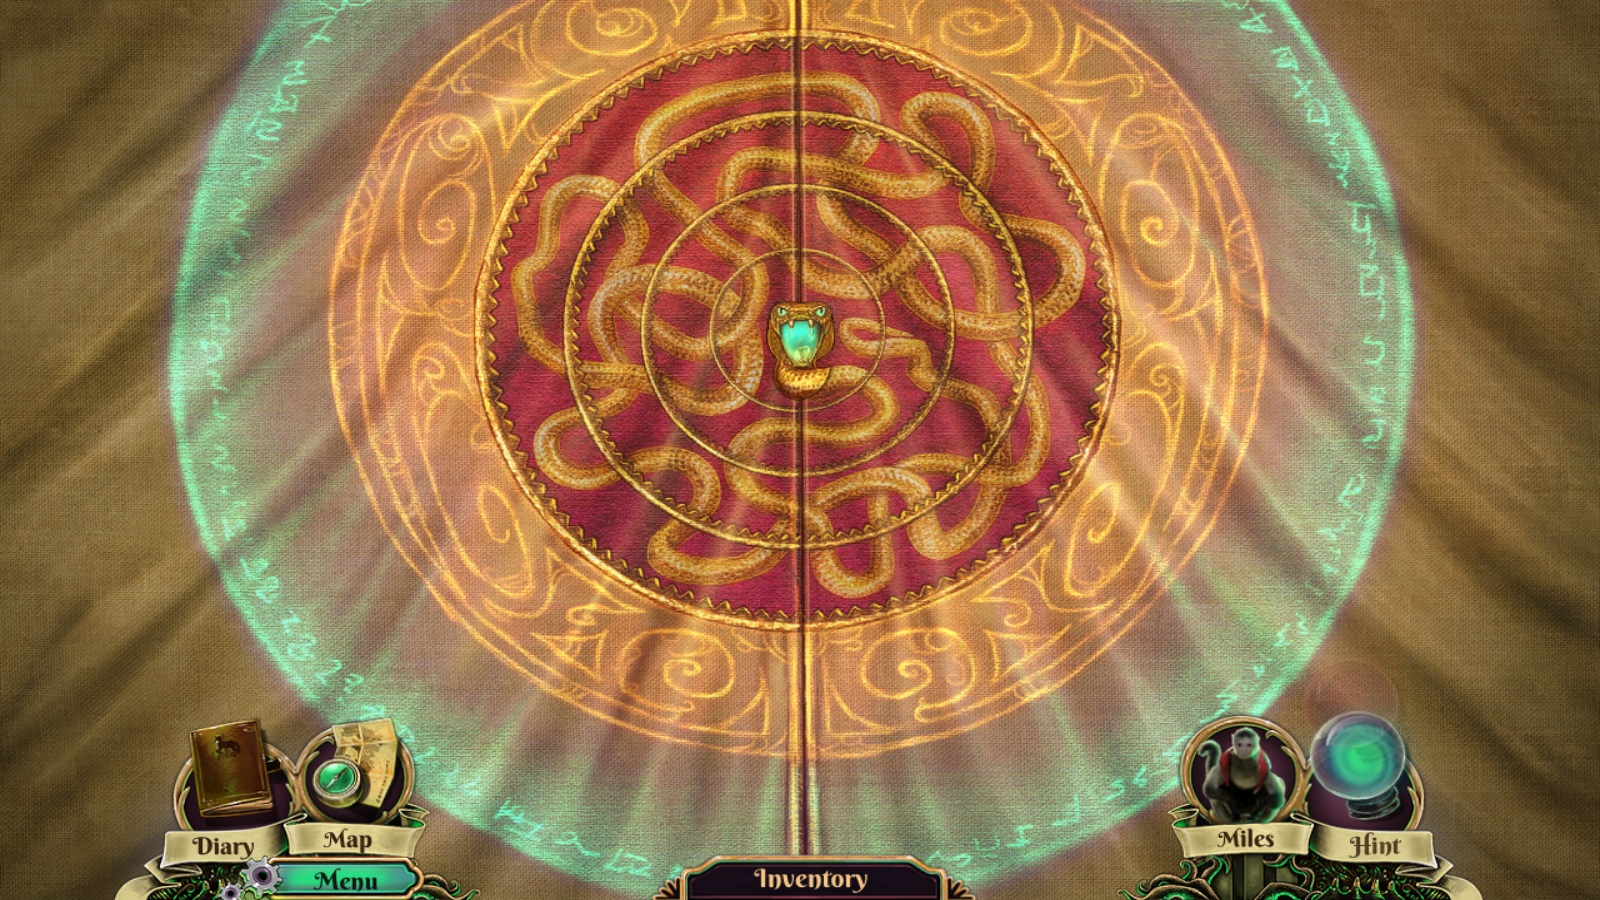
• Puzzle: Rotate the rings so that the image of the snake is complete from head to tail.
• Start from the middle and work your way outwards, solution below.

- Get inside the auditorium, inspect the horse on the right, use monkey on it
- Grab the pump sitting on the boxes on the right
- Go forward to the cages, inspect the stuff on the top of the lion's cage
- Click on it to move everything aside, and grab the key from the pocket
- Go back, inspect the vendor on the left, use the key on its padlock and open his chest up
- Inspect it again to get H-O scene, receive rubber patches
- Go back to the carousel, inspect the horse figurine slot, use the appropriate item from your inventory on it (hint: it's horse shaped)

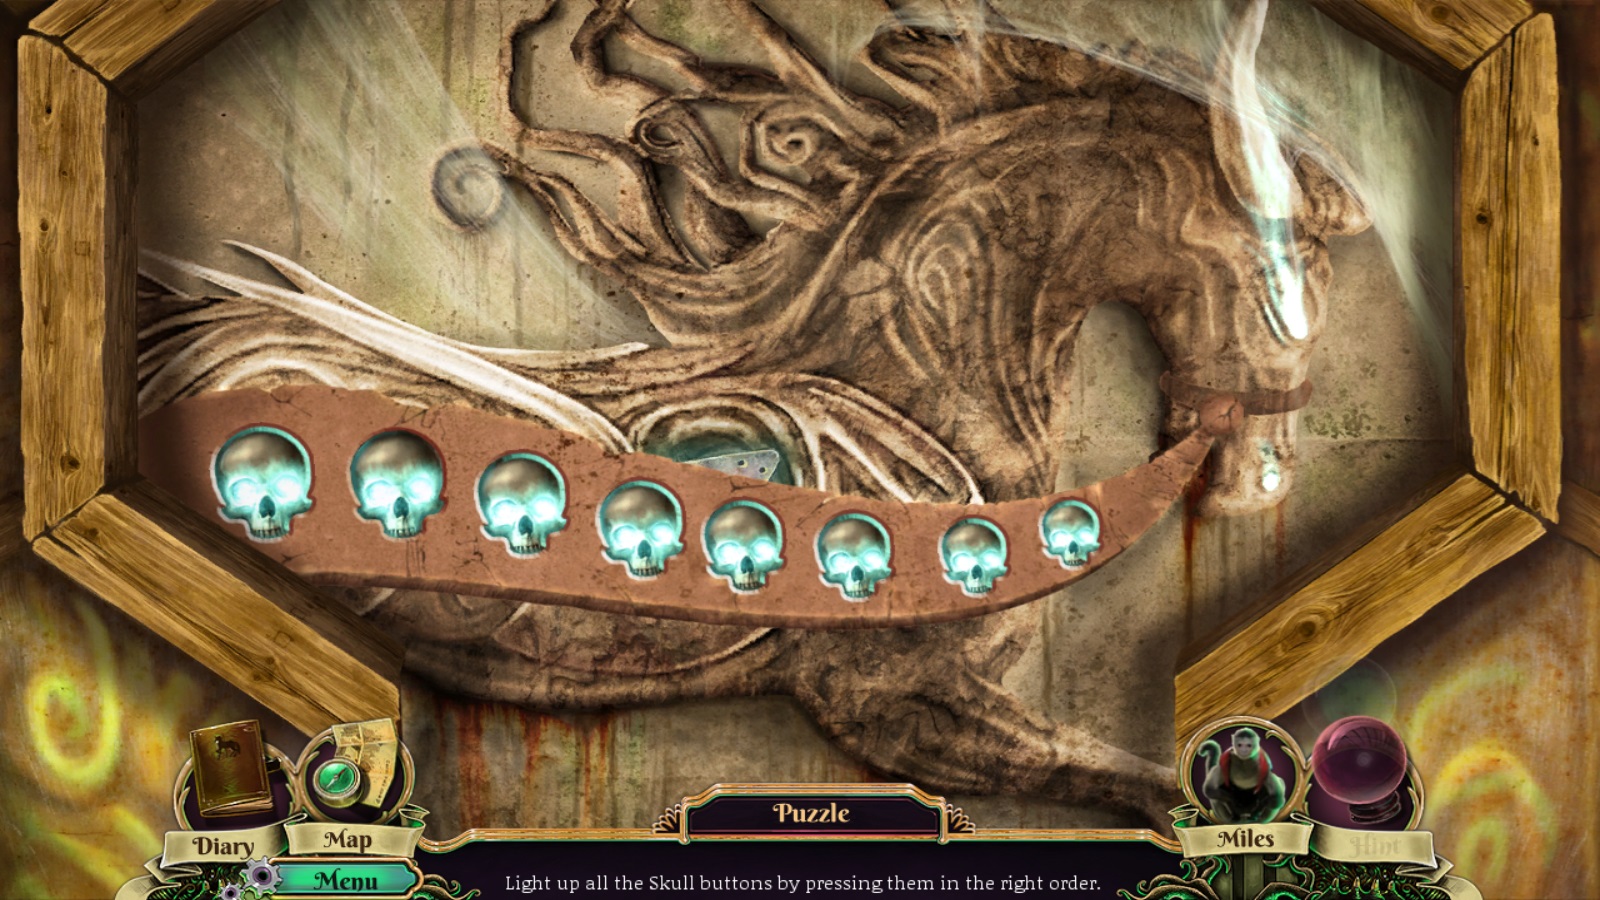
• Puzzle: Light up all the Skull buttons by pressing them in the right order.
• Solution: From the starting positions, press the 2nd, 4th and 6th skulls, in this order

- Get part of door mechanism, go forward, then to the Playground, get cutscene
- Inspect the ride on the center
- Use rubber patches then the pump on the lifebuoy
- Inspect the snack booth on the left again, get H-O scene and receive record (1/3)
- Inspect the diner's entrance, grab a second part of door mechanism
- Use both of them on the slots, go inside
- Inspect the second table on the left, grab the record (2/3) sitting there then grab the note near the ketchup and mustard
- Go back to the Ferris wheel, inspect the toolbox near it

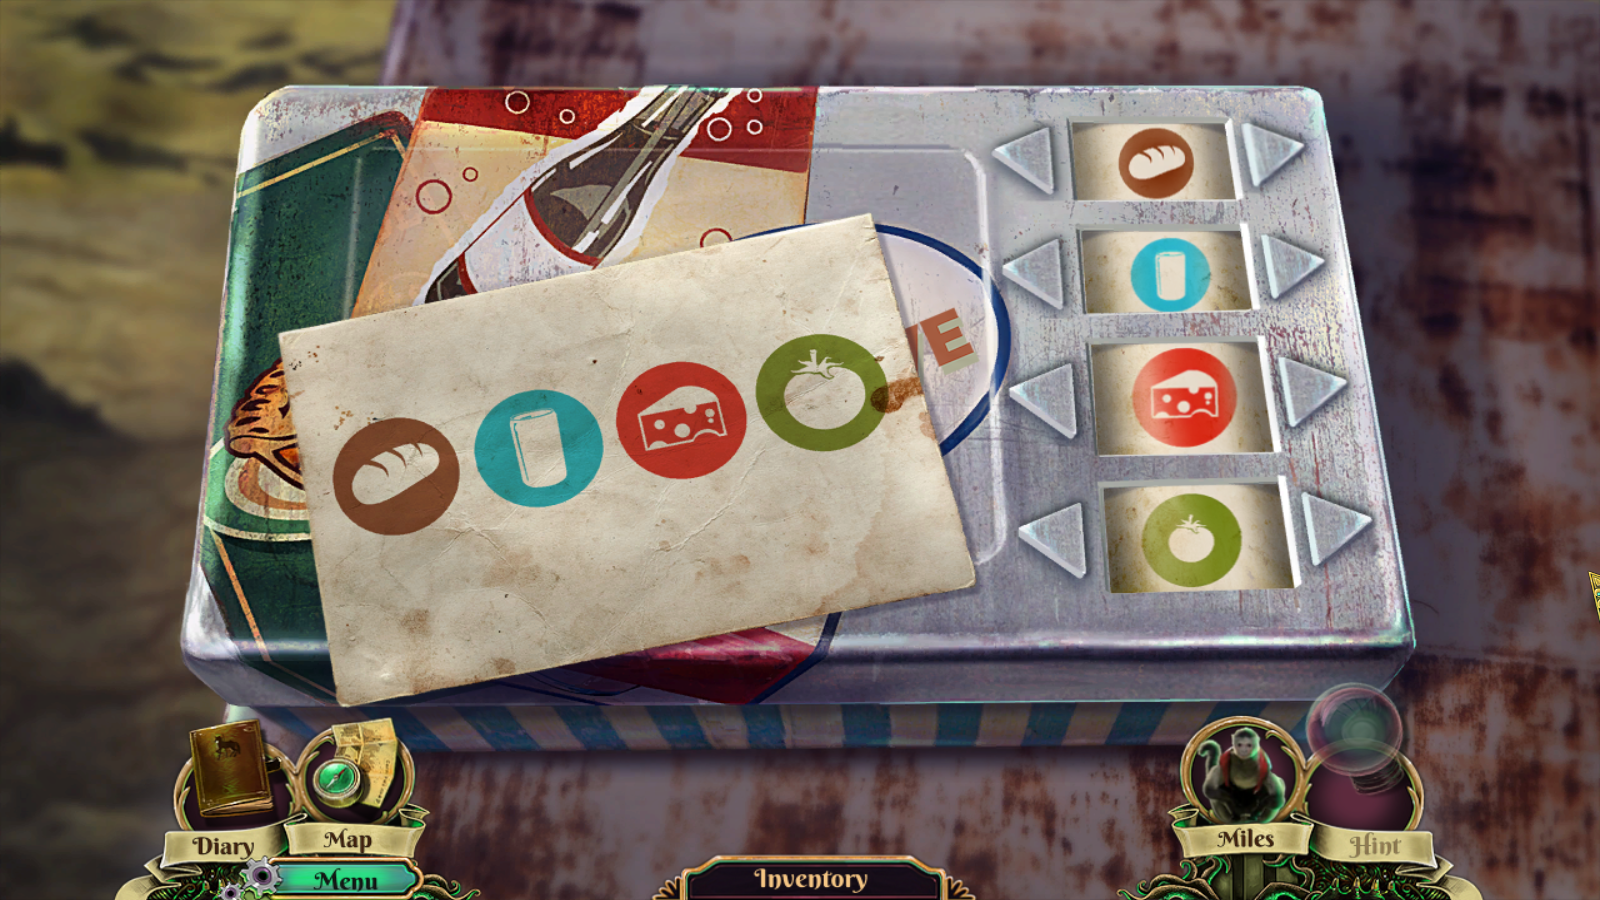
• Puzzle: I need to set the right combination for the lunchbox by rotating each of the four wheels.
• Wait a minute, that puzzle...

- Grab diamond (someone's lunch)
- Inspect the Ferris wheel for H-O scene, receive record (3/3)
- Go back to the diner, Inspect the jukebox, use the records on it

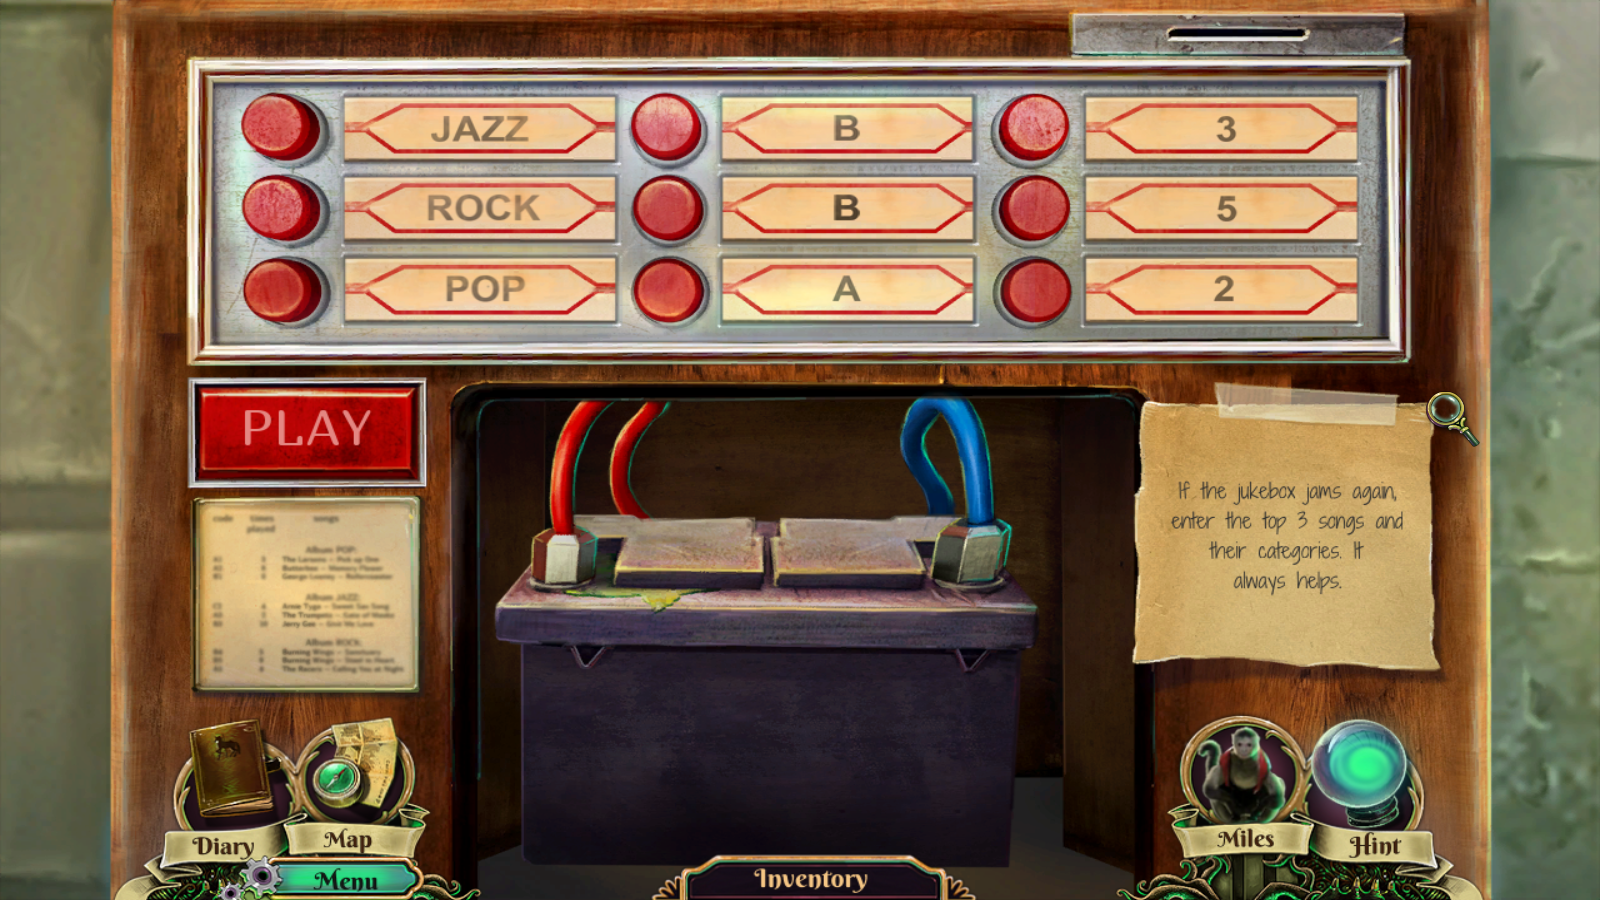
• Puzzle: To open the jukebox, enter the codes for the top hits in each category.
• Solution from the left to the right, top to bottom: Jazz B3, Rock B5, Pop A2
• After the correct combo, press Play

- Grab the battery
- Inspect the glass showcase, use diamond, grab cutters, notice the meat
- Inspect back door, try to open it, use cutters, go through
- Inspect the trash on the left, get H-O scene and receive crowbar
- Inspect the floating rocks formation on the right, use the monkey on it
- Leave his sorry baboon ass there, go back into the dinner
- Inspect the dumbwaiter on the wall to the right, use crowbar on it
- Use lifebuoy on the spooky rope, go outside again
- Use lifebuoy on the monkey, don't leave him hanging, c'mon
- Receive car wheel
- Inspect the base of the car, insert the wheel there
- Inspect the car, insert battery up in there
- Get in the car, we're going to the beach, beatch
Part 4
- "This is my clean inventory. There are many like it, but this one is mine."
- Go to the shed, notice the floating balloon stuck on the floating rock which floats in the floaty sky
- Go forward, to the clearing, get cutscene
- Inspect the target on the right, get head (1/5)
- Look at the photograph, every time I do, it makes me laugh
- Get H-O scene, receive smelling salts
- Inspect coffin, grab medallion
- Go back twice, to the beach, inspect the car
- Inspect the sand castle at the distance, to the left, get H-O scene and receive line with hook
- Go forward, inspect the table with the grinder, next to the shed
- Insert the line with hook on it, close the window
- Inspect the car, attach the hook on the block
- Back to the grinder, press the button
- After cutscene, inspect hole on the shed, grab monkey wrench
- Go to the area on the right: parking area
- Inspect mailbox, click on the crank to receive it
- Click the crane with the chains at the distance
- Use the crank on the slot, grab water
- Inspect and remove the blanket on the center of the screen
- Use monkey wrench on the battery
- Use water on the door on fire, go inside the trailer
- Grab the rod that's sitting inside the sink on the left
- Inspect the cupboard on the right, get sleeping pill (1/3)
- Inspect the bed on the right to get H-O scene, receive funnel

- Go back thrice, to the start (beach)
- Inspect the bear trap, use the rod on it, get letterbox handle
- Go forward to the parking area, use the handle on the letterbox, grab sling
- Go back once, no-scope that balloon stuck up there
- Inspect the remains and grab the key
- Inspect the back of the car that's crashed right there, open it up with the key
- Get the gas
- Go back to the beach, inspect your car's gas fill cap
- Use funnel on it, then the gas
- Use the car to go back
- Make your way back to the circus tent, then go inside the auditorium, then the cage
- Use smelling salts on the woman, get emblem from her
- Go back once and inspect the vendor on the left, get H-O scene and receive matches
- Make your way back to the alley, which is after the carousel when you're going back
- Go inside the house of fears, mourn mirror
- Inspect the door on the left, use emblem on the slot, miss drastically
- Use the monkey to fix your horrible mistakes, go inside
- Inspect the bookcase on the right to get H-O scene, receive (not grass) scissors
- Inspect the couch, click the pillow, get piano key (1/4)
- But wait, there's more
- Use scissors on pillow, get head (2/5)
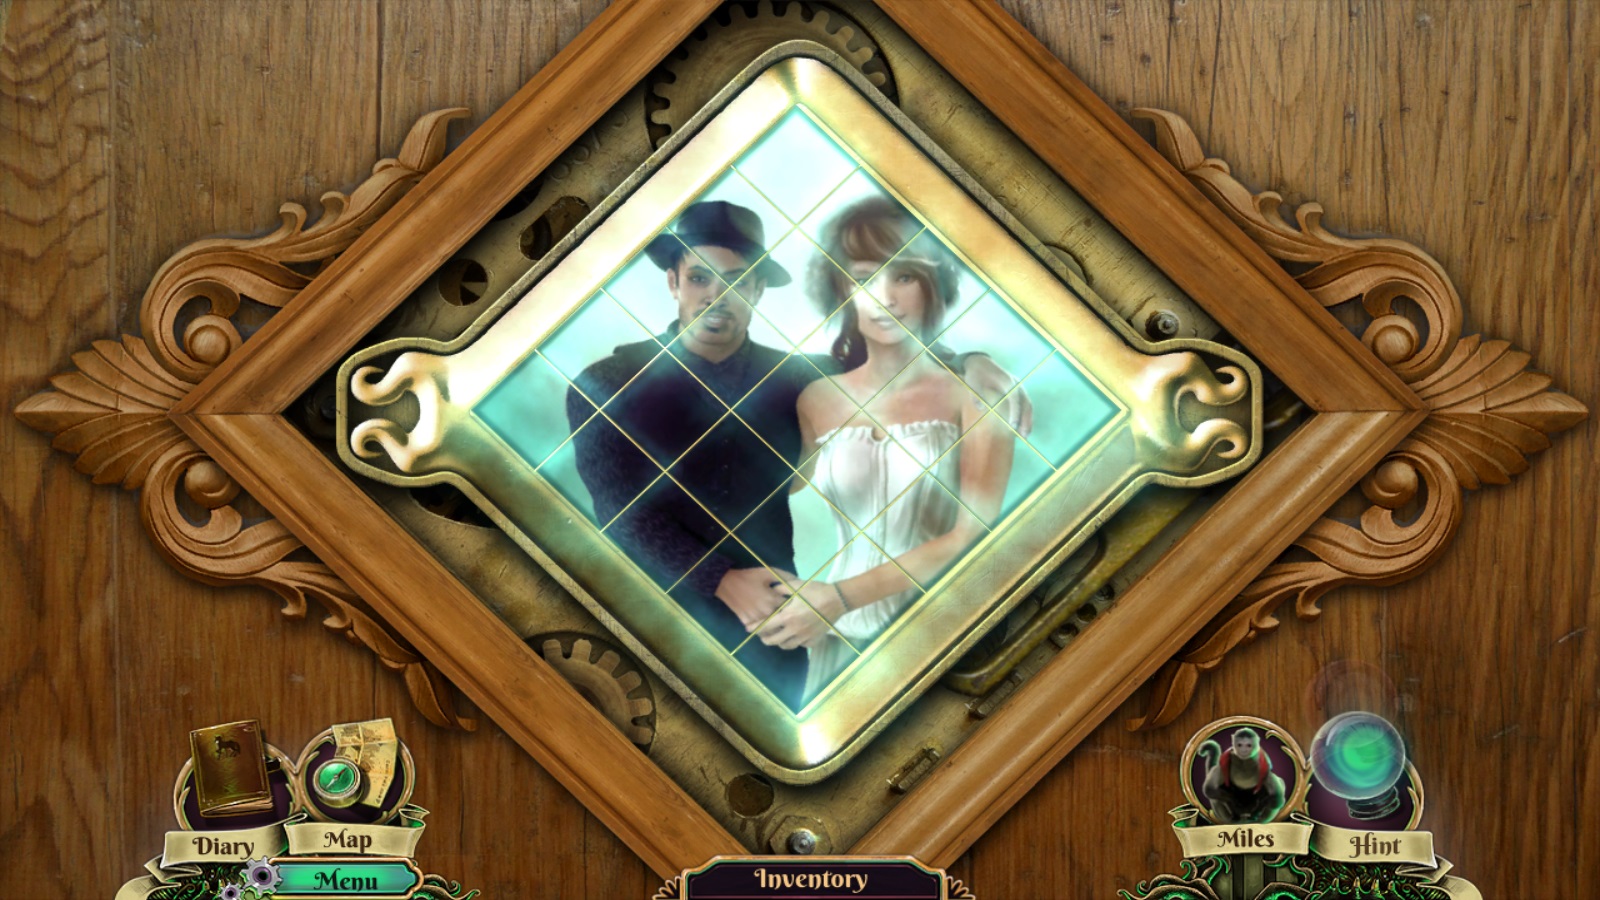
- Inspect the door on the background, use medallion on it

• Puzzle: Swap the tiles to recreate the jumbled image.
• Most of the pieces only need to be swapped once to be in its correct place
• Two pieces of the coat of the man are quite similar, so watch out for that. Solution below.

- Go inside, use matches to light up the room
- Inspect the record player on the right, grab the video tape near it
- Go back, inspect the VHS player, insert the tape, step back, inspect the TV

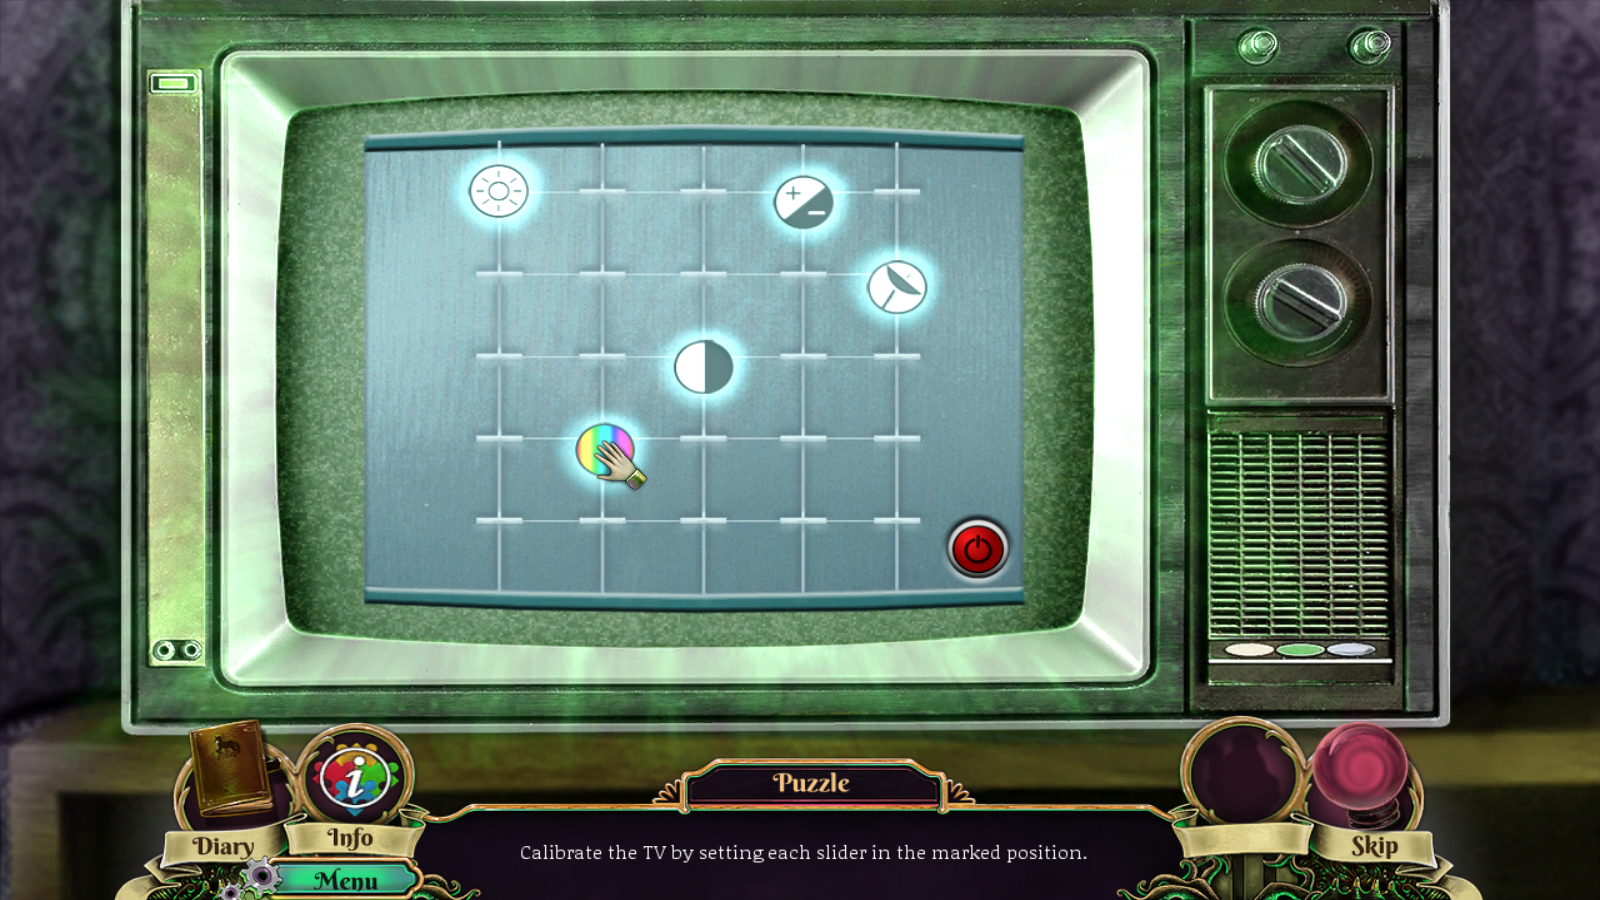
• Puzzle: Calibrate the TV by setting each slider in the marked position
• By far the most annoying puzzle of the game
• From left to right, each slider's name: BRIGHTNESS / COLOR / CONTRAST / VOLUME / SIGNAL
• Correct positions: 5 / 4 / 3 / 5 / 4 (bottom to top)
• All of this to play a f$kin!%g video tape
• Here's the best solution I found for this:
• Move contrast all the way down to 1
• Move brightness to 5
• Slowly move color down until contrast lights up
• Turn volume down until the signal lights up
• Then slowly move contrast to 3, which also moves color and volume to their places, thus lighting everything up.
Part 5
- After watching some soup opera, grab the spray from the TV
- Go back out to the room where the mirror was
- Inspect the cupboard to the left, get H-O scene and receive piano key (2/4)
- Make your way back to the Square, at the beginning of the map
- Inspect the plant guarding the House of Mirrors, use spray on it, go inside
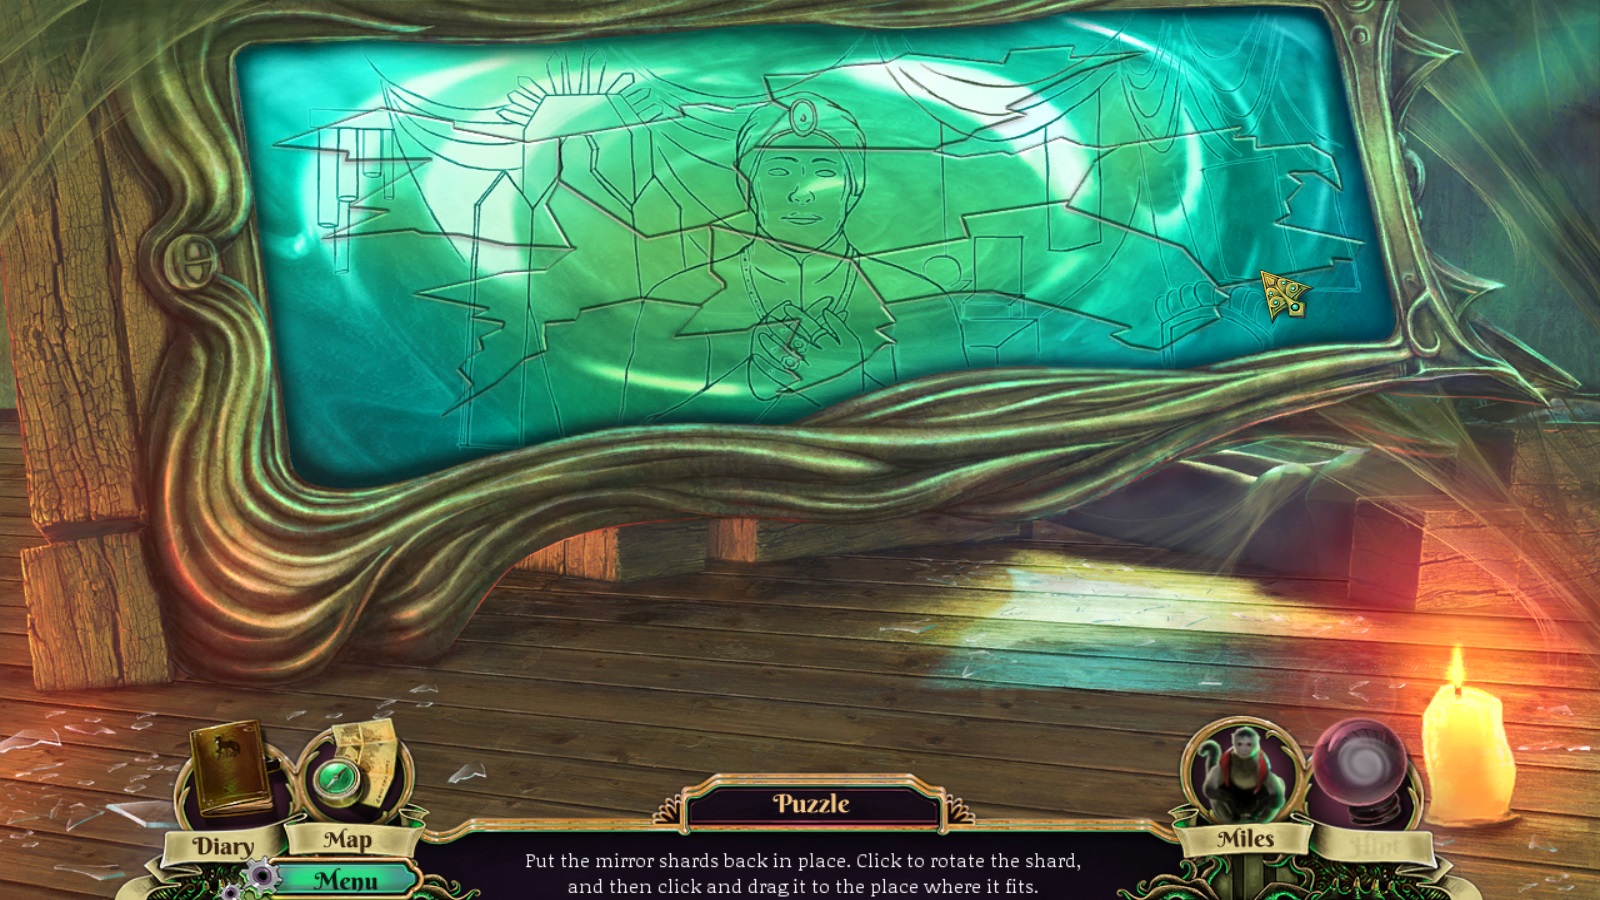
- Inspect the mirror

• Puzzle: Put the mirror shards back in place. Click to rotate the shard and then click and drag it to the place where it fits.
• Another fitting puzzle, not much to be said about it. Final result below.

- Get head (3/5) from the mirror
- Inspect the MUSICIAN skeleton (how does the protag even know the skelly's former profession just by looking at it?) and grab piano key (3/4)
- Open the closet, inspect to get H-O scene, receive BB gun
- Go back to the square, inspect the shooting range on the center of the screen
- Inspect the table, use BB gun

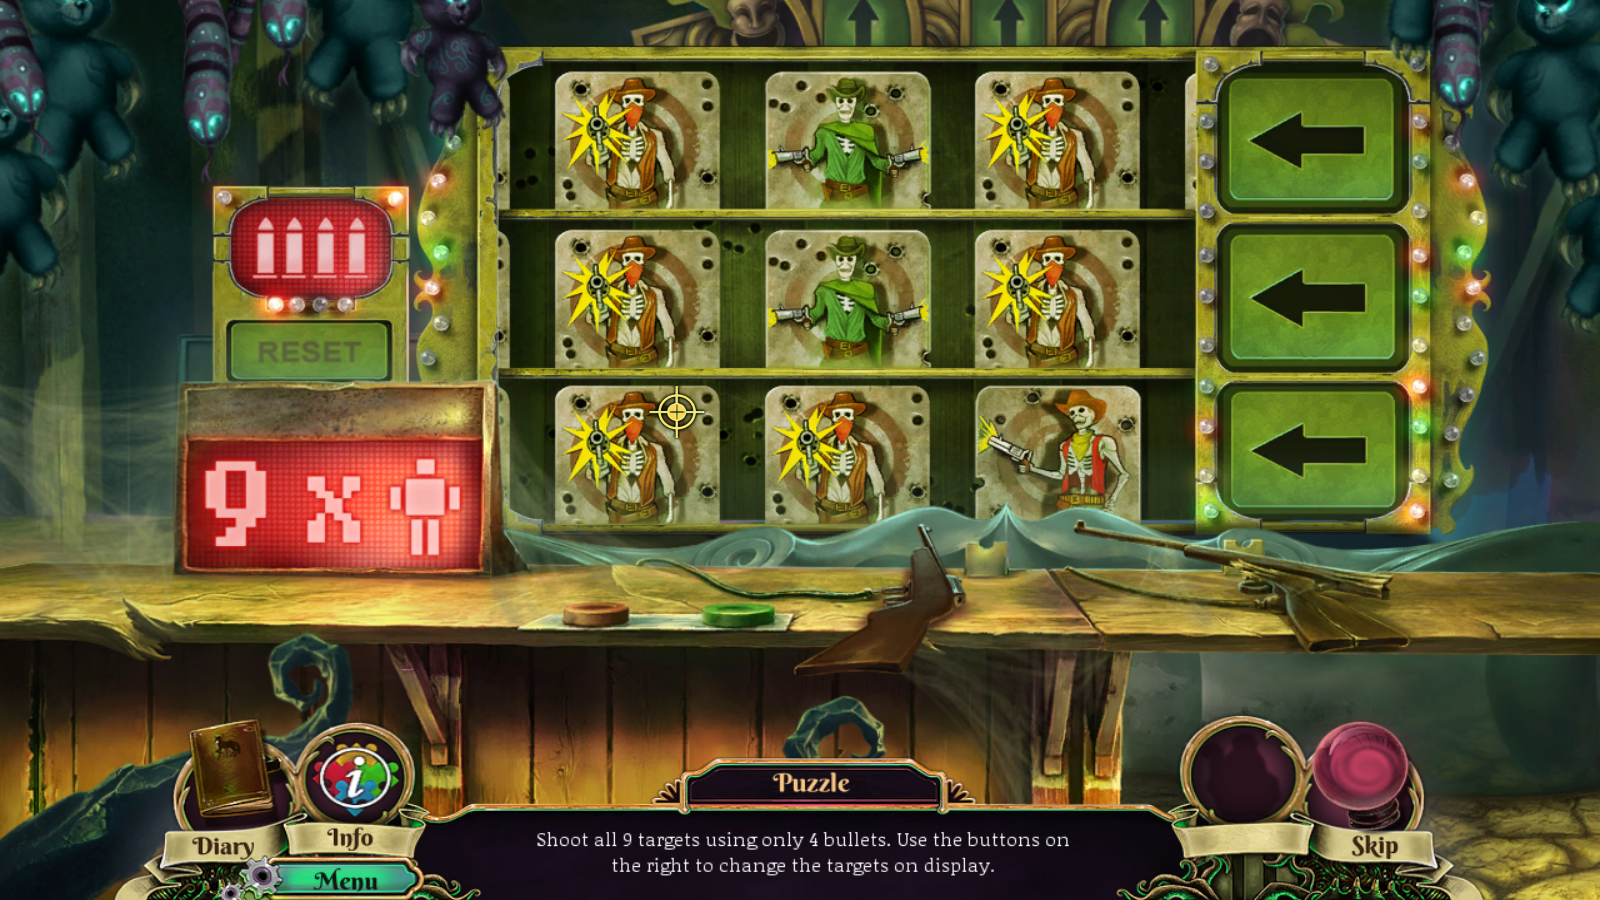
• Puzzle: Shoot all 9 targets using only 4 bullets. Use the buttons on the right to change the targets on display.
• Keep hitting the arrows until there is a green skeleton cowboy in the middle of the 2 rows on the top, and one traitor skeleton (which aims at another skeleton) on the right of the bottom row
• After that, shoot both green skeletons, the traitor skelly then the remaining one

- Receive Jacky, Chucky's brunette cousin, or the creepy doll, as the game says...
- Go forward until you reach the Carousel
- Inspect the devil statue on the right, get H-O scene, receive candle snuffer
- Go forward, reach the Playground again
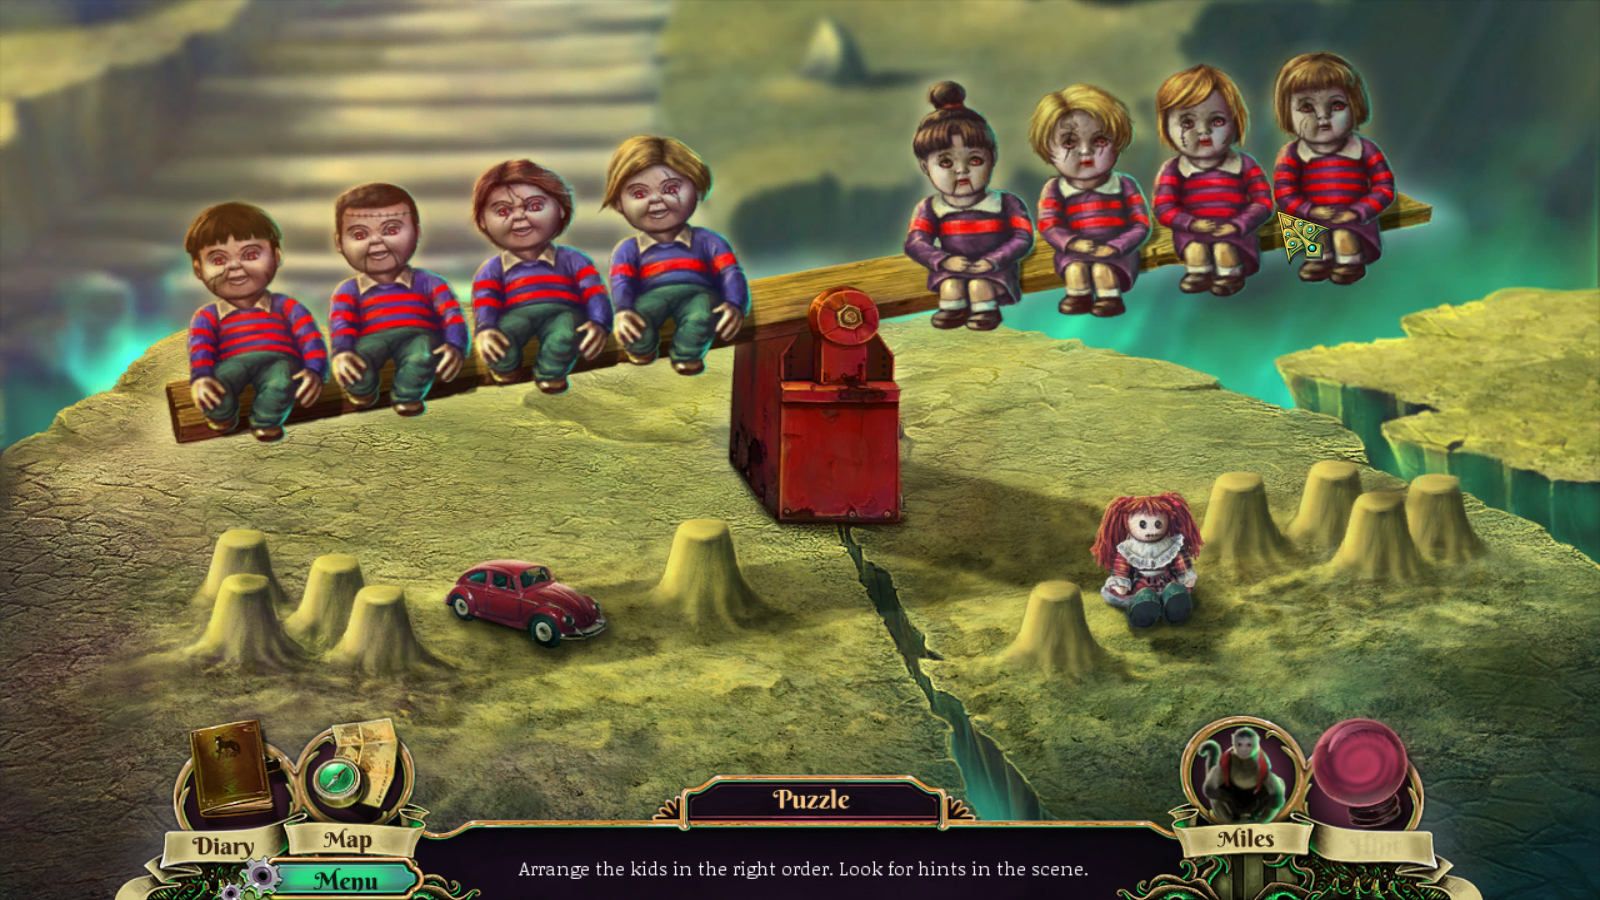
- Inspect the seesaw on the right, use the doll on it

• Puzzle: Arrange the kids in the right order. Look for hints in the scene.
• Solution: After moving each of the dolls to the correct side according to their gender (see toy below, car on the left = boys and doll on the right = girls), arrange so that number of stripes on their coats count 4 to 1 for the boys, and 1 to 4 for the girls. Solution below.

- After that, get head (4/5)
- Go inside the diner, use the car, get to the beach, then forward twice until you reach the clearing
- Inspect the lamp post, use the candle snuffer on it
- Use the monkey on it, get head (5/5)
- Inspect the photograph for another H-O scene, receive piano key (4/4)
- Go back, then to the parking area and inside the trailer
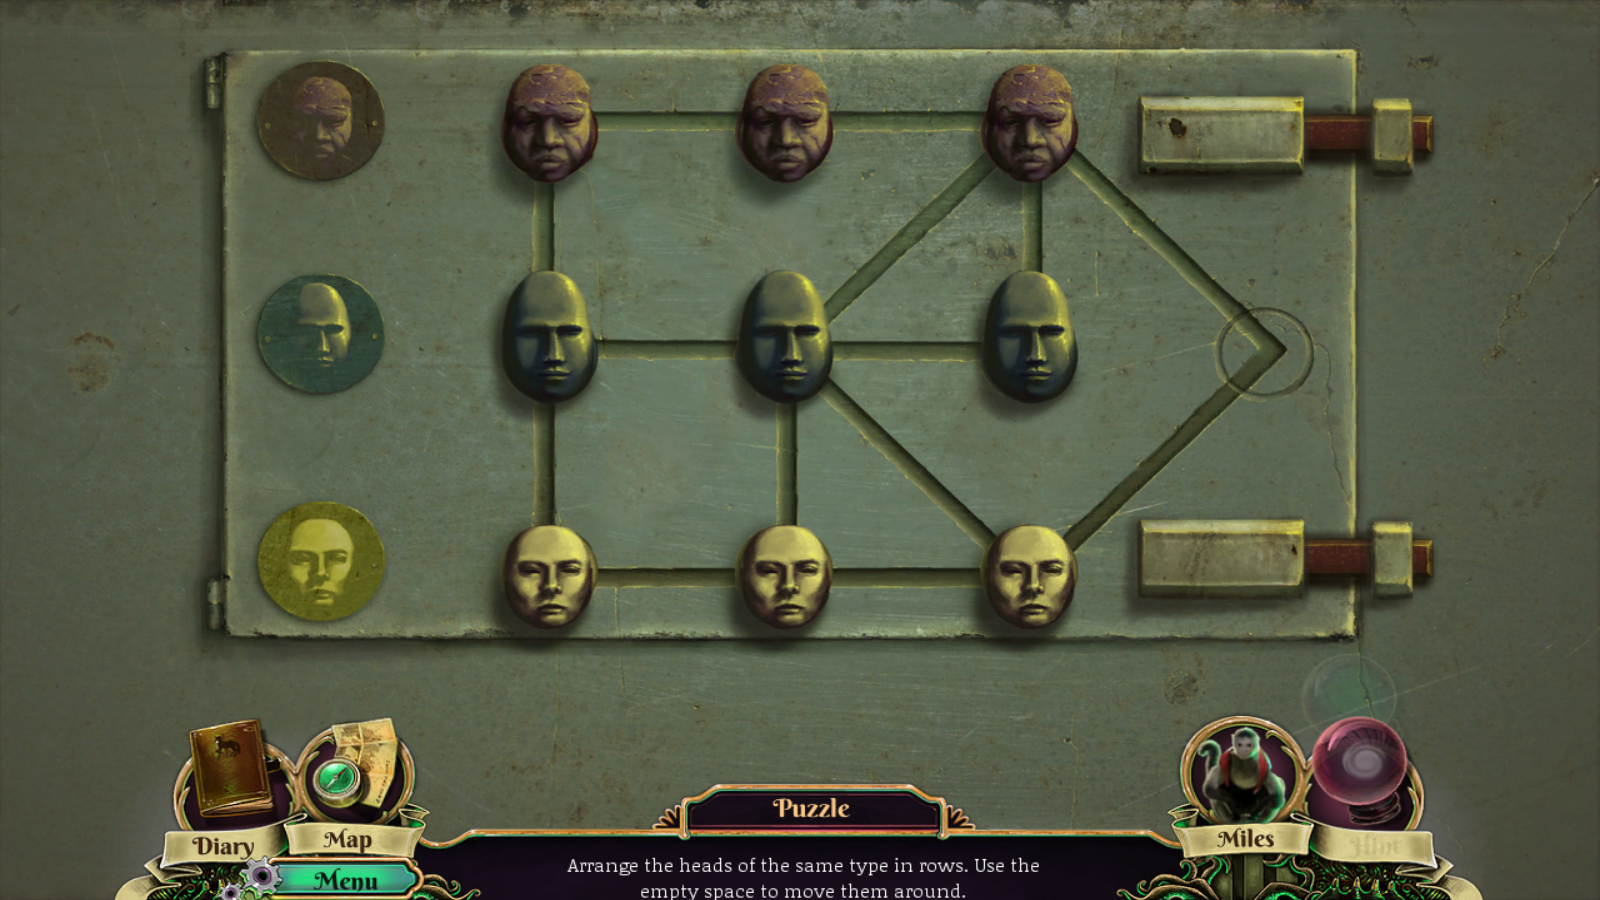
- Inspect the back door, use the heads on it

• Puzzle: Arrange the heads of the same type in rows. Use the empty space to move them around.
• Moving pieces puzzle, not much to be said, final result below

- After the puzzle, open the book on the left, grab sleeping pill (2/3)
- Grab the car jack on the right
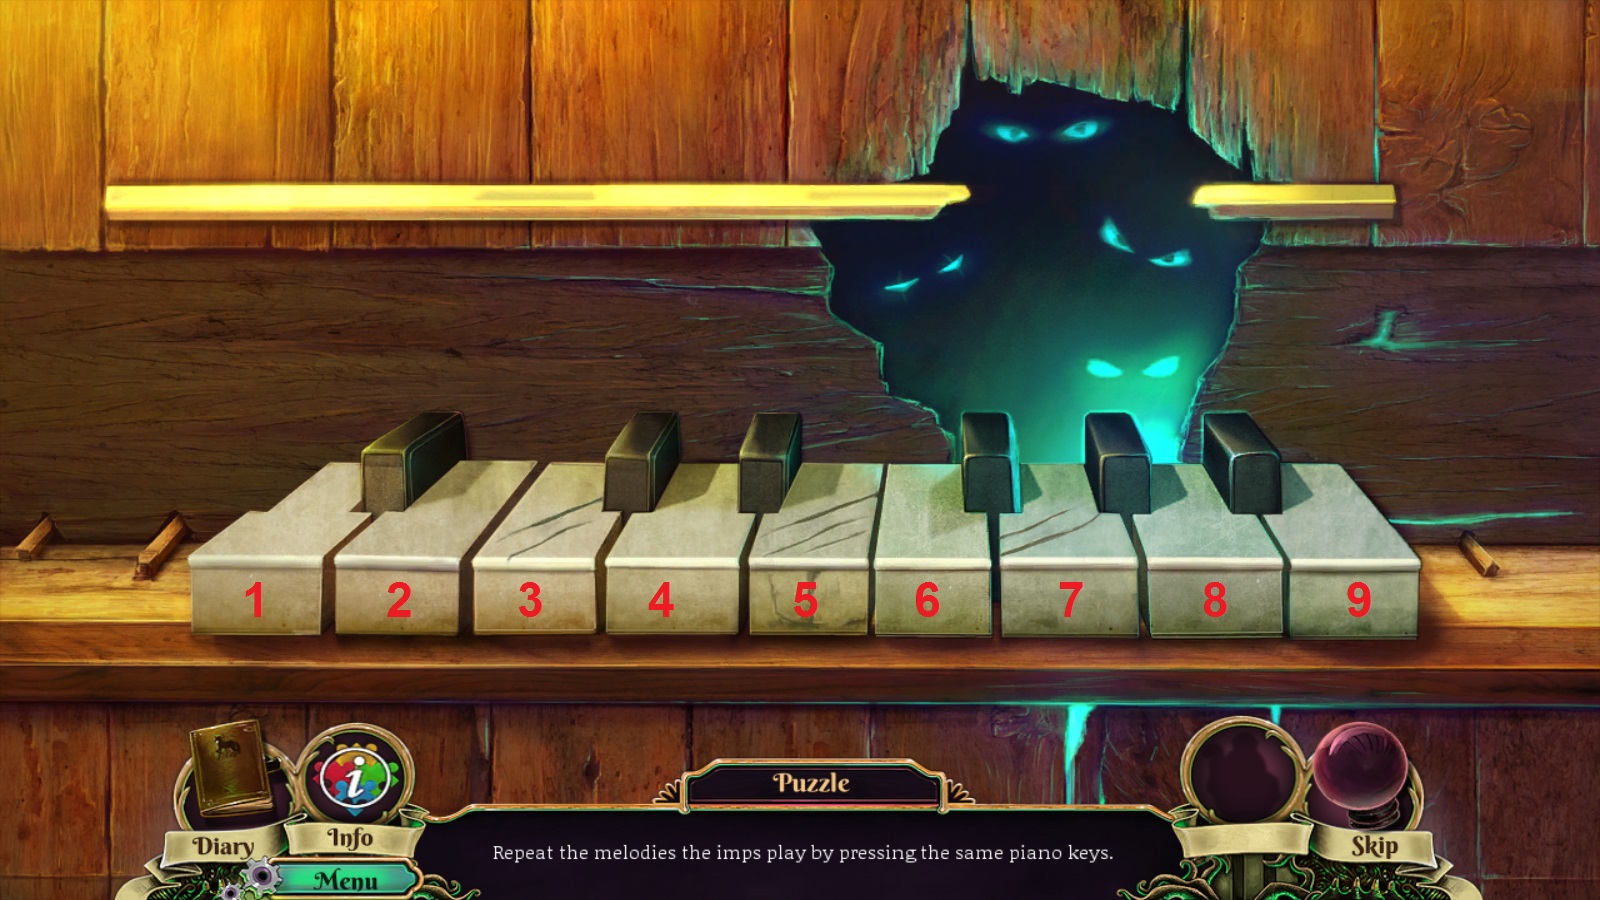
- Go back to the beach, inspect the piano, use the piano keys on it

• Puzzle: Repeat the melodies the imps play by pressing the same piano keys.
• A Simon Says puzzle with 4 turns. Each key in order:
• 3 5 9
• 2 7 5 8
• 1 7 8 3
• 5 4 8 6 3

- Get the demon token
- Now go forward to the Circus tent then downstairs the Bird's Cage
- Inspect the gate, put and use the car jack on it
- Use the monkey, go inside the Sanctuary
- Inspect the pair of statues on the left
- Click the pills bottle near the second statue, grab sleeping pills (3/3)
- Inspect the book in the middle, use the demon token on it
- After cutscene, grab symbol
- Go back upstairs, then into the diner
- Inspect the glass showcase, put some sleeping pills on the meat
- Go back up to the circus tent, then enter the auditorium, go forward, and throw the meat for the lion
- Go forward and watch the cutscene
- Use the symbol on the lock and chain that's hugging the mirror
- Go back to Circus tent, then down the Bird's cage, into the sanctuary
- Inspect each pair of statues and grab all 4 of the tokens
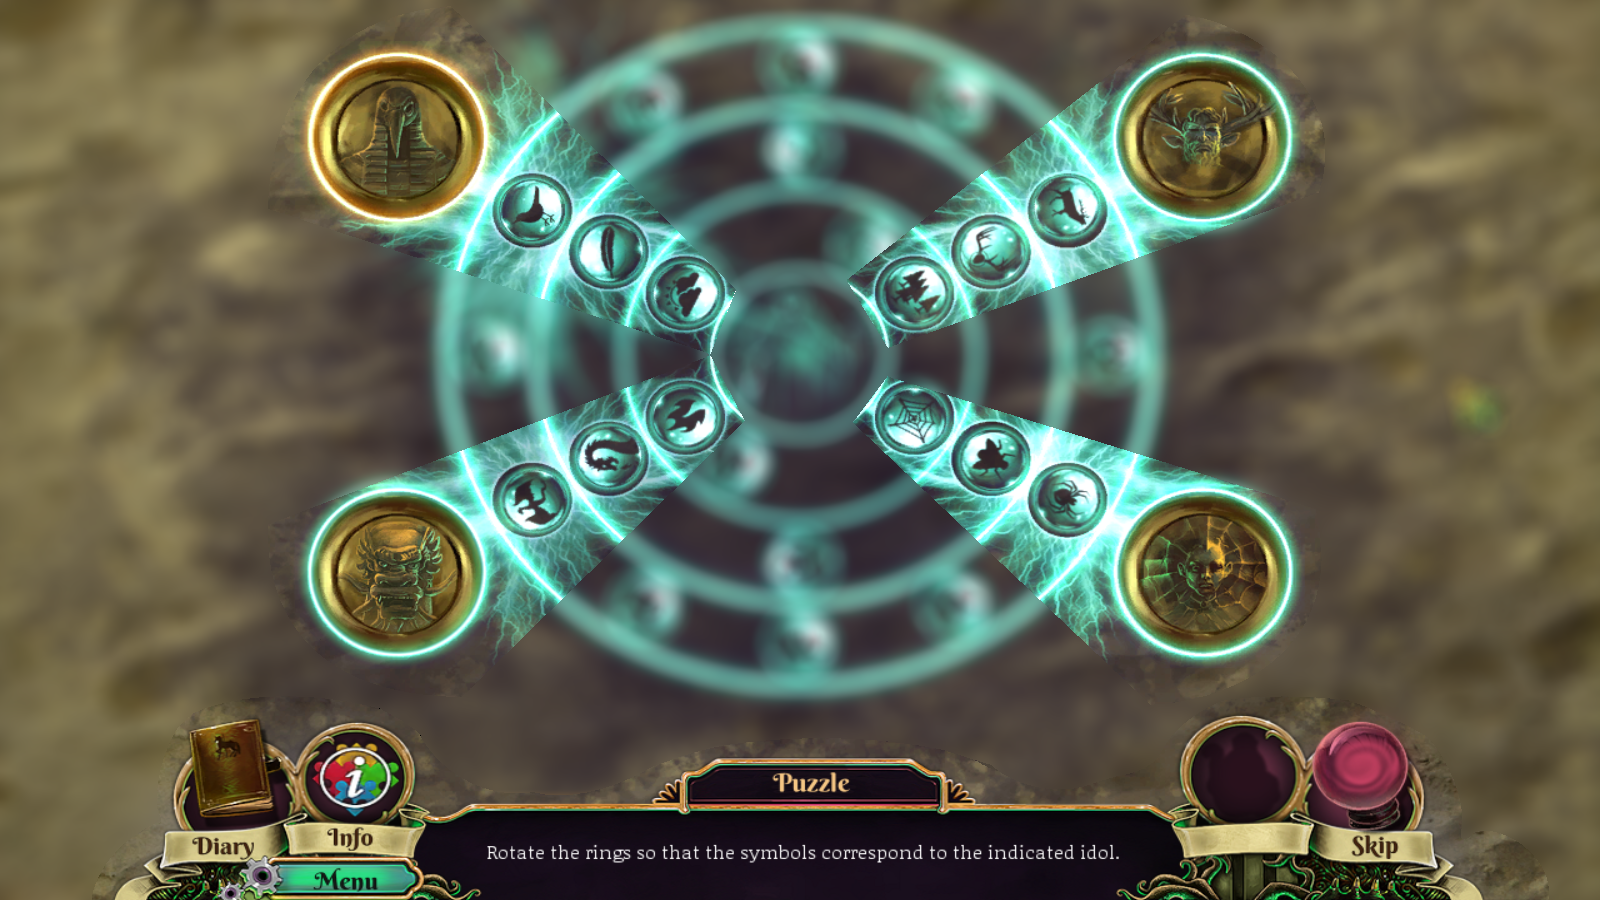
- Inspect the magic circle on the floor and start inserting each token on it to start the final puzzle of the game

• Puzzle: Rotate the rings so that the symbols correspond to the indicated idol.
• It starts on the top-left, then goes clockwise
• Solution below (from outmost, inwards):
• Bird token: bird, feather, clouds
• Deer: deer, antlers, forest
• Spider: spider, fly, web
• Dragon: dragon, dragon head, fire

- Watch ending, go home.
Closing notes
There we go. If this guide has helped you out, don't forget to rate it. And if there is any way that I can make it clearer, do comment.
15 Comments
Matt 9 Jan, 2022 @ 11:18pm 
I just want to say your little comments in this guide were hilarious and I think I had more fun reading them than in playing the game itself. :D:
Averi_Nat 28 Feb, 2021 @ 4:32am 
Спасибо вам! :prlove:
Delisper 22 Mar, 2019 @ 3:00am 
Thanks for your text walkthrough (much better than a video :)
~ ½∞ 18 Apr, 2018 @ 12:57am 
Here russian walkthrough - http://www.virtualija.net/forum/12-967-1


:biohazard: ABOUT TV.

From the starting positions takes this step: (Numerations from top to bottom)

SIGNAL to 2
CONTRAST to 1
CONTRAST to 5
COLOR to 3
BRIGHTNESS to 4
BRIGHTNESS to 1


P.S. Sry 4 my bad english.
Rufus 28 Feb, 2018 @ 5:10am 
For the tv you say 5,4,3,5,4. but your graphic is 5,2,3,5,4.
Great guide thanks, couldn't have done it without this guide.
Nocheluz 14 Jan, 2018 @ 9:45am 
Ah jeez, thank you so much. Saved my a$$ more than once. :dpglsrose:
Gwynbleidd 31 Dec, 2017 @ 7:50pm 
Thank you :necroheart:
yah  [author] 9 Oct, 2016 @ 2:49pm 
@TerracepT
Indeed! I swear I saw 7 skulls instead of 8 when I first revised the solutions, I dunno.
Just corrected the guide, thanks!
TerracepT 21 Sep, 2016 @ 8:38pm 
The skulls are the 2nd, 4th and 6th. Great guide!
Gaberus 3 Jul, 2016 @ 12:30am 
Thank you :)